Windows 11 Cache or for that matter Temporary files are something that doesn’t worsen your device’s speed. They are rather a good thing that helps to better call the functions while restarting apps, opening files, or performing other basic operations. When you kill or purge them, the system needs to put extra effort to launch a program or perform other basic tasks.
So, delete them only when you think you haven’t done this for a long time or your PC starts running very slow or crashes during basic tasks. In this guide, we will let you know what are the locations in Windows 11, where you can find these files and the right way to get rid of them.

What are the different Temporary Files types on Windows 11?
Temporary files or Windows 11 Cache can be associated with one or more of the following –
- Windows Upgrade Log Files
- Previous Windows Installation(s)
- Windows Update Cleanup
- Thumbnails
- Temporary Files
- Temporary Internet Files
- Device Driver Packages
How to Clear Cache or Temporary Files in Windows 11
To remove temporary files or Cache on Windows 11 PC, go through and apply these essential purging methods –
- Get rid of temporary cache files
- Remove system cache via settings
- Use Disk Cleanup Tool
- Purge Stored DNS Cache
- Clear stored cache on Microsoft Store
- Purge your File Explorer History
- Purge location cache
- Clear browsing cache
- Delete contents inside the Prefetch folder
1] Get rid of temporary cache files
Starting from opening an application to working on it to updating your Windows, all tasks leave some cache and thus it gets piled up. The prime source of huge cache generation is none other than the third-party apps running on your PC. As a thumb rule, you should regularly purge all the temporary files on your device. Otherwise, your PC will start running very slowly or sometimes even crash while performing basic tasks.
Follow the instructions below to remove the accumulated cache on your device –
- Press “Windows key + R” to launch the Run dialog box.
- Type “%temp%” and hit OK.
- Use Ctrl + A shortcut to select all the contents inside it, and press the Shift + Del keys combination.
- This will delete all the selected contents permanently.
What happens when I delete these files?
If you had not deleted temporary files for ages, you will notice a significant boost in your PC’s speed. However, if this is your daily task, nothing really happens when you delete these files.
2] Remove System Cache Via Settings
Just like apps running on Windows 11 PC, there are services and system apps that generate a huge cache on your device. In order to free up spaces occupied by such files, do the following –
- Press “Windows key + I” to launch Settings.
- Select the System option from the left pane and then move to Storage.
- On the right pane, click on the option – Temporary files.

- The system will start looking for files that are temporary in nature.
- When the scanning completes, you will get a list of boxes that you can delete.
- Mark all the boxes, and hit Remove files.

- When a confirmatory message pops up, click Continue to go ahead.
- The whole cache deletion will take some time depending on how many files (size and number) you authorize to delete.
3] Execute Disk Clean Up
Disk Cleanup is an in-built tool on Windows 11 that you can use to remove junk files such as stored cache, old Windows installation(s), update cleanup, log files, thumbnails, or others. Here’s how to use the Disk Cleanup tool on Windows 11 –
- On the taskbar, click over the search icon.
- When the Search window opens up, type Disk Cleanup and press the Enter key.
- A pop-up window will appear prompting you to select the disk drive.

- Choose the root drive i.e. (C:); if it varies on your machine, choose the appropriate one.
- Click OK and wait till this tool scans for temporary files on the selected drive.
- When this toll completes the scanning, a list of options will appear that you can free up.
- Click Clean up system files next. Re-select the (C:) drive, and hit OK.
- Tick the checkboxes inside “Files to delete” that you no longer require.

- Lastly, hit OK to authorize deleting the selected files and folders.
4] Purge Stored DNS Cache
Till now, we have discussed how to delete the files and folders that are either duplicates or cached ones. In this section, we will look into how to delete the files stored due to browsing over a network.
Basically, whenever you visit a website, your device stores the domain names of visited sites in the Domain Name System server (DNS). Your PC does so to quickly load the visited links the next time you open that site. This filling of data over the network causes a huge cache to accumulate on the computer that you may delete by following the steps below.
Follow the steps below to clean the DNS (Domain Name System) on Windows 11 PC –
- Right-click on the Windows icon and select Windows Terminal (Admin).
- Press “Ctrl + Shift + 2” to launch Command Prompt on the adjacent tab.
- On the elevated console, type the following and press Enter –
ipconfig/flushdns
- Executing this code will flush all the cache stored in the form of DNS.
5] Clear stored cache on Microsoft Store
Windows 11 allows installing applications that you have downloaded over the internet. With the continually progressing Microsoft Store, users nowadays love installing new apps directly over it. To better open the apps that you searched for, Store also accumulates a few caches. To delete such files from Windows Store, do the following –
- Press “Windows key + R” to open the Run dialog box.
- Type “wsreset.exe” inside it, and hit OK.

- CMD will open up executing this code on its interface.
- You need not need to do anything, just wait for this code to finish running.
- When the stored cache gets cleared up, Microsoft Store will launch by the end.
6] Purge your File Explorer History
Although File Explorer stores a very tiny amount of data in the form of folder/file history that you access regularly, this may end up huge in size over a period of time. So, if you hadn’t deleted its file history, go and purge this as well by following the guideline below –
Note: This becomes an essential task if despite doing everything above, you are still unclear about the data filling up your disk drives.
- Press Windows + E to launch File Explorer.
- Click over the three horizontal dots and select Options.

- Locate Privacy, and hit the Clear button beside the “Clear File Explorer History.”

- At last, hit Apply then OK to confirm the changes made so far.
7] Purge Location Cache
If you keep the location setting ON inside Windows 11 and travel from one location to another pretty often, there is a possibility of a stored cache here as well. To purge this cache, you need to do the following –
- Right-click on the Windows icon and select Settings.
- Select Privacy and Security and head over to the right side.
- Click App permissions > Location.
- Scroll down to Location History next and hit the Clear button.

8] Clear Browsing Cache
Now that you have deleted every form of cache on your Windows 11 PC, open the browsers that you use pretty often, and delete the stored cache here as well –
- Click over the browser’s icon to launch it on Windows 11.
- Use the “Ctrl + Shift + Del” hotkey to open the Clear browsing data section.

- Mark each one of the boxes here, and hit Clear data.
This method works for almost all web browsers with a slight change in the “Clear data” button.
9] Run Prefetch
Prefetch is basically a memory management system that remembers what was opened the last time you opened your PC. This way, your PC boots very fast and takes the least time possible to start different programs. However, with Prefetch running on your system, a huge amount of data gets stored inside the temp folder.
If you are facing storage issues on your computer, it is essential to clear your Prefetch folder once a fortnight. Doing so will not delete any system files and strengthen your disk storage. However, remember that this will slightly increase the booting time between the first and second restart of your PC. Here’s how to perform this task –
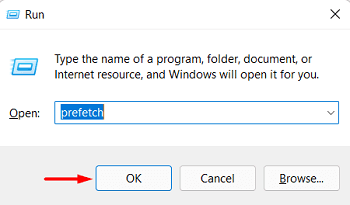
- Open the Run command by pressing Win + R.
- Type “prefetch” and hit OK.

- File Explorer will open displaying the Prefetch folder.
- Select all the contents inside this folder, and hit Delete.

- A warning message may appear asking whether you want to proceed ahead or not. Well, hit the Continue button.
If you have performed all the purging tasks as stated above, your PC is now cache-free. Your device should now run fast and perfectly without any glitches in the speed.
Confusions while deleting Windows 11 cache or Temporary Files
While all of the above methods are perfectly OK to perform, there are some users who often get into a dilemma about whether they should delete the files above or not. Well, to answer that, we have written a few frequently asked questions by them and try to answer them as clearly as possible –
Q1. Is it okay to delete previous installation(s) of Windows?
You are the better judge as you know whether your device is working all right after the upgrade or not. If your PC is not running slow or getting into any trouble, and you are certainly sure that you are not moving backward, it’s completely okay to delete the previous installation(s) of Windows.
As previous installation files occupy a huge section of the disk drive, it’s certainly the prime source of all storage-related issues on your computer. Even if you don’t go for this, Windows will automatically get rid of the old files when you complete a total of 10 days on the new Build OS.
Q2. Will deleting Windows Upgrade files downgrade my Build OS?
Windows Updates go only in the forward direction unless you manually opt to roll back your operating system. So, don’t worry and remove the upgrade files if your PC is working all right.
Q3. How fast the cache will re-build after these files’ deletion?
The cache starts to form the moment you start using any application/service or performing any task on Windows 11. This helps to better call some files that are required to run a program or service on the computer.
Q4. Will deleting temporary files boost up my PC?
That depends on how much storage you free up while performing the purging task. If you had cleaned up huge storage spaces on your computer, you will certainly notice a speed boost.


