Today, in this post, we discuss some easy workarounds that disable Security warning while opening network files in Windows 10. One may encounter such issues when they try to open any network file or an application on Windows 10. Moreover, similar anomalies may also appear when you attempt to move files from one directory to another in File Explorer. In such instances, you may receive one of these security error messages (listed below) –
These files might be harmful to your computerWe can’t verify who created this fileYour Internet security settings suggest that one of more files may be harmfulThis file is in a location outside your local network. Files from locations you don’t recognize can harm your PC
To get rid of such bugs while retrieving the network files on Windows 10, you need to make some essential changes inside Internet Options.
Fix security warning while retrieving the network files
To disable Security warning while opening network files on Windows 10, use the steps –
- At first, open the Settings from the Power Menu (Win & X).
- When this application loads, select the Network & Internet category.
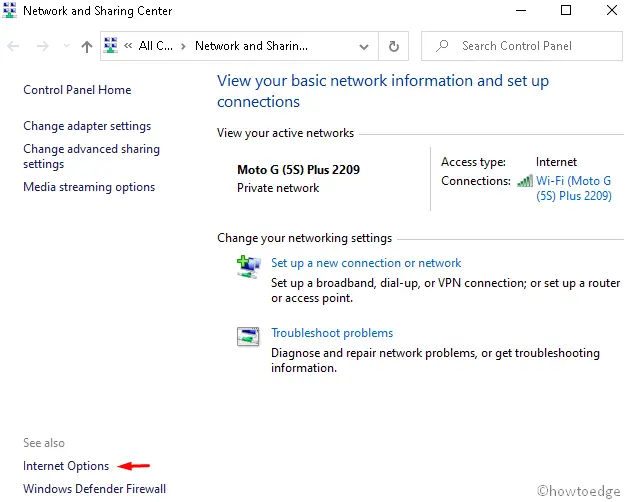
- Under the Status section, head over to the right side and tap the Network and Share Center.
- On the succeeding screen, scroll down to the bottom and click Internet Options.

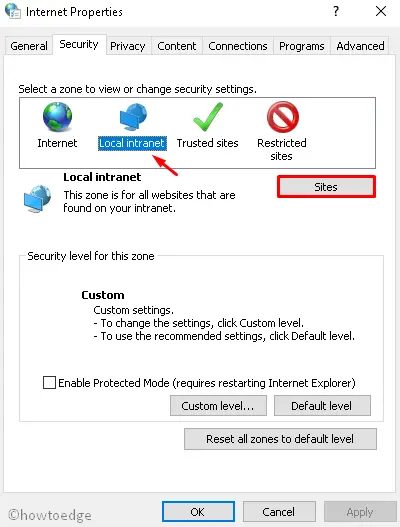
- Next, switch to the Security tab under the Internet Properties window.
- Afterward, select the Local Intranet zone thereafter the Sites button.

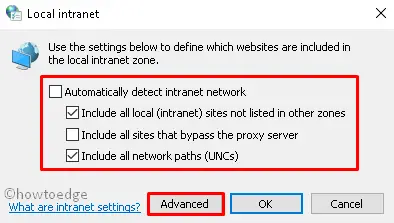
- Here, uncheck the
Automatically detect intranet networkandInclude all sites that bypass the proxy serverbox. - Tick Include all local (intranet) sites not listed in other zones and Include all network paths (UNCs) checkboxes.
- Moving ahead, hit the Advanced button.

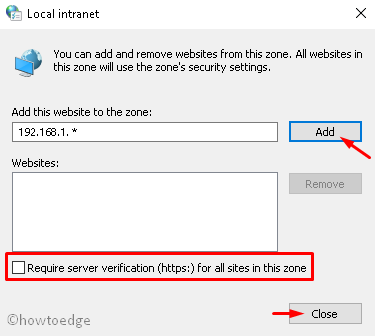
- Under Add this web site to the zone section, put the local network address ( including asterisk mark) then hit the Add button. For example, if your IP address is 192.167.9.8 with a subnet mask 255.255.254.0, use 192.167.1.* instead.
- Henceforth, unmark the field – “Require server verification (https:) for all sites in this zone“.

- Click Close then OK on the preceding page.
- Hit Apply then OK again to confirm the changes.
- Once you complete the above steps successfully, press Win and E altogether to launch the File Explorer.
You may now try opening any network file or application without receiving a security warning.


