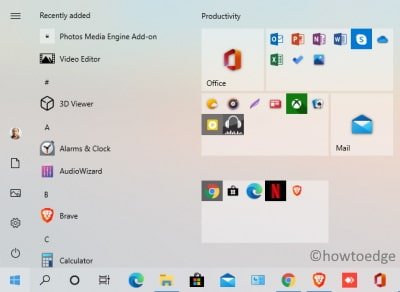
Windows 10 Build 20161 improvised the Start Screen to a greater extent. The new Start Menu now consists of a cleaner, more refined, translucent background with focused app icons. Replacing the programs logo’s solid color backplates with uniformity of current theme, this presents the best Start Home Screen so far in Windows 10. This looks superb on both Light and Dark modes by offering a distraction-free board to display system or 3rd-party apps.
Being a project of version 21H1, you won’t be able to activate this any sooner than May 2021. As of now, this is available to only a handful of insiders. However, there’s a way out there applying which you can enjoy the beauty of this new Start Menu on Windows 10. All you require is to download and install a third-party tool titled “ViVeTool” from the GitHub. Let’s explore the steps in detail –

Recent – A complete Guide to Windows 10 21H1 Features, Changes, and Improvements
How to activate the 20161 Start Menu on Windows 10
To start using the New 20161 Start Menu on Windows 10, use the following steps –
- First of all, visit GitHub Site and download the ViveTool-vx.x.x.zip file.
- After the download completes, open the folder containing this file.
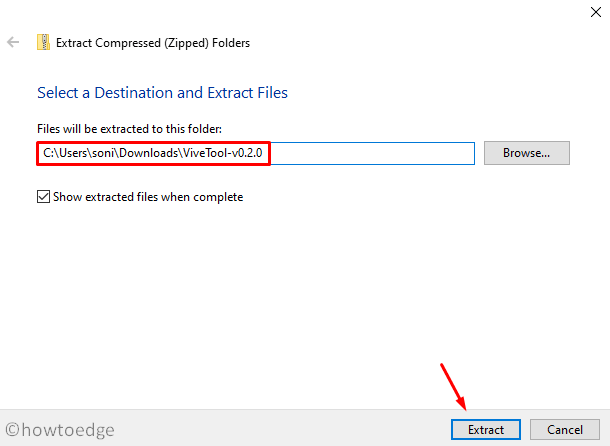
- Make a right-click on ViveTool-v0.2.0.zip and choose “Extract All“.
Note: If you want to extract this to some other folder, click browse and reach out to the desired location. However, you must copy the full path as we are going to use this –

- Now, open the Command prompt as an Administrator.
| Jointly press Win+R to open Run, type “cmd”, and hit Ctrl+Shift+Enter keys together to start Command Prompt as an Admin. |
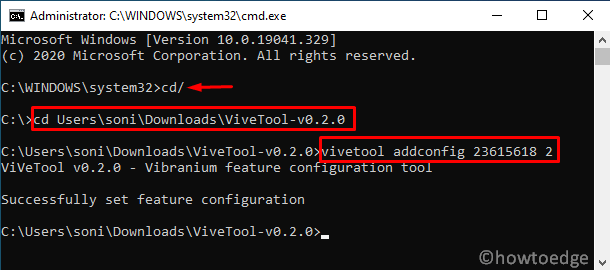
- On the elevated console, type “cd\” and press Enter to enter the root folder.
- Next, type “cd” followed by the file path that you copied earlier –
cd c:\Users\<YourName>\<FolderName>\ViveTool-v0.2.0
For example – C:\Users\soni\Downloads\ViveTool-v0.2.0
- Subsequently, copy/paste the below command and hit Enter.
vivetool addconfig 23615618 2

- When the console displays “Successfully set feature configuration”, close the prompt.
- Restart Windows so that the changes made above come into effect.
- Sign back in and you will find the new 20161 Start Menu active on the computer.
How to disable 20161 Start Menu on Windows 10
If you ever change your mind and want to revert to the earlier display, you can do so using these steps –
- Reopen the Command Prompt having administrative privileges.
- Now, execute these codes one after another –
cd\
cd c:\Users\<YourName>\<FolderName>\ViveTool-v0.2.0
vivetool addconfig 23615618 1
- Make sure to hit Enter at the end of each command line –
That’s it, the new 20161 Start Menu no longer remains active on the computer.
|
Apart from the new Start Menu, users may also activate some other changes that came on Windows 10 20161 Dev channel. All you need is to run some additional codes on the Windows Console. These are as follows –
|


