Did you lately encounter the error code 0x80070057 while updating your Windows 11 or 10 Build OS? Well, this error may occur on account of different reasons. A few of them are – update services not starting automatically, damaged system files, incorrectly configured registry, and Windows cache folders becoming corrupt somehow. You may receive an error message as well that reads –
There were some problems installing updates, but we'll try again later. If you keep seeing this and want to search the web or contact support for information, this may help – (0x80070057).

Whatever the reasons behind this issue, we have discussed five solutions that should resolve the update-related problems on your computer. Besides this, you may also encounter the 0x80070057 error because of incorrectly specified parameters or while opening Microsoft Office and its products. We have separately dealt with both these issues at the last of this article.
Windows Update Error 0x80070057 Solutions
Go through the below list of solutions to fix the 0x80070057 error and its types on Windows 10 PC –
1. Rename The SoftwareDistribution Folder
At times, this error occurs owing to corruption inside the Windows Update folders. So, better rename or delete these folders to something different and try installing recent patches again on your computer. Just make sure to disable certain services before attempting to delete/rename Windows cache folders. Here’s how to perform this task –
- Click on the Start Menu and type services. Double-click the top result to launch the Services window.
- Scroll down to Windows Update service, right-click on it, and hit Stop on the context menu.
- Now, go to the following addresses and rename the specific folders mentioned below –
C:/Windows –> SoftwareDistribution to sd.old
C:/Windows/system32 –> Catroot2 to catroot2.old

- After renaming both these folders, go back to the services window. Here, right-click again on the Windows Update and select the Properties option.

- Subsequently, check what’s selected under the
Startup Typesection. This should point to Automatic. If not, you may use the drop-down menu and select this option. - Hit the first option i.e. Start under the Service Status section.

- Lastly, hit Apply then OK to confirm these changes.
Close the services window and restart your PC. From the next login, you should be able to upgrade the operating system without falling into any trouble.
2. Run the Windows Update Troubleshooter
If the 0x80070057 error still occurs while upgrading Windows 10, take the help of the update troubleshooter. This is a great tool by Microsoft running which can look for underlying causes and fix them. Here’s how to troubleshoot –
- Press Win + I and follow the path –
Update & Security > Troubleshoot. - Click Additional troubleshooters on the right pane.
- Click to expand the Windows Update box and hit Run the troubleshooter.

- The troubleshooter will diagnose the problem and once done, hit the Apply this fix option.
- Wait for this tool to repair Windows Update.
Note: If you are getting this error code on your Windows 11 PC, follow these steps instead –
- Press Win + I to launch Settings.
- Click System > Troubleshoot.
- Select Other troubleshooters and then hit Run available besides Windows Update.

- Follow the on-screen instructions to complete the remaining steps.
Lastly, close all running windows and Restart your computer. Hopefully, you can now update your operating system without getting into the same error again. If the error persists even after this, try repairing your device by executing a few codes on the Command Prompt.
3. Configure Windows 10 Services to Run automatically
There are times when one or more services get stuck when required. The update may fail and result in some error code when either of the essential services fails to start automatically. You may configure them to auto-start right on the Services window. Or, just run a few codes on Command Prompt (Admin) –
- Press WinKey + R to launch the Run dialog.
- Type “cmd” in the text field and press
Ctrl + Shift + Enterkeys together. - On the elevated console, execute the below commands one after another. Just make sure to hit the Enter key after each passing code –
SC config wuauserv start= auto
SC config bits start= auto
SC config cryptsvc start= auto
SC config trustedinstaller start= auto
- Once over, come out of the prompt area and Restart Windows.
From the next logon, check if the error still appears during the Windows update or has been solved.
4. Use The System File Checker
The presence of file corruption on the computer may also prevent Windows 10 from being updated. If that’s the case, you may use the inbuilt scan tool for Windows i.e. System File Checker. Running this tool will search for the corrupted or missing files and if found any, this will repair the same. Here’s how to run this tool –
- Hit the Start button and type “command” in the text bar.
- Right-click on the top result and select Run as Administrator on the shortcut menu.
- Next, copy/paste the following code and press Enter –
sfc/scannow

- Wait for this command to complete. This entire scanning/repairing process may take 15-20 minutes to solve system-level corruption.
- When the Command Prompt displays 100%, you may close the console and
Restart your PC.
Sign back into your computer and try to update the operating system again. If the problem persists, configure the registry as explained below –
5. Modify Windows Registry
If none of the above solutions help to resolve the 0x80070057 error, you need to make some necessary changes to the Windows registry. To do so, follow the below guideline –
Imp: Make sure to first back up the registry before performing any changes to this: How to enable Automatic Registry Backup in Windows 10
- Jointly press
Windows key and Rto invoke the Run command. - Type “
regedit” and press Enter to launch the Registry Editor. - When the UAC window comes into view, hit Yes to authorize the access.
- Browse to the following path on the registry –
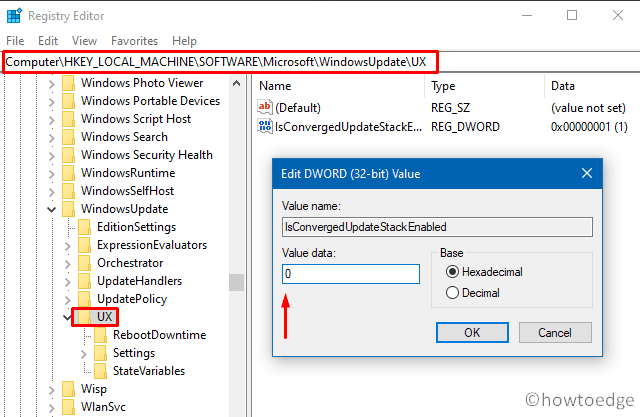
HKEY_LOCAL_MACHINE\SOFTWARE\Microsoft\WindowsUpdate\UX
- Jump to the right pane and look for a file titled “IsConvergedUpdateStackEnabled“. If there indeed exists a DWORD key matching this new, double-click to open that and put “0” under the value data field.

- If not, you may create this file by pressing right-click and selecting
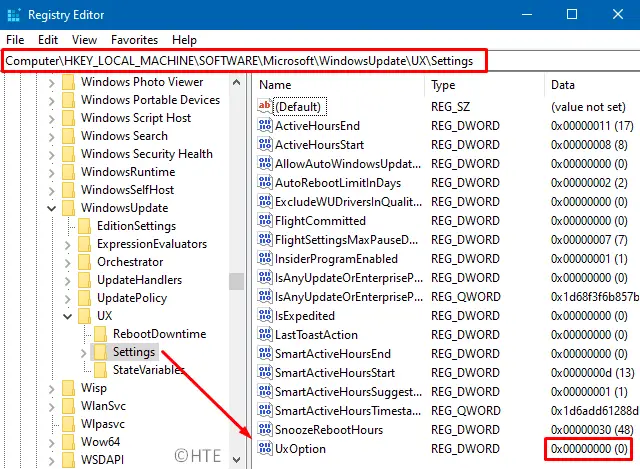
New > DWORD (32-bit) Value. Rename this key entry as “IsConvergedUpdateStackEnabled” and the value equals zero. - Similarly, change the value data of the “
UxOption” key to “0” available at the following location –
HKEY_LOCAL_MACHINE\SOFTWARE\Microsoft\WindowsUpdate\UX\Settings

- After making the above changes successfully, close the registry and Reboot your PC.
From the next logon, the 0x80070057 error should be gone and you may continue to install the latest Windows 10 update.
Error 0x80070057: The Parameter Is Incorrect
If you get the message “An internal error has occurred: The parameter is incorrect: (0x80070057)”, this implies the backup process is failing to start. To resolve this bug, you may make slight changes under the registry. The required changes on the registry are as follows –
- Open the Windows registry (as explained above).
- Browse to the path –
HKEY_LOCAL_MACHINE\SOFTWARE\Policies\Microsoft\SystemCertificates. - Right-click on SystemCertificates and choose to
New > DWORD (32-bit) Value. - Rename this DWORD key as “CopyFileBufferedSynchronousIo” and set its value to “1”.
- Click OK to confirm these changes and Restart your PC.
You won’t get this error again while backing up files or starting any earlier backup on the computer.
Microsoft Office Error 0x80070057
Sometimes you may also get the 0x80070057 error while starting Microsoft Office or its products. To fix this problem, you must disable the firewall on your computer. In rare scenarios, you need to temporarily disable the Microsoft Defender or third-party antivirus software on your device. In case you don’t know how to disable the Firewall, use these steps –
- First of all, launch Control Panel.
- Click System and Security followed by Windows Defender Firewall.
- Subsequently, click
turn Windows Defender Firewall on or offon the left pane.

- Select Turn off Windows Firewall (not recommended) under both Private as well as Public Networks.

- Next, go to Control Panel > Programs > Uninstall a Program.
- Right-click on Microsoft Office software and choose to Uninstall.
- When the office products get uninstalled completely, Restart your PC.
- When you sign back into your device again, reinstall the Microsoft Office program.
That would be all. I hope this article helps to solve the different types of 0x80070057 errors on Windows 11/10 PC. If you have any queries or suggestions for us, let us know in the below comment section.


