Did your device turn blue displaying amdkmpfd.sys failed BSOD Error and you are wondering what to do next? Well, you just encountered a blue screen of death error which is a part of the Driver_Irql_Not_Less_Or_Equal stop error code.
In this post, we will cover what exactly causes such an error code, and the relevant fixes that might solve it on Windows 11/10 PC. When this problem occurs, you might see a Blue Screen resembling the below snapshot.

What causes this amdkmpfd.sys failed BSOD Error?
Amdkmpfd.sys is basically a system driver in which Amdkmpdf stands for AMD Kernel Miniport Filter Driver. The Blue Screen must be appearing because this system driver has failed to start and thus results in a BSOD error. This could also be occurring when this AMD driver is not supporting or has become incompatible somehow.
The other reasons that might also result in similar error codes are as follows –
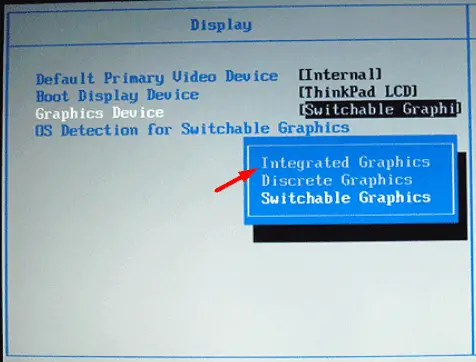
- You have enabled the Switchable Graphics feature inside BIOS.
- Missing or damaged system files and folders
- Corrupt or faulty display adapters
- You have installed a conflicting third-party app on your computer
How do I Solve amdkmpfd.sys failed BSOD Error?
If you are getting a blue screen error due to failing amdkmpfd.sys on Windows 11/10, attempt the below fixes one by one. Make sure to apply the below fixes in the same order as they were put in.
Before you apply any fix, make sure to boot your Windows into Safe mode first. This is important as you can’t apply any fix without booting into this mode.
1] Disable Switchable Graphics inside BIOS
Switchable Graphics is a new feature that allows switching between the Intel® graphics and a discrete graphics controller on your Windows PC. If you have a device supporting this feature, the amdkmpfd.sys failed BSOD error must be occurring because of it. Disable the Switchable Graphics feature inside BIOS and this might solve the blue screen error on your computer.
Here’s how to perform this task –
- Shut down your PC first by pressing the power button.
- Wait for the next 15-20 seconds, and then press the Power button again.
- While Windows 11/10 is loading, hit the F12 key 2-3 times. The BIOS key varies from one device to another. So, do check for the same for your laptop/desktop.
- Assuming you are inside the BIOS, locate and click Video Group.
- Go to the Switchable Graphics, and uncheck the box – “Enable Switchable Graphics”.
- Click Apply and then come out of this BIOS Setup screen.
HP users may follow these steps –
- Use the f10 key to boot into the BIOS Screen while Windows is loading.
- Go to Advanced > Built-in Device Options, and select Graphics.
- Use the arrow keys and change this option to Integrated Graphics.

- Click Save and then Save Changes to confirm the recent modifications inside BIOS.
Restart your PC and check if the Blue Screen issue resolves on your computer.
2] Uninstall the Graphics drivers
The device drivers play an important role in connecting your hardware to software. Over a period of time, these drivers become obsolete and may result in kernel errors. The amdkmpfd.sys failed BSOD Error is mostly the work of issues within the AMD display driver. So, uninstall the existing graphics driver on your Windows PC using the below steps.
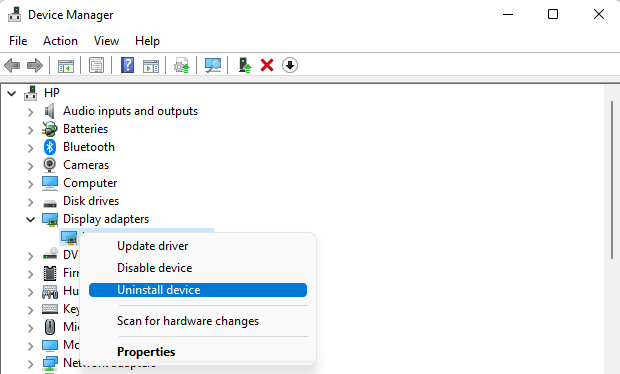
- Press Win + X, and select Device Manager.
- On the upcoming screen, locate and click to expand Display adapters.
- Right-click on the available driver, and select Uninstall device.

- After the display adapter uninstalls successfully, restart your PC.
When Windows 11/10 reloads, the uninstalled adapter will reinstall on its own. Check if the amdkmpfd.sys failed BSOD Error resolves from here onward.
3] Check your hard disk using CHKDSK
Blue screen of death errors mostly occurs because of bad sectors inside the hard disk. Go and check the current status of your disk drive using CHKDSK. Here’s what you need to do next –
- Press WIN + X, and choose Terminal (Admin).
- On the terminal, copy/paste the following, and press Enter.
chkdsk C: /f /r /x

- Since your root drive is already in use, this command won’t run. Rather, this will ask if you would like to run this tool the next time your PC restarts.
- Type “Y“, and press Enter. Restart your PC next and the CHKDSK tool will come into action.
- This is a time taking process, so you need to wait till this is over.
- In the end, you will get a report stating whether you can use your HDD or not.
Do as it recommends, and hopefully, the amdkmpfd.sys failed BSOD Error resolves this way.
4] Run SFC & DISM Scans
Third-party applications are known to interact with the system files and corrupt them. Many of us still use external antivirus programs to safeguard our devices. Well, these programs do more harm than good. For example, these apps will consume more system resources and thus very few resources are left for system apps or programs that you run very often.
Because of this interaction, some system files may start missing or become corrupt. To bring back or repair such files, run the System File Checker tool. Here’s how to perform this task –
- Launch CMD as administrator first.
- Copy/paste the below command on it, and press Enter.
sfc /scannow
- Wait for this tool to automatically detect and resolve system file corruption.
- When this repairing process attains 100%, execute the below command on the same prompt –
Dism /Online /Cleanup-Image /RestoreHealth

- We suggest running this tool as DISM can find and resolve corruption within the System Image.
- Wait again for this tool to finish its repairing task. This whole process will take 10-15 minutes.
- After you execute both SFC and DISM Scans successfully, restart your PC.
Sin back into your device and check if the blue screen stops appearing on your lock screen.
5] Use a Restore Point
We often see solving one blue screen error code results in another BSOD error and this trend continues. For example, when you resolve the issues that were failing amdkmpfd.sys, some other system file starts failing. This might happen in cases where your system is corrupted beyond repair by using normal workarounds.
If you had created a system restore point when your system was functioning well, use this backup to revert back your device to its normal working state. However, if you haven’t enabled System Protection on your C:\ drive, you may skip this restoration process.
In case you are able to boot into Safe Mode on your PC, follow this guide. Else, use the below steps to restore your Windows PC to its original state via Startup Repair.
Assuming you do have a restore point, use these steps to restore your Windows PC to its original state –
- Power On and off your device 2-3 times using the power button.
- Your device will boot next into the Automatic Repair Screen.
- Go to Troubleshoot > Advanced Options, and click on System Restore.

- Wait for the system to detect the restore points available on your PC. When it does display the latest restore point or the available ones, choose one and follow the on-screen instructions.
I hope the amdkmpfd.sys failed BSOD Error resolves automatically when your device reboots.
6] Clean Install Windows 11 or Windows 10 on your PC
In case you have not enabled the system protection, there won’t be any restore point available on your computer. Well, all you can do now is perform a clean installation of Windows 11 or 10 on your device. The complete guide to installing both these operating systems is as follows –
I hope the amdkmpfd.sys failed BSOD Error resolves after applying the fixes outlined above. Let’s know in the comment section if you face difficulty following any section on this post.


