Lately, some users have come across a problem known as Error 0x80042306 when they try to create a System Restore Point on their computers. In today’s blog post, we’re going to talk about why this error happens and how you can possibly fix it.
This issue usually pops up after a failed update, problems with the Volume Shadow Copy service, or issues with VSS components.

What causes this System Restore Point Error 0x80042306?
This error, 0x80042306, might also show up if there are problems with parts of your hard drive or if some of your system files are damaged.
You can try a few things to fix it: restart or re-register the VSCS, repair any missing system files, check if your hard drive is healthy, and restart the Volume Shadow Copy service. If the problem is still there, you can try changing the name of the system restore files – that could help you figure out what’s going wrong. Let’s take a closer look at each of these solutions.
Recommended: Four different ways to use System Restore in Windows 10
Fix System Restore Point Error 0x80042306
If you are facing trouble restoring system backup on your Windows PC, here are a few fixes that might help you out.
1. Restart the Volume shadow copy service
The error 0x80042306 mostly appears when the volume shadow copy service is not live or malfunctioning. Restart this service and check if you can create or use the system restore point on your PC again. Here’s what you need to do –
- Right-click on the Start and choose Run from the Power Menu.
- In the text box, type
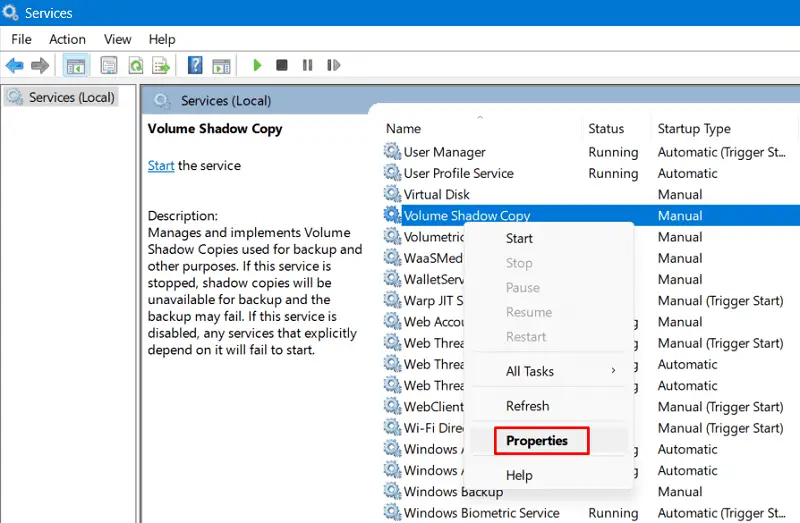
services.mscand then hit OK. The Services window will appear next. - Scroll down to Volume Shadow Copy and right-click on it.
- Select the Properties option from the context menu.
- On its properties window, change the startup type to Automatic and hit Start.
- If this service is already running, you better stop it first, change the startup type, and then start it again.
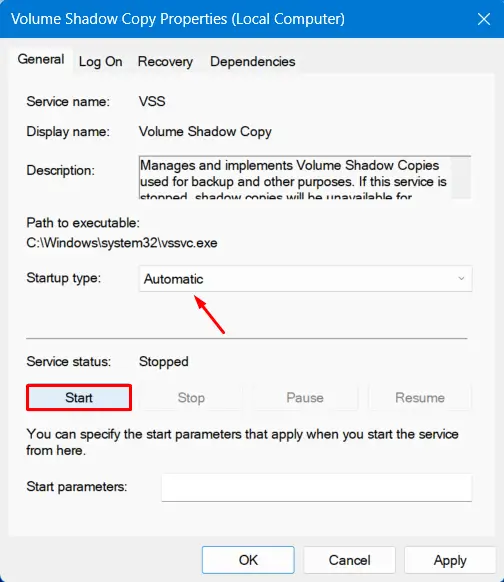
After you complete these steps, restart your PC. Sign back into your device and check if the error 0x80042306 resolves on your computer.
2. Re-register VSS components
The Volume Shadow Copy Service (VSS) requires accommodating huge data servers, backup applications, and storage spaces. For this, they require some components. These components, when corrupted, may sometimes result in an error 0x80042306.
If you are facing this problem as well, you better follow these steps to re-register your application.
- Right-click anywhere on the desktop and hover the mouse over New thereafter select Text Document.
- Now, opens this text document and copy/paste the following set of command lines inside.
cd /d %windir%\system32
net stop vss
net stop swprv
regsvr32 /s ole32.dll
regsvr32 /s oleaut32.dll
regsvr32 /s vss_ps.dll
vssvc /register
regsvr32 /s /i swprv.dll
regsvr32 /s /i eventcls.dll
regsvr32 /s es.dll
regsvr32 /s stdprov.dll
regsvr32 /s vssui.dll
regsvr32 /s msxml.dll
regsvr32 /s msxml3.dll
regsvr32 /s msxml4.dll
vssvc /register
net start swprv
net start vss
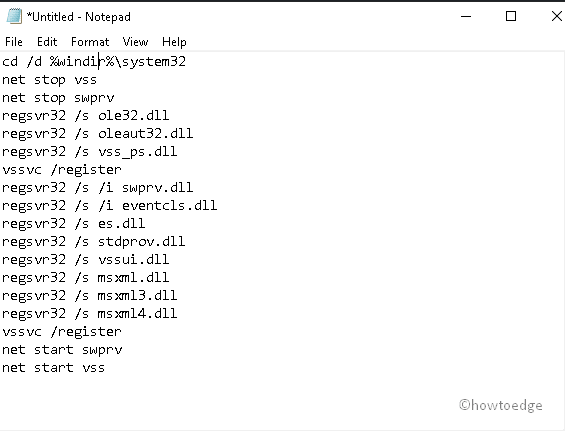
- Succeeding after, save this file as .bat extension under Save as type: drop-down menu.
- Right-click again on this file and choose Run as Administrator.
This will re-register the Volume Shadow Copy Service on your system.
3. Run Chkdsk command
If some of the sectors have become corrupt on HDD may also arise this Error 0x80042306. To make sure what’s the fact, try executing the DISM command on your PC. This will scan the whole hard drive and repair the same if minor bugs exist. Here are the steps to proceed with-
- Type cmd in the search box then do the right click on Command Prompt option.
- Henceforth, choose Run as administrator from the context menu.
- If there appears a UAC, tap Yes.
- Type or copy/paste the following code near the blinking cursor to detect the problem.
chkdsk C: /f /r /x
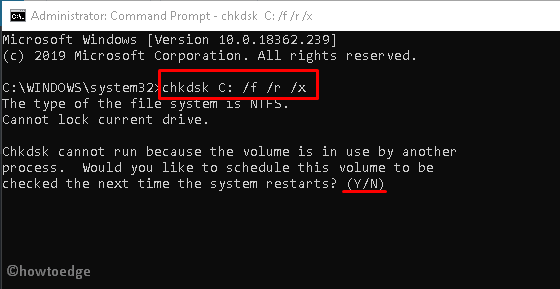
Note: The parameter C: indicates the drive that keeps the OS file, and f directs to fix the problem. Similarly, r is there to find out the bug and x starts the scanning process.
- If your system is a little busy, this displays a message to reschedule this task when the PC reboots.
- Press Y to give your permission.
Lastly, Restart the computer again and check if this issue gets solved or not.
4. Perform the System File Checker command
Sometimes, the bug lies in the core system files. If that’s the case, try executing “sfc/scannow” command line on your PC. This may resolve this Create Restore point error 0x80042306 issue. The steps are quite easy to follow-
- First, right-click on the Windows icon and choose Run from the pop-up menu.
- In the text area, type cmd and simultaneously press Ctrl+Shift+Enter to begin the Command Prompt as Administrator.
- If the UAC Screen prompts, click Yes.
- Now, type
sfc /scannownear the blinking cursor followed by the Enter key.
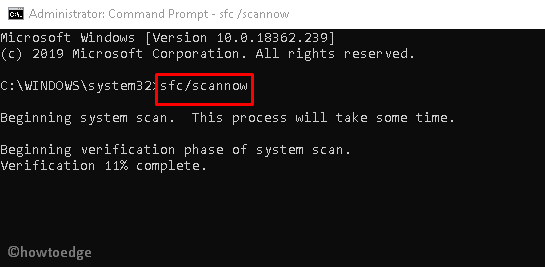
- This whole scanning and repairing will take approx. 10 minutes, so wait accordingly.
- Once over, Reboot your PC and sign into your System.
5. Rename the Restore Point file
If you are experiencing an error code 0x80042306 while using a restore point, you better rename the backup file name. Follow the below steps to carry out this fix –
- Press Win-logo and R together to open the Run dialog.
- In the void box, write the following command then hit Enter at the end.
%windir%\System32\Tasks\Microsoft\Windows\SystemRestore.
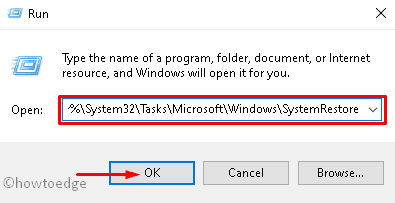
- Thereupon, locate the directory SR and rename it to SR.sav.
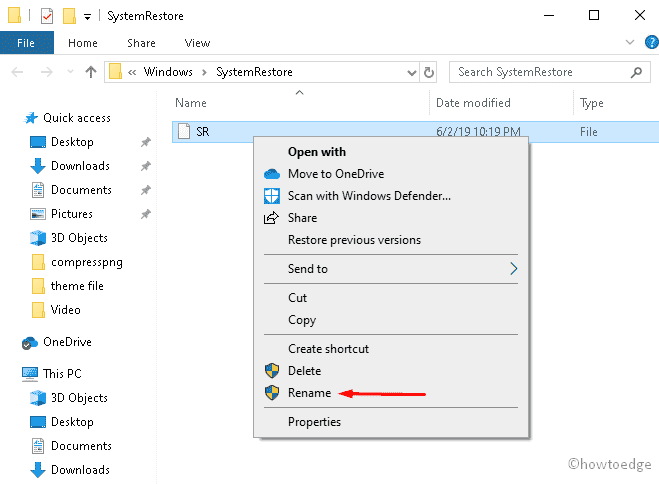
- After you rename this file, Restart your PC to check if it actually solves the persistent issue or not.
6. Adjust System Restore Space Usage
Another issue that may cause this error code is the lack of sufficient storage space. The option to adjust the maximum available spaces for System Restore was there on Windows XP, removed for Vista, and then brought back again from Windows 7 onward.
Follow the below instructions on how to adjust the system restore space usage in Windows –
- Search for “systempropertiesprotection” in Windows + S, and click on the top result.
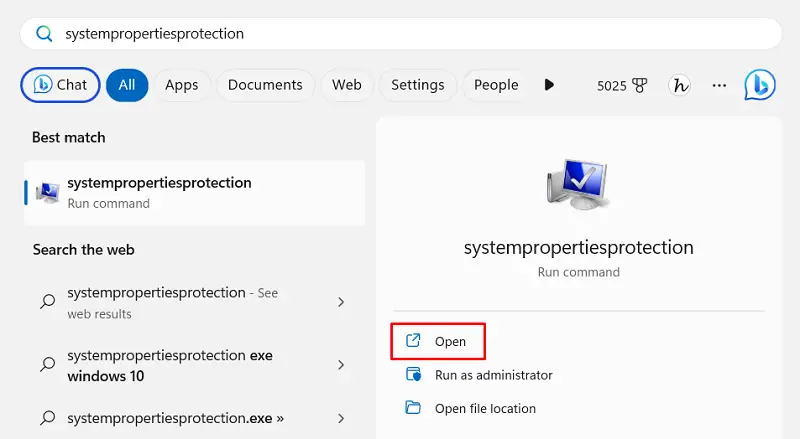
- The system will redirect you to System Properties. Alternatively, you may also use Win + Pause/Break keys.
- Go to the System Protection tab, select a device from the available ones, and then hit Configure.
- Make sure to keep the “Turn on system protection” checkbox turned On. If not, do it first and then use the slider to increase the Max usage in terms of disk space.
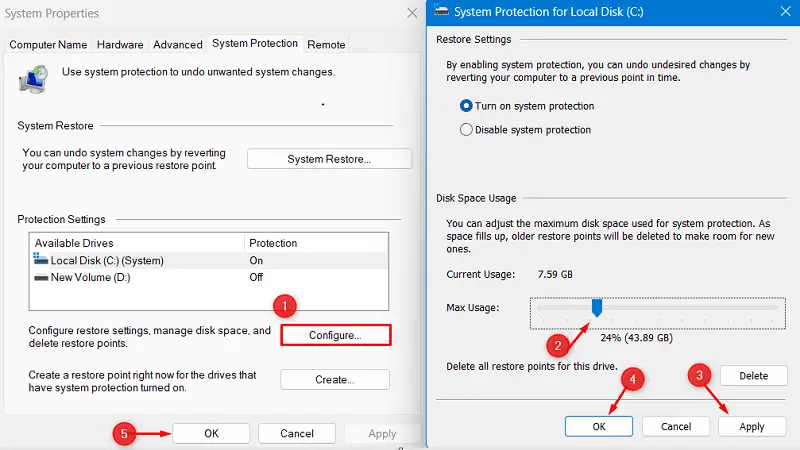
- Click Apply and then OK to confirm the recent changes.
- Coming back to the first screen, click Apply > OK again.
Note: There exists a counter that displays the current Usage of space. In case, you set the new disk space lower than the current one, this will delete some of the files of earlier Restore points so as to accommodate the newly assigned disk space.
That’s it, I hope you are now able to use System Restore without getting into an error code 0x80042306 again on your PC.


