The installations of a new Windows 10 update or setup offer multiple benefits but may also become troublesome with error 0x80190001, restricting the user from downloading files. This is a usual problem faced by users due to incompatibility and safety issues with the drivers.
With this error code, you may see the following error message – Something went wrong or An unexpected error was encountered while attempting to download files required for the upgrade. This article covers some effective workarounds that will help you to solve this error code. The step-by-step error correction procedures are guided below.

Fix Windows 10 Error 0x80190001
To fix Error Code 0X80190001, follow the below methods:
1] Clear Junk files and Temporary files
Windows 10 update is a new generation software with an automated setup of removing junk & temp. files. The procedure may also be taken up manually by the user for better Windows performance. The manual procedure is as under:
- Open Taskbar search using Windows+S keys.
- Type
cleanmgrand press Enter.

- Choose the root drive (C:) then click OK.
- Select the Clean-up system files option.
- Choose C: drive again then hit the OK button.

- Mark all the check-boxes except Download and click OK.
- Click Delete files to confirm the clean-up.
2] Run Windows Update Troubleshooter
There is an option of an inbuilt troubleshooter for self-error correction in Windows update. It is not necessary that the problem may be fixed every time using this option, but it can be useful in various scenarios. The following are the steps of using a troubleshooter:
- Right-click on the Start button and select the Settings option.
- In the Settings app, click Update & Security > Troubleshoot > Additional troubleshooters.
- Select the Windows Store Apps, and then hit Run the troubleshooter.
- Now follow the on-screen guidelines to complete the process.
Once you perform the above steps, restart your computer and try updating your Windows again.
3] Turn off Antivirus and Firewall
Firewall & Antivirus in a few cases can become a hindrance while installing Windows 10 update and may generate the error code 0x80190001. In such cases, the firewall & Antivirus can be uninstalled while updating Windows 10 and then reinstall them after updating the operating system. Here is how to do it:
- Open Windows Settings using Windows+I keys.
- Go to Update & Security > Windows Security > Virus & threat protection.
- On the next page, scroll down and click on the Manage settings link.

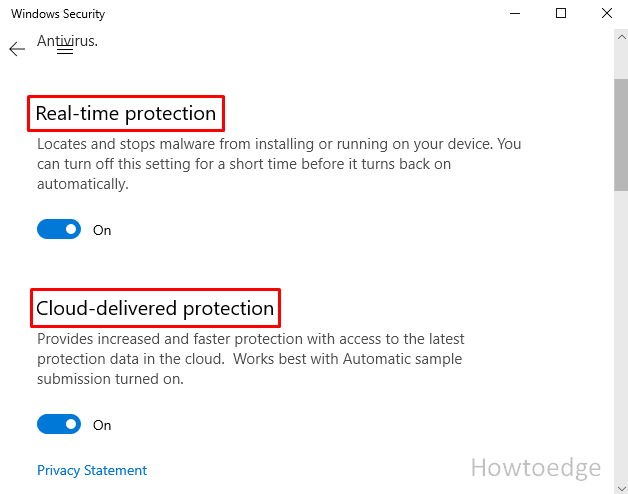
- Now turn off the toggle button of Real-time protection and Cloud-delivered protection.
- Close all the windows and see if the error 0x80190001 is solved now.
4] Remove the external peripherals to fix 0X80190001
Sometimes big problems can be solved with small inputs. It is suggested to remove all the peripherals except the essential device like your mouse and keyboard. Once you did, try to install the update again and see if it works.
5] Delete the Software Distribution Folder
The operating system of Windows 10 consists of a folder called Software Distribution. The folder is used by the system to secure files that are temporary and not required after a time. Such files can corrupt the system and must be cleaned regularly. Following are the steps:
- Open an elevated Command Prompt.
- In the elevated window, type the commands given below and hit Enter after each.
net stop wuauserv
net stop bits
- After running the above commands, open File Explorer (Windows+E) and browse to the following:
C:\Windows\SoftwareDistribution folder.
- Select all the files and folders (Ctrl+A) and delete them.
- After deleting the SoftwareDistribution folder, open the command prompt and run the following commands:
net start wuauserv
net start bits
- This will restart the Windows Update-related Services.
6] Check Date & Time
The inaccuracy of Date & Time can incur error code 0x80190001. So, the accurate Date & Time shall be ensured, and correction can be done through the following process:
- Click on the Start button, type “Date & time settings”, and select the same from the list.
- Go to the right side and disable the Set time automatically option.
- Under the Set the date and time manually section, click on the Change button.
- Adjust the date and time manually and then click on the Change button to apply the changes.
- Restart your system and try updating your Windows again.
7] Perform a clean boot
Another method here you can try to fix Error 0x80190001 is to clean boot Windows 10. Follow the steps given below:
- Click on Start and type
msconfig. - Select the System Configuration option from the list.

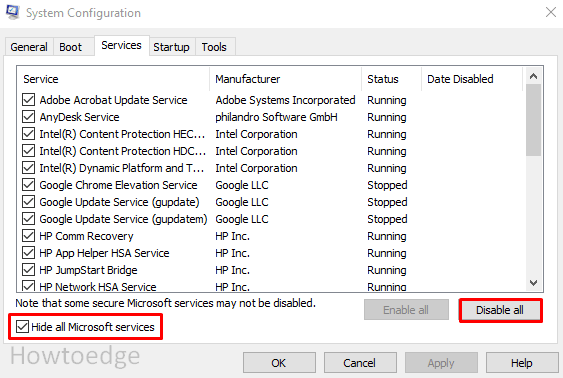
- Go to the Services tab and then check the Hide all Microsoft Services checkbox.
- Click on the Disable all button.
- Now switch to the Startup tab and select Open Task Manager.
- On the Startup tab, select each item and Disable them one by one.
- Close the Task Manager window and click OK to save the changes.
Restart your system and check if the error is resolved.
8] Download Windows 11/10 ISO image and install it
Windows is a new generation system that must be understood before adding changes to it. The up-gradation is the common procedure that must be carried out before opting for any update. The Media Creation Tool can be installed and used for correcting error code 0x80190001. Such foreign download may cause loss of data files, therefore backup may be ensured before installing Media Creation Tool. Take the below steps:
- At first, download the Media Creation file.
- Go to the downloaded location and double-click on the downloaded file to launch it.
- If UAC prompts, click the Yes button.

- Click the Accept button to accept the license terms and conditions.

- Select Upgrade this PC now option and then click the Next button. Wait for a while until Windows prepares to install the important files.
- Then select the Keep your personal files and apps option and then click Next.
- Finally, hit the Install button to start the upgrade process.
Once you get the latest version of your Windows, the problem should be resolved. Let us know which methods you find useful.


