Did you recently encounter the error 0xC00D3E8E while performing operations on a media file like – renaming, moving, or deleting? If yes, then follow our six ways guide to resolve this issue on Windows 10. The error is –
Error 0xC00D3E8E: The property is read-only
The Error 0xC00D3E8E is primarily associated with media files and comes into existence when you try moving them from one location to another. Restart File Explorer, Change the File Metadata, Take ownership of the file are a few solutions that may resolve this issue on Windows 10. If not, you may perform an SFC scan, DISM, or CHKDSK. In case the bug still exists, use the “system restore point” or rollback OS to its earlier build versions.
Ways to Fix Error 0xC00D3E8E in Windows 10
To solve the error code 0xC00D3E8E on Windows 10 PC, use the below workarounds –
1] Restart the File Explorer
Since the error 0xC00D3E8E occurs due to misconfigured media files, restarting Windows Explorer may fix the issue. Here’s how to do this –
- Make a right-click on the Taskbar and select Task Manager.
- When the Task Manager window opens, go to the Details Tab.
- Scroll down and locate the explorer.exe process. Once found, make a right-click and hit End Task.
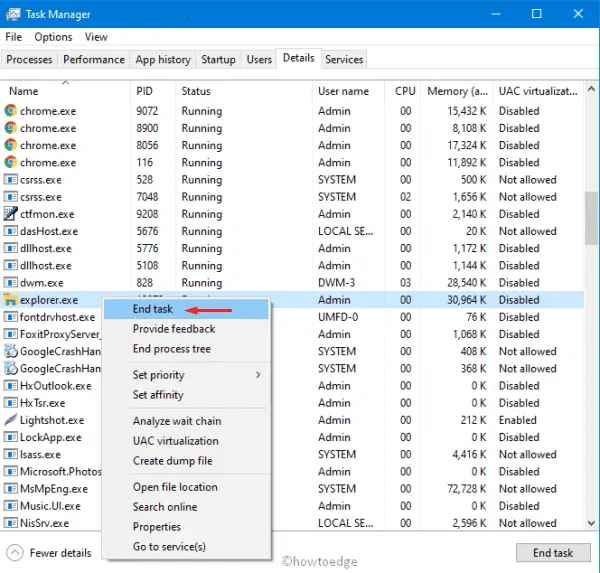
- The File Explorer will immediately stop working and there appears a black strip on the Taskbar.
- Now, go to the File tab and click “Run New Task”. Type explorer.exe at the void and press Enter to restart File Explorer.
2] Change the File Metadata
The error 0xC00D3E8E mainly occurs due to non-supported Media extensions. To change the metadata of a file, just copy/paste it to a USB device. Now, check whether you can modify the file name or not. If yes, you can copy this file back to your computer.
In case this doesn’t help, you may try third-party apps that change the metadata of a file like – FFMPEG, ExifTool (mp4 only), etc.
3] Take Ownership of the Media File
Sometimes, when you don’t own the files that you are going to modify may lead to this error message. If that’s the case, you should first get the necessary permissions following the below steps –
- Do the right-click on the file or folder that you want to modify or delete and select Properties on the shortcut menu.
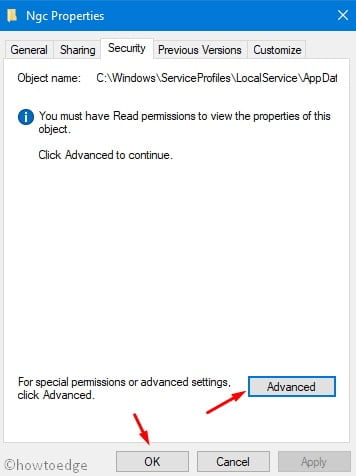
- When the properties window pops up, go to the Security tab and hit the Advanced option thereafter OK.
- Click Change available next to the Owner. You may now modify the object permissions on the succeeding screen.
- To do so, type “
ComputerName\Administrators” inside the “Enter the objects name to Select” box.
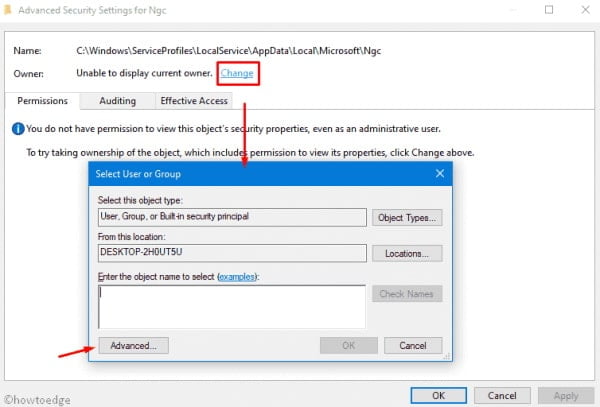
Note: If you are not sure about the object name, you can hit the Check Names button available right of the box.
- If all is good, press Apply then OK to confirm these changes.
4] Run SFC/DISM/CHKDSK
The above three methods should resolve the error 0xC00D3E8E on Windows 10. However, if not, you may try these utility programs –
System File Checker Utility
To get rid of the error code 0xC00D3E8E, one should search the entire PC for any missing/damaged files and repair the same (if found). Here’s how to correct such files using SFC –
- Right-click on the Taskbar and click Task manager using the shortcut menu.
- Head over to the File Menu and choose Run new task.
- Type cmd (Admin) at the void and press the Enter key.
- On the elevated console, type sfc /scannow and press Enter again.
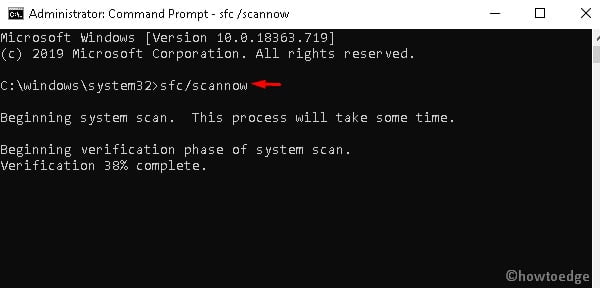
- This takes approximately 10-15 minutes for completion, so wait accordingly.
- Once over, Restart your computer and check whether you can install new cumulative updates or not.
DISM
If you are still receiving the Media Error 0xC00D3E8E, you may try another utility program DISM to locate and repair the corrupt Windows image files. Here are the necessary steps to work upon –
- Jointly Press Win+R to start the Run dialog.
- Type cmd at the text field and press Ctrl+Shift+Enter keys together.
- When the User Account Control window prompts, tap Yes.
- On the elevated command prompt, run the following codes one after another –
DISM /online /Cleanup-Image / ScanHealth
DISM /Online /Cleanup-Image /RestoreHealth
- This will take some time to finish, so wait accordingly.
- Lastly, Reboot your PC to confirm the changes performed so far.
CHKDSK
The insufficient disk performance may also result in error code 0xC00D3E8E on your Windows 10 device. There’s no harm in checking the health of the hard drive. Here’s how to proceed –
- At first, launch the Command Prompt with administrative privileges.
- Copy/paste the below code and press the Enter key to start scanning the HDD.
chkdsk C: /f /r /x
Here, chkdsk implies executing the scanning process and the characters symbolize to the following –
c – is the disk drive where the Windows installed.
f – means the settings to detect the faults.
r – represents scanning faults in the specified disk drive.
x – implies the partition of the disk drive and let’s begin the repairing process.
5] Use System Restore Point
If none of the above fixes resolve the error 0xC00D3E8E, it’s time to revert back the OS to an earlier state when this was running completely normal. Here’s how to use the existing system backup on your computer –
- Type System Restore Point in the search field and click the well-matching result.
- On the next screen, head over to the System Protection tab and hit System Restore.
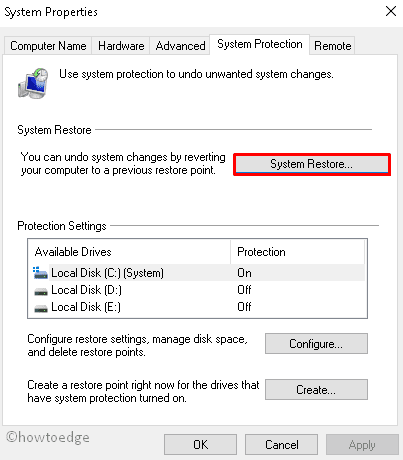
- Click Next to move further, a list of recent backups will appear.
- Select the latest backup and click “Scan for affected program” followed by Next.
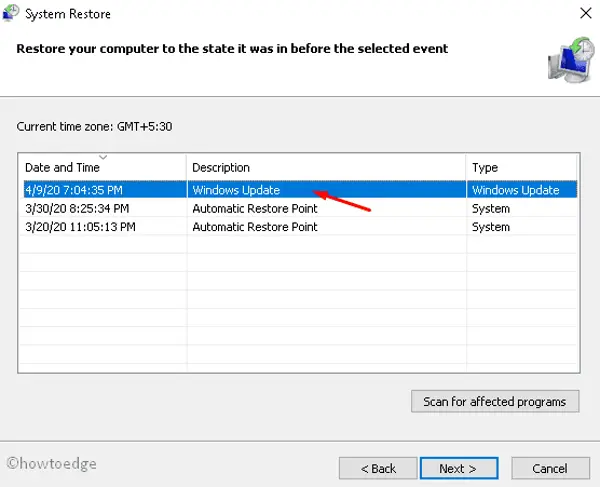
- Now, press the Finish button so that the system starts rolling back the OS.
- This takes a few minutes to complete, so wait accordingly.
6] Rollback Windows 10 OS
If the media error 0xC00D3E8E starts occurring after a recent upgrade, you should rollback the Windows 10 OS. All you need is to perform the below tweaks inside the Settings app –
- Open Settings using Win and I shortcut.
- Select Update & Security thereafter Recovery on the upcoming screen.
- Go to the right panel and press Get started button under “Go back the previous version of Windows 10” section.
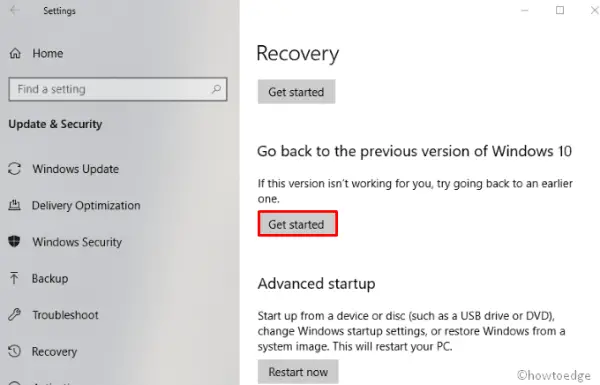
- The system may ask a reason for rolling back the OS to the earlier version. Select the option that best matches your issue and click the Next button.
Note: Using this method you can revert back the Windows 10 operating system only up to ten days. If you want to remove the recent OS Build version that spends more than 10 days, Get started button becomes fade.

