Did you encounter an error code 0x8007007f when upgrading to the new Windows 11 OS using Installation Assistant? Here’s a guide on how to find the underlying causes, and fix them.
Windows 11 is now officially available for everyone. However, there are devices that yet can’t upgrade to the new OS due to a few glitches on them. For all such devices, Microsoft has brought the “Windows 11 Installation Assistant” tool. With the help of this tool, one can easily upgrade his/her computer to Windows 11 from Windows 10 OS.
Though it sounds good, there are users who are still failing to install Windows 11 on their PCs and are getting an error code that says – “Something went wrong”, Error code 0x8007007f. If you are one such user, this guide is intended for you. Let’s explore what causes this issue, and how to fix it in detail –

Why does Windows 11 Update fail on an error code 0x8007007f?
The error code 0x8007007f typically occurs when you try to install Windows 11 via Windows 11 Installation Assistant. When it appears, you won’t be able to upgrade your Windows operating system. Some users have even reported that their update starts normally, however, gets stuck around 70% and never finishes.
What causes Error code 0x8007007f?
This error may occur because of one or more of the following reasons –
- Disabled User Account Control
- Outdated graphics card
- Insufficient disk space
- Disabled Secure Boot
- Corrupted system files
- Presence of third-party antivirus
How to Fix Update Error Code 0x8007007f in Windows
These are the things that you may perform in order to fix error code 0x8007007f in Windows 11 –
1. Reboot Your PC
Many a time, errors like this occur simply because the system is not able to read a few important files. This may also appear when those files get corrupted somehow. A simple restart of the PC might repair the damaged files or regenerate the missing ones. All you require is to keep pressing Alt + F4 till you get the below snapshot.

- Using the drop-down menu, select Restart, and hit OK.
- When Windows 11 reloads, check if this solves the issue that you were struggling with.
In case it doesn’t try the next set of solutions discussed below.
2. Enable User Account Control
If you are using Windows Update Assistant to download/install the new OS, it is possible that the existing operating system is blocking it from accessing the system directory. As a result, the update error code is appearing. Though you can always run Windows 11 Installation Assistant as an admin, you would never be sure if UAC is set to “never notify”.
In such scenarios, users can certainly get rid of this error code 0x8007007f by enabling User Account Control on their devices. The UAC is basically a prompt that seeks administrative consent to perform a task in the Windows operating system. If you have disabled it sometime back, make sure to re-enable the same. To do so, use these steps –
- Launch Control Panel first.
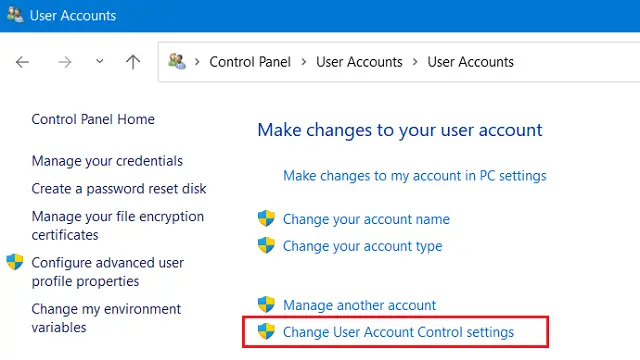
- Click User Accounts > User Accounts.
- On the right pane, you will find a link to “Change User Account Control settings”. Well, click on it.

- When the UAC settings window launches, drag the slider to the top i.e. “Always notify”.

- Click OK next to confirm these changes.
- The UAC will prompt immediately afterward, hit Yes to acknowledge this setting.
3. Enable Secure Boot
To install Windows 11 updates, it is mandatory to enable Secure boot on devices build on TPM 2.0. In case, your device doesn’t have TPM 2.0 or the secure boot disabled, you can’t install any updates to Windows 11.
Here’s how you can check both of these minimum system requirements –
- TPM 2.0: Press WinKey + R to launch the Run dialog. Type “
tpm.msc” here and press Enter. When the Trusted Module Management window opens up, see what’s written beside its status section. This should display “TPM is ready to use”. If not, you need to boot into your BIOS and enable it from there. - Secure Boot: You can check its status by opening the System Information window. Press Win + S, type “system information”, and click on the top result. On the subsequent screen, scroll down to Secure boot state and see if it displays an “On” or “Off” state. In case it is disabled, enter your device’s BIOS, and enable it from there under the Security tab.
4. Disable or Uninstall Third-party Antivirus
Gone are the days, when you install a third-party app every time you clean install Windows into your PC. There is no need for that now. An external program often interacts with core system files and makes them corrupt, thus causing different update-related issues. Such a program does everything except the work they are supposed to do. So, there’s no point in using a free anti-malware application as this will only rearrange system files by clearing RAM.
So, if you want to solve error code 0x8007007f, uninstalling or at least disabling third-party antivirus should be your top priority. Windows Security is a good alternative in such cases on Windows 11/10. To be on the safer side, you may go for premium antivirus software.
After you uninstall the third-party antivirus program, make sure to restart your PC. When Windows 11 reloads, check if this fixes the issue that you are getting while updating Windows.
5. Run SFC/DISM
If the error 0x8007007f still exists and is preventing you from updating Windows 11, this might be due to the presence of some corrupted or missing files. In order to fix system file corruption, you may take the help of an in-built tool i.e. SFC. Here’s how you can run this utility program –
- Launch the Command prompt as an administrator.
- When the Windows Console comes into view, type “
sfc /scannow“, and press Enter.

- Let this tool find and fix any damaged files on your computer.
- After the scanning/repairing process reaches 100%, close CMD, and restart your PC.
If the problem persists even after this, repair any issues on Windows 11 Image as well. To repair Windows 11 OS image, do the following –
- Right-click on the Windows icon and select Windows Terminal (Admin).
- The terminal will take you to the PowerShell by default. Type the following and hit Enter –
DISM /Online /Cleanup-Image /RestoreHealth

- Wait for this scan to complete 110%. Once over, restart your PC, and check if this resolves the error 0x8007007f.
6. Free up Storage space using Disk Cleanup Tool
To perform an update successfully in Windows, there should be sufficient disk space on your PC. If there isn’t adequate storage space, this may result in Windows 11 failing on error code 0x8007007f. This bug appears only when you are using Windows Assistant to download/install the new operating system on your computer.
Normally, it is recommended to have at least 100 GB of free disk space, so that Windows 11 installs with no bugs or errors. To clear unnecessarily accumulated storage spaces in Windows, you may take the help of the tool – Disk Cleanup.
Note: In case your device already has more than 100 GB + disk space, this solution is not for you, so skip this one.
7. Update Graphics cards
The presence of outdated or obsolete device drivers especially graphics cards may obstruct Windows 11 from updating or installing normally. If you hadn’t updated any of your device drivers, go and open Device Manager. When this opens up, check if any driver displays a yellow exclamation mark next to it. In case it is, that particular driver must be the faulty or problematic one.
Right-click over it, and select the update drive option. Click “Search automatically for drivers” > Search for updated drivers on Windows update. The device manager will redirect you to the Windows update. Click Check for updates next and wait for the system to find any pending updates for your computer. In case it does find any update, the same will automatically be installed on your PC. Restart your PC and check if this resolves the issue that you were dealing with.

8. Clean Install Windows 11 using a bootable ISO file
If none of the above solutions work to resolve error code 0x8007007f on your device, it’s better to download an ISO image of the new OS, make it bootable, and install it on your PC.
While performing a fresh installation, make sure to do the following –
- Get the latest Media Creation Tool by Microsoft.
- Download the ISO image instead of making the USB drive bootable right from the start.
I hope this guide was easy to follow and you were able to update your Windows 11 PC now. In case you have any queries or suggestions, let us know in the comment section.


