Did you face an install error 0x800b010a while installing or upgrading to the latest patch updates on Windows 11? If yes, then follow this article till the end. In this post, we have discussed the reasons why it occurs and seven workarounds that should help you fix this error code on a Windows PC.
This installation error often occurs displaying an error message that reads the following –
Windows Update Standalone Installer
Installer encountered an error 0x800b010a.
A certificate chain could not be built to a trusted root authority.
What causes an error 0x800b010a in Windows?
As you can see in the error message itself, this error occurs when some root certificate updates are missing on your PC. If that’s indeed the case, you must manage or add new trust certificates on your computer. Here’s a complete guideline on how to do that.
In case all your root certificates are genuine and trusted, this update error must be occurring due to one or more of these reasons –
- Internal Glitches: Run Windows Update Troubleshooter, and you may resolve this install error 0x800b010a in no time.
- Disabled Update Services: Windows Update functions properly only when all required services are enabled and running in the background.
- Incorrect Date & Time: Having an incorrect date and time on your PC prevents your system from upgrading to the next available OS Build version. Correct Date and Time settings and you will be able to overcome this issue.
- Corruption within the Cache folders: If you haven’t cleared the cache folders in Windows, make sure to purge them first. You will be able to install or upgrade to new updates shortly afterward.
If none of these workarounds help to fix this error 0x800b010a, you may proceed with these solutions –
- Boot into Safe Mode and Update Windows
- Manually download and Install Pending Patch Updates
- Or, Upgrade to Windows 11 23H2 via the Media Creation Tool
1. Troubleshoot Windows Update
When you are getting an error code 0x800b010a while upgrading to the latest OS Build version of Windows, you must troubleshoot Windows Update. This tool
Here’s how to do it –
- Press Windows + I to launch Settings.
- Go to System > Troubleshoot > Other troubleshooters next, and locate Windows Update.
- Locate and click on the Run button available next to Windows Update.

Wait for the troubleshooter to launch and when it opens, click Next. You may now follow the on-screen instructions to complete the troubleshooting task. After this is over, you may close its window and restart your PC. From the next login, check if you can update Windows normally.
2. Restart All Windows Update-Related Services
An update error 0x800b010a mostly occurs when any one of the Windows Update Services is disabled on your computer. As we all know, Windows Update Services are essential for an update to function correctly, you must check all update services and re-enable the disabled one.
Here’s how to perform this task –
- Press Windows + X, and select Run.
- Type services.msc on it, and hit OK.
- When the Services window launches, scroll down and locate the following services.
Background Intelligent and Transfer Service
Cryptographic Services
Windows Update
- Right-click on each service, and select Start/Restart depending on whether a service is disabled or already running in the background.

- After you enable all these services, restart your PC and check if you can update Windows normally afterward.
3. Check Date & Time
Sometimes, an update error may also occur due to an incorrect Date and time on your computer. An incorrect date and time settings on Windows force your system not to connect with Microsoft servers thus resulting in an update error 0x800b010a.
Correct both the Date and Time settings on your computer, and you will be able to update your Windows PC without encountering the error code 0x800b010a again. Here’s how to do it –
- Press Windows + I to launch Settings.
- Select Time & language from the left navigation, and select Date & time from the right pane.
- Enable the toggle switches next to Set time zone automatically, and Set time automatically.
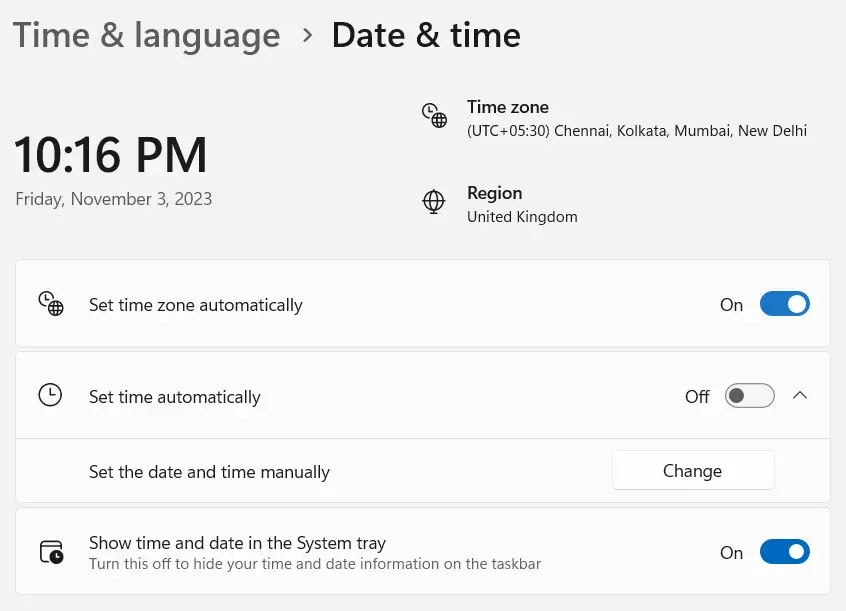
Note: In case the Set time automatically toggle switch doesn’t work, you may click on the Change button underneath it and manually set the time matching the region where you reside.
- Next, scroll down to Additional Settings, and hit Sync now.

Note: When you are correcting the Date and Time settings, make sure to press the Sync button as well.
4. Purge SoftwareDistribution & Catroot2 folders
SoftwareDistribution and Catroot2 are two cache folders in Windows that contain all the relevant information about past updates. Over a period of time, these folders might become corrupt and thus result in an update error code 0x800b010a.
Purge both these folders and check if you can update Windows normally from the next login. Do note that you have to disable all update-related services while clearing these two folders. After you have successfully purged both these folders, make sure to re-enable all those services.
Note: Learn how to Reset Windows Update Components to fix update errors
5. Boot into Safe Mode and Update Windows
Third-party apps and services often interact with the system files and make them corrupt. If you do know of some apps (recently installed) on your computer, make sure to uninstall them first.
Next, boot into Safe Mode on your Windows 11 PC, and check if you can update your Windows normally while being in this mode. The Safe Boot disables all third-party apps and services and thus it would be easy to upgrade while in this mode on your computer.
6. Manually download and Install Pending Patch Updates
Microsoft releases the standalone package of each and every update at its official Update Catalog site. If you do know which enablement package is failing to install on your computer, use its KB number to search here.
When you press the Enter key, you will see a number of matching updates popping up on the screen. Pick the update that best matches your system architecture, and hit the Download button. This site redirects you to a new page, from where you may download the setup file (in .msu file format).
Wait for this download to complete and when this is completed, you may double-click on the downloaded file to begin upgrading to the chosen OS Build version.
Here’s a complete guide on how to manually download and install pending updates on Windows 11.
7. Upgrade to Windows 11 23H2 via the Media Creation Tool
If none of the above solutions help you resolve an update error code 0x800b010a in Windows, this error must be beyond repair. In such cases, what you may do is download the latest Media Creation Tool, and download Windows 11 version 23H2 using that.
After you download this tool, double-click on its setup file to begin its installation. Double-click on its icon to launch the Media Creation Tool and follow the on-screen instructions to create an ISO image of Windows 11 Multi-edition Disk Image.
Alternatively, you may also use this tool to make the Windows Operating system bootable and then use it to clean install Windows on your computer.
How do I fix Update Error 800b0100 in Windows?
The error code 800b0100 occurs when your system misses some important files or folders from the root drive. When it happens, Windows can’t verify the authenticity and integrity of the update package and thus invokes an error code 0x800b0100 while updating Windows.
If you are using some third-party apps, boot into Safe Mode on your PC so that their interferences are restricted. Go to Settings > Windows Update, and you may now upgrade to the latest version on your Windows 11 PC.


