Microsoft releases cumulative updates every second Tuesday of the month so as to ensure the smooth functioning of Windows 10 OS. However, while doing so, several users encounter different installation errors. Today, in this post, we will discuss one such error 0xC1900101 – 0x20017, the underlying causes, and six solutions. As per the user’s view, installation completes and reaches the 100% mark but fails at the time of Rebooting Windows.

What in general causes this installation error on Windows PC?
The presence of external devices like Printers, Network/ WiFi interface cards, and Bluetooth adapters may cause this error. Remove all peripheral devices and restart your PC. If this error is still appearing, this must be due to erroneous settings under BIOS or the device drivers have been corrupted.
Re-configure BIOS setup and update all drivers on your computer via Device Manager or Windows Update. Deleting certain entries inside the Registry might also help to overcome this installation error.
Windows Update fails with error code 0xC1900101-0x20017
The most effective way to resolve such errors is by manually installing the update that is failing on your computer. You may find all recent updates uploaded to Microsoft Update Catalog. For this, you need to have the cumulative update number starting with “KB”. This number is associated with the failing update and you may find the same in Windows 10 Update history.
- Here’s a stepwise guide on how to manually download and install pending updates on Windows 10.
Ways to Solve Installation Error 0xC1900101 – 0x20017
To resolve the installation error 0xC1900101 – 0x20017 on Windows 10, follow these workarounds –
Create a Restore Point
Since this is an installation failed error, performing the below methods incorrectly may corrupt the BIOS. This is why we suggest you create a System Restore Point to save the system files. The same may work as a repairing tool if anything goes wrong. Here are the steps to follow –
- Press Win and S together to open the Search.
- Type Create a Restore Point in the text area then hit the Enter key.
- Switch to the System Protection tab and select Create.
- Henceforth, type the description in the text box and thereafter hit the Create option again.

- Wait till this creates the image file of the System files and folders then Close all running windows.
- Now try the below fixes to resolve the installation error 0XC190010 – 0x20017.
1] Remove the Peripheral devices
Sometimes attached additional devices like Printer, Wireless or Network adapter, USB printer, SSD, and USB disk may prevent Windows 10 from being updated. If that’s the case, you should remove external devices and then try reinstalling the operating system again.
Disconnecting the Wireless adapter is rather a simple task. To do this, shut down the system and unplug all the cables from its USB port carefully then remove the Wireless adapter. If the system is under warranty, you may take help from the official service center.
Note: If doing this does solve the issue, replace the existing wireless adapter with a new one.
2] Uninstall the conflicting device driver
The incompatible Bluetooth and Wireless device driver may also result in installation error 0xC1900101 – 0x20017 on your Windows 10 PC. Hence, uninstalling them before updating the Windows OS works as the diagnostic tool. Here’s how to proceed –
- Right-click on Start and select the Device Manager option.
- From the list, locate the installed Bluetooth driver.
- Next, right-click on it and select Uninstall device.

- If any confirmation dialog appears, hit Uninstall again.
- Repeat the same process for all the drivers under the Network Adapters section.
- Once over, Restart the PC to save the changes performed so far.
3] Update Windows 10
The outdated BIOS may also evolve the installation Error 0xC1900101 – 0x20017. To overcome this problem, update your operating system to the latest released version of Windows 10 following these steps –
- First of all, visit the Microsoft official page and tap over the Update now button.

- Once downloaded, double-click the setup file to begin the installation.
- Henceforth, select Upgrade this PC now.
- Afterward, hit Next at the bottom of the page.

- Now select Download and install updates (recommended) thereafter Next again.
- On the succeeding wizard, tap Accept to agree to the license terms and conditions.

- Mark the Keep personal files and apps option and press the Next button.
- Succeeding that follows the on-screen instructions to complete the installation process.
4] Disable Wireless and Bluetooth adapter
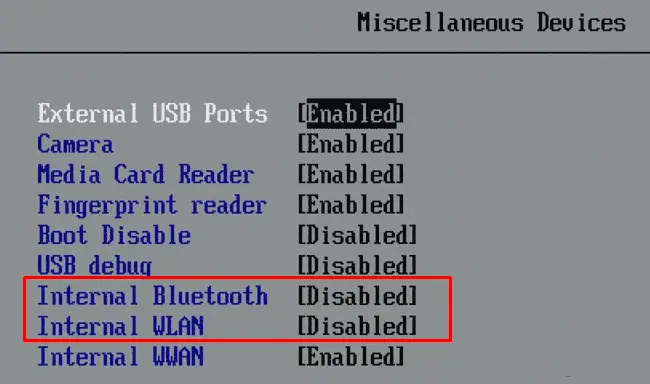
If the above solutions didn’t resolve the error code 0xC1900101 – 0x20017, disable the wireless and Bluetooth settings under BIOS. Here are the steps to follow –
- Restart the running computer.
- When the BIOS is loading, press F2, F4, Del, F10, or Esc to enter the boot mode.
- Under the Advanced tab, navigate to the Wireless option.
- Here you will get two consecutive options i.e. Internal Bluetooth and Internal WLAN.
- Go to each section separately and press Enter to select the Disabled option.

- Press Esc to return to the main screen.
- Next, select the Save button to confirm the recent changes.
5] Change the BIOS settings
Sometimes the Installation Error 0xC1900101 – 0x20017 may also occur appear due to erroneous settings inside the BIOS. To fix this, one needs to re-configure the hardware by enabling the setup changes such as AHCI to IDE mode. Once performed, re-install the Windows and check if the problem has been addressed this way.
6] Modify the registry settings
If none of the above solutions work, try modifying certain key values under the registry to fix the installation error 0xC1900101 – 0x20017. Here’s how to proceed –
- Press Window and R hotkey.
- Type
regeditin the Run command and press Enter. - If the User Account Control window appears, tap Yes.
- Next, copy/paste the following path into the address bar of the succeeding screen and hit Enter.
HKEY_LOCAL_MACHINE\SOFTWARE\Microsoft\WindowsSelfHost\Applicability

- Here, change the following key values to –
Ring = WIF
RingBackup = WIS or Enabled
EnablePreviewBuilds = 2
BranchName = TH1
UserPreferredBranchName = TH1
- When the above process completes, close the Registry editor.
- Lastly, do the Restart to save the recent changes.
Note: The modification under the registry might be dangerous for the system. Hence, it is recommended to export the registry before making any changes.
- To do this, go to the File Menu and select the Export option.
- Here, select All as the Export range then put the desired file name.
- Next, navigate to the specific location and click the Save button.
This will create a registry backup so that it becomes easy to restore the existing OS just in case something went wrong.


