Realtek High Definition Audio Issue is a common issue that several Windows 10 users face now and then. This trouble arises primarily when you are playing Audio on your System. In general, the no sound bug appears due to a corrupt or incompatible device driver.
Hence, the first thing you need to do is to update any obsolete/ outdated drivers that exist inside your System. A yellow exclamation mark next to any driver indicates that it has become corrupt. Here, in this article, we will discuss some easy tips to solve this issue on Windows 10. They are- update sound drivers, run troubleshooter, and modify speaker properties. Let’s explore them in detail-
Note: If you experience a similar issue on your HP computer, read this article to solve the problem.

Realtek High Definition Audio Issue- Solutions
Here, we explain three different ways to encounter this Realtek High Definition Audio Issue on Windows 10 PC. They are-
1. Update obsolete Sound driver
Most of the time, a malfunctioning Audio driver is the root cause behind Realtek’s High Definition Audio Issue. Hence, before proceeding any further, you should first check the running status of the installed Audio driver. Here are the steps-
- Press Win & R altogether, to invoke Run dialog.
- In the void box, type
devmgmt.mscthen hit Enter to open Device Manager. - On the next window, expand the Sound, video, and game controllers driver.
Note: If you see any yellow exclamation mark next to the device driver, it indicates the problem lies in that particular section. Therefore, you should update the same.

If you follow the above steps and found a yellow warning message along with the Realtek High Definition Audio driver, you should update this too.
- Make a right-click on it and select Update Driver on the context menu.
- Succeeding after, select Search automatically for updated driver software followed by Next.

- Now go through onscreen instructions to complete the whole process.
Once finished, Reboot your system so that changes made so far come into effect. After the restart, try playing audio on your device and see whether it works or not. We hope it does, however in case it doesn’t, move forward to the next fix.
2. Use the Windows Troubleshooter Tool
Windows Troubleshooter is yet another in-built diagnostic tool that can solve many hitches on your system. In case, you don’t know how to proceed, here are the steps-
- At first, open Control Panel then click Troubleshooting on the current window.
Note: Select large icons in view by category using the top-right drop-down menu.
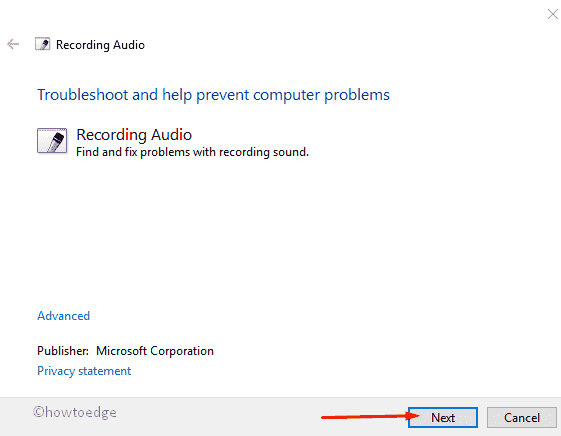
- Again under Hardware and sound item, select Troubleshoot audio recording.
- If a new window pops up, click Next to start this process.

This will detect the problem in sound automatically and repair the same if possible. In case, the issue still persists, changing speaker properties might solve this bug.
3. Change in Speakers Properties
If you continue struggling with no sound issue even after updating the driver, you should configure the Audio services. You can adjust settings inside the properties section by following these steps –
- Press Win logo & S shortcut keys together to launch Cortana, type Sound followed by the Enter key.
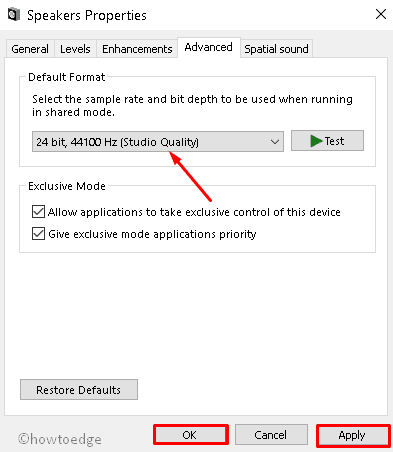
- Under the Playback tab, click Speakers (connected at present), and then the properties button.
- On the succeeding window, tap the Advanced tab and select a bit rate 24bit/44100 Hz or 24bit/192000Hz (as per your speaker’s configuration) using the drop-down menu.
- At last, hit Apply next OK to confirm the changes.

After the task is over, Reboot your system, this will make the necessary changes.
Note: While trying the above fixes, make sure that you don’t mute the High Definition Audio device accidentally on your Windows 10 machine.
Wrapping…
I hope, this article helps you to fix the Realtek Audio High Definition issue on Windows 10 while playing audio. If you have any queries related to this post, do ask us in the below comment section.


