Everyone loves the new and improved Start Menu that has been part of Windows since the launch of Windows 10. But what happens when this feature suddenly stops working after a Windows Update? If you’re experiencing the same problem with your Start Menu or Search not working or performing slowly after a recent update, follow along and we’ll get you running again!
Start Menu Search not working on Windows 10 after installing Updates

It can be an extremely frustrating experience, as you are unable to access any of your applications or search for files. Fortunately, there are some simple fixes that can help get your Start Menu and Search back up and running again. This article will explain how to troubleshoot this issue and provide step-by-step instructions on how to fix it.
1] Run Windows Troubleshooter
Windows Troubleshooter is the perfect solution to solve the Start menu and Search not working on your Windows Machine. This is an in-built feature of Windows 10 that automatically detects and repairs the problem. Follow these guidelines to complete this process –
- Type Control Panel in the Search box and hit the Enter key.
- Scroll down to the Troubleshooting option.
- Next, hit System and Security thereafter Search and Indexing on the succeeding screen.

- On the Troubleshooter window, click Next to go to the bottom of the page.
- Now activate Files don’t appear in search results checkbox then Next to let scan and repair the faults.
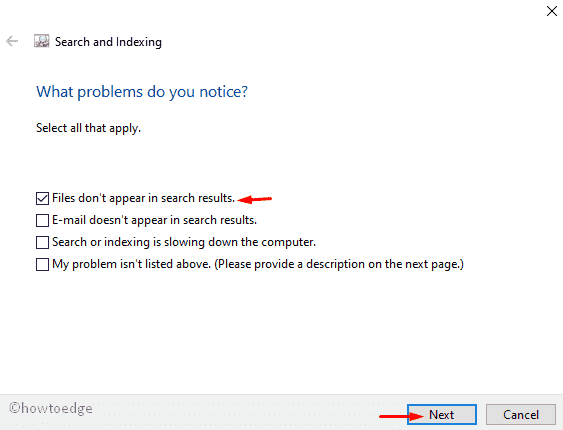
- After going through these steps, Restart your PC and the Start Menu may start functioning as usual.
2] Run the SFC command
SFC is one of the simplest workarounds to rectify the issue under System Files. Performing this is quite easy, just execute a single code on the Command Prompt.
Step 1: Click on the Search and type Command Prompt.
Step 2: Right-click on the well-suited result and choose Run as administrator.
Step 3: If the User Account Control window appears, press Yes to sanction the access.
Step-4: On the elevated dark prompt, type the following code and hit the Enter key at the end.
sfc /scannow
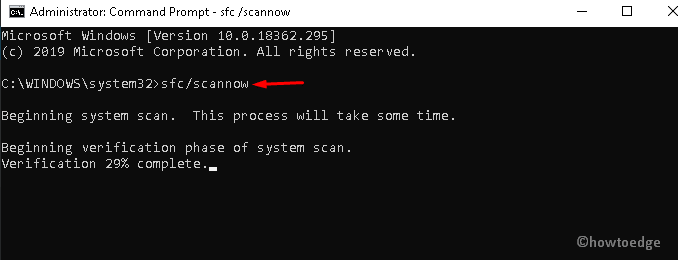
Step-5: This process will take a few minutes to complete, so wait accordingly.
Step-6: Once the above task is over, Reboot your PC and check if the Start menu and Search not working issue is rectified or not.
3] Perform the DISM command
Alternatively, you may try the DISM command to repair the corrupt system files on your Windows 10 PC. Here are the steps to perform-
- Press Win & Q altogether to open the Search box.
- Type cmd in the void area and right-click on the Command Prompt option. Select the “Run as administrator” option on the context menu.
- You will receive the UAC window, press Yes to give permission.
- Now, type the following code on the dark surface and hit the Enter key-
DISM.exe /Online /Cleanup-image /Restorehealth
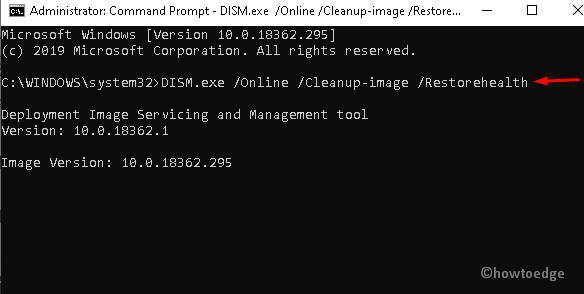
- Wait till the task completes, Reboot your PC to save the changes made so far.
4] Uninstall Third-Party antivirus application
If your system is having any third-party anti-malware program, do uninstall the same. Windows Defender quite works the same and is a Windows app. Hence, rather than using an exterior antivirus program, you should switch to an in-built app. To uninstall any app, follow these easy steps-
- Perform a right-click on Start and choose the Settings option on the Power Menu.
- Subsequently, select App next to the Apps & Features section on the left pane.
- Switch to the right-hand side and hit the specific antivirus application on your PC.
- Now, click the Uninstall option and then Uninstall again to confirm this action.
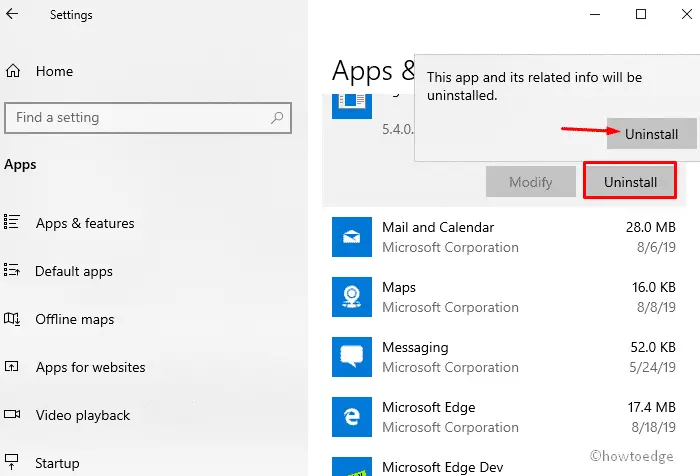
- Once this software gets completely removed, Reboot your PC and see if it does solve this issue.
Note: If you are using a paid version, you should first disable the same and see whether it corrects the issue. If not, you may switch back to the paid antivirus program.
5] Enable Windows Defender Firewall
Sometimes disabled Windows Defender Firewall may prevent the Start Menu and Search from working properly after installing the LCU. To avoid this issue, you need to set this feature enabled by following these steps-
- Right-click on the Start button and select Run using the Power menu.
- Type Control Panel in the text box and hit OK to let this desktop app begin.
- Select Windows Defender Firewall from the list then Turn Windows Defender Firewall On or Off on the left pane.
- Under Customize Settings page, select the Turn On Windows Defender Firewall radio button in both Private and public networks.

- At last, click OK and Restart your computer. After re-login, you will see the Start button and Search working smoothly.
6] Restart Windows Explorer and Cortana
Windows Explorer manages all the files and helps in the smooth running of the Start Menu. If this desktop app fails, may cause the Start menu and Search not working issue to pop up on your Windows 10 device. Restarting Windows Explorer may fix this issue. Here’s how to move ahead-
Step 1: Jointly press Ctrl + Shift + Esc hotkey to jump into the Task Manager window.
Step 2: Here, select the More details option at the bottom of the page to explore all files.
Step 3: Scroll down until you locate the Windows Explorer option.
Step-4: Once found, right-click on the same and select Restart from the context menu.
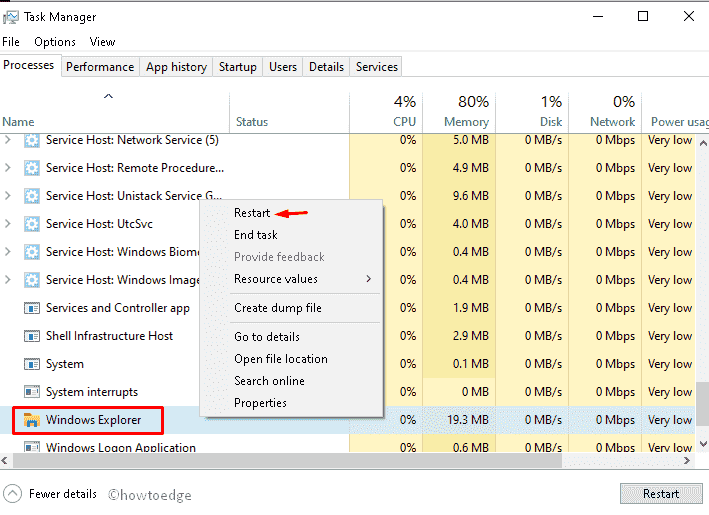
Step 5: Repeat the above steps to locate and Restart Cortana from the list.
Step 6: Wait for a couple of moments, the Start and Search will start working as usual.
7] Create A New User Account
If the Start Menu and Search not working bugs are still available, signing in with a new account may resolve the underlying cause. Hence, create a new user account and sign in to your system using this. Here are the essential steps-
- Press the Win logo and R together to open the Run dialog.
- Type cmd near the cursor thereafter hold down the Ctrl+Shift keys and press the Enter key to launch the console as an Admin.
- If the UAC prompts, tap Yes to give permission.
- Now, execute the following code to create a new user account-
net user Username password / add
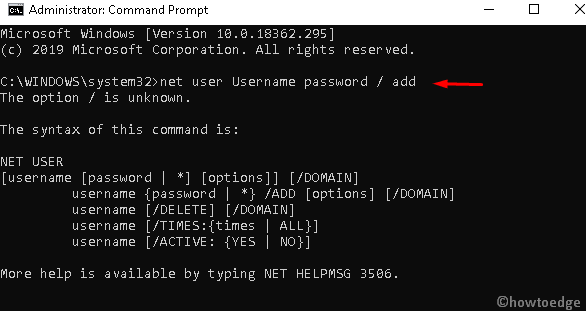
Note: This will create a new account with the name “Username”. You may edit this name and set the password as per your choice.
- Next, log out of the current account and re-login using the newly created account.
- Hope, this time Start Menu and Search not working issue gets rectified.
8] Clear page file
The Page file separately allocates a certain amount of data from the hard drive and uses it as RAM. Usually, this feature finds useful while bouncing Random-access Memory on your PC. When Start Menu and Search are not working, you should rebuild the Swap file using the following guidelines-
- Go to File Explorer and right-click on This PC on the left page.
- Select Properties using the context menu to let open the System window.
- Henceforth, click the Advanced System Settings option on the left panel.
- Next, on the System Properties page, click Settings under the Performance section.
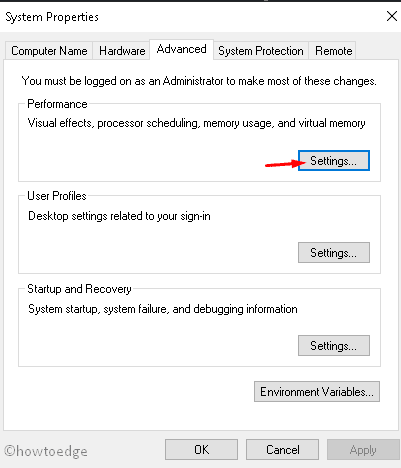
- Tap the Advanced tab, then press the Change button under the Virtual Memory section.
- On the succeeding page, check the no paging file radio button then OK to confirm the changes.

Rebooting your PC will clear the page file and fix the Start Menu not working issue.
9] Re-register Cortana
If the above fixes don’t solve this issue, try re-registering Cortana. Here’s how to restart Cortana settings-
- Launch the File Explorer. You may use the Win+E keys combination to do this.
- Navigate to the following address-
C:Windows\System32\WindowsPowerShell\v1.0
- Move to the bottom, right-click on powershell.exe and choose Run as administrator.
- On the UAC prompt, tap the Yes option to authenticate the access.
- Thereafter, copy/paste the following command line and hit the Enter key at the end-
Get-AppXPackage -AllUsers | Foreach {Add-AppxPackage -DisableDevelopmentMode -Register "$($_.InstallLocation)\AppXManifest.xml"}
- After finishing the above task, Restart your computer. Start Menu and Search should start working.
10] Check Windows Search Service
Sometimes, Windows Search Services may stop thus leading to the Start menu and Search not working issue on your Windows 10 PC. To fix this bug, you need to check this service and restart the same if found not running-
- Right-click on the Windows icon and choose the Run option.
- Next, type services.msc near the winking cursor and press the OK button.
- On the new window, search and locate Windows Search Services.
- Once found, right-click on it and choose the Properties option.
- Now check its status, if this says “Running” skip it, otherwise click on the Start button.
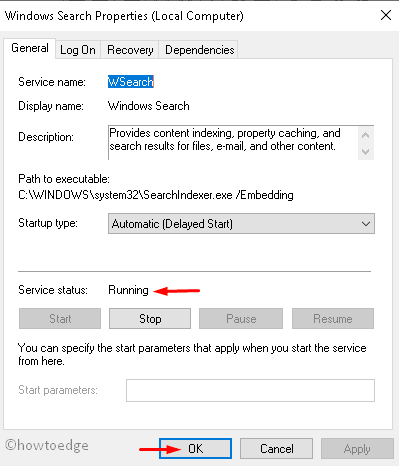
- Lastly, press the OK button to confirm the changes and Reboot your PC.
I hope, the above article proves helpful to resolve the Start Menu and Search not working issue on your Windows 10 PC.
Fix: Start Menu and Search not working after Windows Updates
