System Restore is no doubt one of the most reliable and essential programs on Windows 11 or 10 PC. Whenever some unusual bug starts occurring on our computer, we heavily depend on such backups. This even helps in reverting back the OS to an earlier state when everything was running pretty normal.
But what if the System Restore starts causing trouble and doesn’t work when we need it the most? Recently, we came across one such error, wherein, System Restore failed to extract the backup file on an error code 0x80071160.

What causes System Restore to fail on Error 0x80071160?
This issue typically occurs on Windows PC when a few permissions get denied somehow to use the available backup. Here, in this post, we have discussed four ways applying which you may get rid of this persisting error.
If you are getting the same error code while updating Windows, read and apply the solutions discussed in this guide.
Fix – System Restore failed on Error 0x80071160
To solve the system restore error 0x80071160 in Windows 11/10, try the following suggestions –
1] Access System Restore Points via WinRE
When you can’t use the restore points normally, try entering the Windows Recovery Environment. Plugin the Windows Installation (bootable) disc/USB to its respective port and follow the below guideline –
- First of all, reach out to the below location –
Settings > Update & Security > Recovery
- Jump to the right side and click “Restart now” under the Advanced startup section.
- When Windows 10 reboots into the Recovery mode, go to the below path –
Advanced Options > Troubleshoot > Advanced Options
- Click System Restore and see whether you can now access the previously-created backup files or not.

If the error persists even after this, click Startup Repair to start the repairing process.
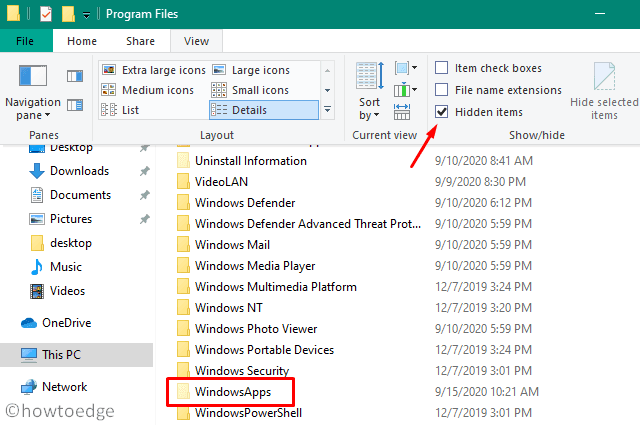
2] Rename WindowsApps Folder
If you are still getting the 0x80071160 error while using the available Restore Points, try to rename the Windows Apps folder. You may locate this folder by visiting C:\Program Files.
By default, the WindowsApps folder remains hidden. So, you need to first unhide this folder. To do so, open File Explorer (Win + E), click View Tab then mark the checkbox left of “Hidden items“. See the Snapshot below –

Once found, make a right-click on this folder and rename it to something – WndowsApps.old. Do Restart your PC to incorporate the above changes.
In case, you didn’t find this folder, boot Windows 10 into the Safe Mode, and follow these easy steps –
- Once you enter the Safe boot, hit the Windows icon and type cmd in the search bar.
- Right-click on the top result i.e. Command Prompt and select Run as Administrator.
- On the elevated console, run the below codes one after another –
Note: If you have installed Windows on some other disk drive, replace “C:” with the exact driver letter.
cd C:\Program Files
takeown /f WindowsApps /r /d Y
icacls WindowsApps /grant “%USERDOMAIN%\%USERNAME%”:(F) /t
attrib WindowsApps -h
rename WindowsApps WindowsApps.old
- After successfully executing the above codes, reboot your PC.
Note: In case, you were not able to boot into the Safe Mode normally, use these advanced steps –
- Browse to
Settings > Update and Security > Recovery. - Scroll down to Advanced Options on the right side and click Restart Now.
- When Windows reloads, navigate to the below path –
Troubleshoot > Advanced Options > Command Prompt

- The system may prompt you to sign in to your Microsoft account, do the same.
- Next, run these codes one by one followed by the Enter key –
cd C:\Program Files
attrib WindowsApps -h
rename WindowsApps WindowsAppsOld
You should now be able to use Restore Points without getting into 0x80071160 trouble.
3] Use System File Checker Utility
If the above methods fail to address the 0x80071160 error, we recommend performing the SFC scan on the computer. Running this utility program will fix any corruption associated with the system files.
Here’s how to proceed –
- First of all, open the Run dialog using WinKey + I.
- Type “
cmd” in the text field and press Ctrl+Shift+Enter keys together. - Doing so will start Command Prompt with Admin privileges.
- Now, type
sfc/scannowand press Enter.

- Wait for a while as this might take 15-20 minutes depending upon the level of system corruption.
- Once the scanning/repairing process reaches 100%, close Command Prompt, and Reboot Windows.
Sign back into Windows and check whether you can now restore your PC successfully or not.
4] Repair Windows System Image using DISM
Similar to that of the SFC scan, you may run the DISM codes to resolve any corruption inside the Windows Image. All you require is to run the below set of codes on an elevated command prompt. Just make sure to launch Command Prompt having Administrator rights.
Here is the set of commands that need execution –
DISM.exe /Online /Cleanup-image /Scanhealth
DISM.exe /Online /Cleanup-image /Restorehealth
DISM.exe /online /cleanup-image /startcomponentcleanup

- After the operation is completed successfully, Restart Windows.
If you can’t stand losing your personal data, files, or folders; make sure to create a local backup as well. You may use such backup in situations like this. To know more, visit Microsoft Errors Forum.


