Today, in this article, we will discuss how to fix turn ON Windows 10 PC by itself. This issue, in general, pops up when you have recently upgraded your Windows 10 OS. There are numerous things that can generate this issue on your System. If you have recently upgraded your Windows OS, the chances of facing this error are pretty high. Windows 10 PC will start automatically, even if there was no one nearby you.
Again, this issue has a strange pattern and that is your computer won’t stay turned off for a large time say a few hours even without user intervention. This guide will basically discuss 10 different ways to fix Turn On Windows 10 PC by itself trouble. Each solution is described in detail and will bring you closer to solve this issue, just follow the chronological order. Let’s move to explore this bug and its solution.
- Disable Fast Startup
- Change Settings under Startup and Recovery
- Disable Wake Timers
- Troubleshoot the Problem
- Wake up your Wi-Fi Adapter
- Run Power troubleshooter
- Reset Power Plans to Default
- Disable System Maintenance to wake up the computer
- Disable Reboot Scheduled Task
- Windows Update Power Management
How to fix turn ON Windows 10 PC by itself-
Here is the complete walk-through on how to fix turn ON Windows 10 PC by itself issue-
Note: Before proceeding, make sure to create a System Restore point to get back your previous settings if anything goes wrong.
1. Disable Fast Startup
Step-1: At first, click on the Cortana and type CP in the text box. Here hit on the Control Panel icon from the list.
Step-2: On the right top corner, tap View by drop-down menu and select small icons option followed by Power Options.
Step-3: Again from the left column, select Choose what the power buttons do link henceforth Change settings that are currently unavailable.

Step-4: At last, tick against Turn on fast startup checkbox then tap Save changes.
2. Change Settings under Startup and Recovery
- Jointly press Win logo & R to lunch Run box, type
sysdm.cplat void on the pop-up menu then hit Enter. - Again switch to the Advanced tab under the System Properties window.
- Now move to the Startup and Recovery section and choose Settings.
- There forth unmark the Automatically restart check box, click OK to close the current page.
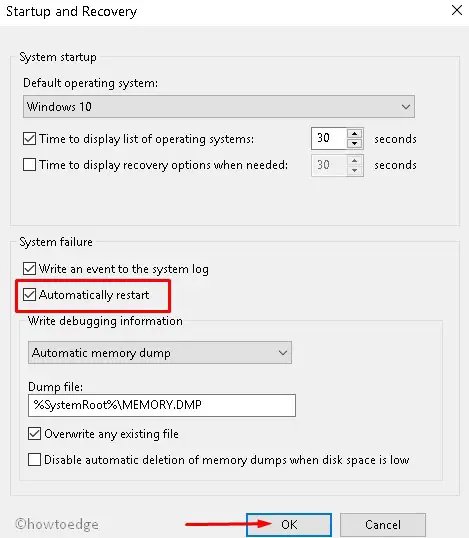
- Go ahead and hit Apply then OK to save changes.
- Finally, Restart your system, and check if the issue gets fixed or not. If not, follow the next workaround.
3. Disable Wake Timers
- Make a right-click on the Start Button and Select Run option.
- Type
powercfg.cplin the blank box then hit Enter key to launch Power Options. - Again expand Show Additional plan and select Change plan Settings under High-performance section.
- Here tap Change advanced power settings thereafter locate and expand the Sleep option.
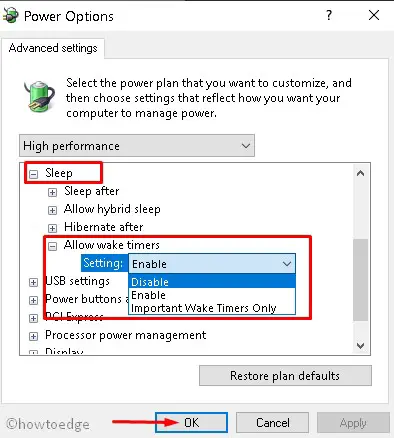
- Now click on Settings and Disable the same, henceforth hit Apply and OK to save changes.
- At last, Reboot your system so that changes made so far come into effect.
- If the above method doesn’t help you in fixing the issue turn on Windows 10 PC, then try the next solutions.
4. Troubleshoot the Problem
- At first click on the search icon and type Command Prompt.
- Once the best-matched result appears, right-click on it & choose Run as administrator.
- If the UAC prompt appears up, hit Yes to permit the access.
- On elevated command prompt run below code one after another followed by the Enter key to execute the command-
powercfg –lastwake
- This command identifies the device which has lastly woke your system.
powercfg –devicequery wake_armed
- This command finds all those devices which are proficient enough to wake up the system.
- Now from the list, recognize the faulty device then run the Below code to disable the corrupted device.
powercfg -devicedisablewake “device name”
- Here device name shows the specific one which occurs in the list of faults.
- Finally, Reboot your system to let the changes made so far come into effect.
- Hope this time you have successfully fix the “Turn ON Windows 10 PC” by itself error.
5. Wake up your Wi-Fi Adapter
- Right-click on the Start icon (left the lower corner of the desktop), select Device Manager.
- When the page comes in view, Expand the Network adapter from the list and right-click on your installed adapter.
- Thereafter select Properties from the context menu.
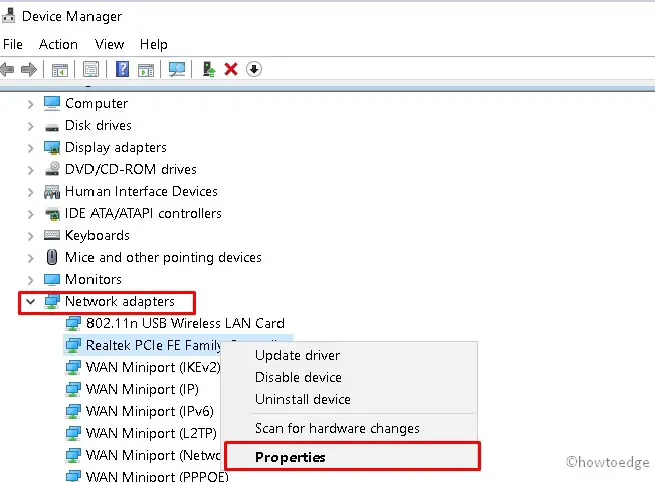
- On the succeeding page, tap the Power Management Tab then deactivate the checkbox “Allow the computer to turn off this device to save power“.
- Hit Apply thereafter OK to save changes.
- At last, Restart your system and check if you successfully encounter the trouble.
6. Run Power troubleshooter
- Type Control Panel in the Search box, click on the well-matched result to launch the app.
- After that select a small icon in the “view by:” category followed by Troubleshooting from the list.
- On the succeeding window, click on System & Security option thereafter choose Power.
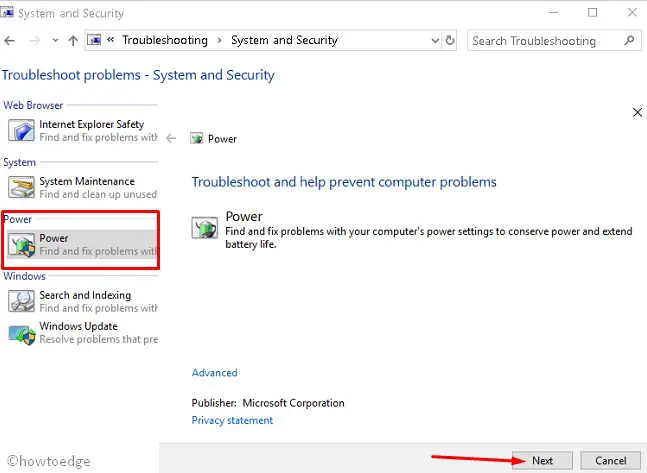
- Here hit the Next button, subsequently, follow On-screen instructions to start troubleshooting the problem.
- When this task gets completed, Restart your System and see if the problem is solved or not.
7. Reset Power Plans to Default
- At first, write cmd in Cortana then make a right-click on Command prompt on the appeared result.
- Now choose the Run as administrator option on the context menu.
- If the User Account Control dialog appears up, click Yes to permit the access.
- Near blinking cursor, type command is written below followed by the Enter to execute the code-
powercfg –restoredefaultschemes
- Once this process is completed, Reboot your PC and check if the error has solved or not.
8. Disable System Maintenance to wake up the computer
- First of all, type “CP” in the Search bar thereafter make a click on the Control Panel desktop App.
- Once the window appears up, hit System & Security category.
- Henceforth expand the Security and Maintenance link followed by Maintenance on the same page.
- Now hit Change maintenance settings and unmark against the “Allow scheduled maintenance to wake up my computer at the scheduled time” checkbox.
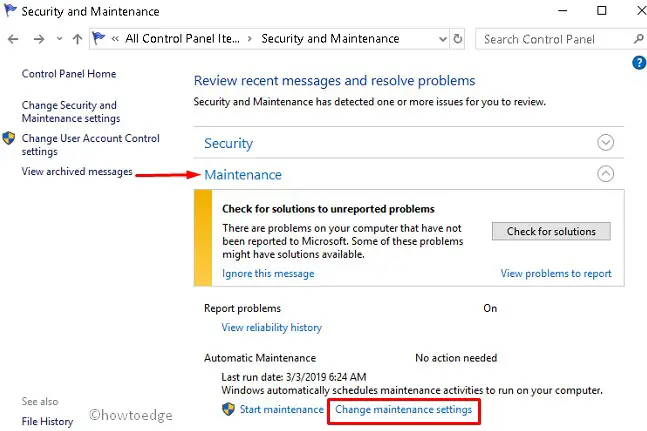
- Finally, hit OK and Restart your system to adjust the changes. Hope this time, you will successfully solve the “turn ON Windows 10 PC” by itself issue.
9. Disable Reboot Scheduled Task
- Right-click on the Windows icon and select the Run.
- Here, type
Taskschd.mscin blank box henceforth press Enter key to launch Task Scheduler. - Once the page comes in view, Switch to the left pane and navigate to this path-
Task Scheduler Library > Microsoft > Windows > UpdateOrchestrator
- Thereafter double click on the Reboot option.

- On the following page tap the Conditions tab and move to the Power section and uncheck Wake the computer to run this task option.
- Now hit OK to save changes henceforth right-click on the Reboot option and choose Disable from the context menu.
- Note: You have to edit the permission to make these settings stay otherwise they will fade the moment you close Task Scheduler. To restrict Windows from changing the settings, here is the procedure-
- Navigate to the following path-
C:\Windows\System32\Tasks\Microsoft\Windows\UpdateOrchestrator
- Here, right-click on the Reboot file and choose Properties.
- Again, press Win+X and choose Command Prompt (Admin).
- On the elevated command prompt, copy/ paste or write the following commands and hit Enter at end of each code-
takeown /f C:\Windows\System32\Tasks\Microsoft\Windows\UpdateOrchestrator\reboot cacls C:\Windows\System32\Tasks\Microsoft\Windows\UpdateOrchestrator\reboot /G Your_Username:F
Note: Make sure to take ownership of the reboot file in order to modify settings.
- At last, click Apply then OK.
- Reboot your PC so that changes made so far come into effect. If the error “Turn on Windows 10 PC” by itself, you can try the last workaround.
10. Windows Update Power Management
- At first, go to Cortana and type gpe then select group policy Editor on the list.
- Once its page appears up on the screen, navigate to the following path:
Computer Configuration > Administrative Templates > Windows Components > Windows Updates
Note: This will not work for Windows Home Edition users.
- Here locate and open the “Enabling Windows Update Power Management to automatically wake up the system to install scheduled updates” option.
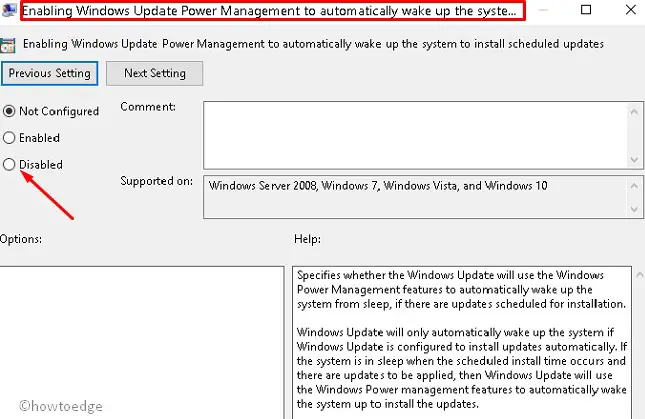
- subsequently, select Disable radio button then OK to save changes made so far.
- At last, Restart your system and check the trouble again.


