Did you tried installing the latest security/optional update on your PC, however, it fails on an update error 0x8007001d. If yes, then worry not as you are not alone. Several other users are getting this error code and they reported fixing this problem by applying the fixes discussed in this post.

What may cause Update Error 0x8007001d?
This error primarily occurs when your device meets one or a combination of issues as elaborated below –
- Missing or Corrupted System Files/Folders
- Corruption inside the System Image
- SoftwareDistribution and Catroot2 folders are full of not essential data or information
- Problems inside the registry editor
Fix Update Error 0x8007001d on Windows 11
If you are getting this error code on your Windows device, attempt these fixes sequentially –
1] Run Windows Update Troubleshooter
In case of getting any error code while updating Windows, the best tool to fix this is by running a Windows update troubleshooter. Here are the steps to follow –
- Right-click on the Windows icon and select Settings.
- Select System on the left navigation.
- Head over to the right pane, scroll down and locate Troubleshoot.
- When found, click over it and then choose the option – Other troubleshooters.
- The chosen section will expand, hit the Run button available beside Windows Update.

- Now, follow the on-screen instructions on the upcoming screen.
- After the issue has been resolved, make sure to restart your PC.
2] Try System File Checker
Third-party apps interfering with system files might damage or corrupt them. When the required files go missing on your computer, this may prevent Windows updates from occurring. As a result, update error code 0x8007001d appears. One may repair the corrupted files via the System File Checker utility program. Here’s how to run this tool –
- Launch Command Prompt as administrator.
- When the UAC window prompts, hit Yes.
- On the elevated console, execute the following code –
sfc /scannow

- Wait until the process is finished and reboot your PC after completion.
- Sign back into your computer again and check if you can update Windows without getting into any bug or issue.
3] Run DISM Scan
At times, Windows might fail to update if somehow the system image itself has become corrupted. The DISM is an inbuilt feature on Windows that diagnoses and repairs the underlying causes when called upon. To run this tool, follow these simple steps –
- Press Win logo and R altogether to start Run.
- Type CMD, and press Ctrl + Shift + Enter keys together.
- Command Prompt will start having administrative privileges.
- Now, copy/paste the below code followed by the Enter key –
DISM /Online /Cleanup-Image /RestoreHealth

- Wait till this command completes or reaches 100%.
- Once this is over, check if the update error 0x8007001d resolves or is still occurring.
4] Reset Update Components
Windows updates may also fail when the cache folders i.e. SoftwareDistribution and catroot2 get filled with too much data. It is required of you to purge both these folders from time to time. If you don’t act so, these folders become full of old files and folders which are no longer required.
Clear all the contents that lie inside both cache folders. One can’t simply reach out to these folders’ locations and purge their contents. If you do so, update services might break and result in some black or blue screen error. You need to stop all update-related services beforehand making any changes to these folders. Here’s a detailed guide on how to reset update components on Windows.
5] Modify Registry Editor
Several users reported fixing this error code by tweaking certain entries on the registry editor. As this worked on their PCs, try replicating things as they suggested. Here’s what you need to do on your computer –
Imp: Before you make any changes to the registry, make sure to create a backup of your entire registry. This is essential as any wrongdoing inside it may corrupt the entire operating system. When you do have a registry backup, you may use that to undo the recent changes on it.
- Press Win + R to launch Run.
- Type “
regedit“in the text field followed by OK. - The UAC window will come into the display next, hit Yes.
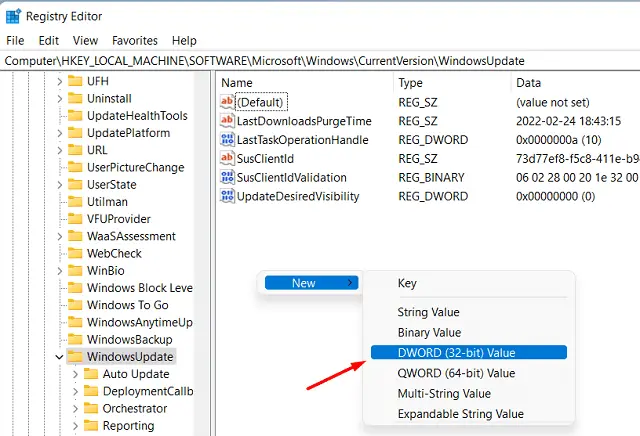
- Navigate to the below path next. Alternatively, simply copy/paste the entire path on the address bar, and hit Enter.
HKEY_LOCAL_MACHINE\SOFTWARE\Microsoft\Windows\CurrentVersion\WindowsUpdate
- Look out for the “
OSUpgrade” entry on the right pane. - If there is none, right-click anywhere on the right pane and select New > DWORD (32-bit).

- Rename this entry as “
OSUpgrade“. - Now, double-click on the newly created entry, and change its Value data field to “1”.
Note: Here, “1” means enabled, while “0” signifies disabled.
- Click OK to save the changes made so far.
- In the end, restart your PC and see if this indeed resolves the issue that you were dealing with.
6] Manually install Pending updates
If none of the above solutions help to resolve update error 0x8007001d, you may try out this last fix. As in this method, you are forcing Windows updates to happen manually, this should resolve the problem.
Read on how to get standalone packages from Microsoft Update Catalog, and later install them on your computer. I hope this article helps to overcome the issue with which you were struggling before.
Read Next: How do I clear Windows 11 Cache – Delete Temporary Files


