The error 0x80070424 is an update-related issue and it occurs mostly when upgrading to the next available Build OS version. A few users even reported encountering the same error code when they were trying to update their systems by running the update standalone installer on their Windows PCs.
When this occurs, you see an error message that reads the following – Installer encountered an error: 0x80070424. The specified service does not exist as an installed service.

What Causes an update Error 0x80070424 in Windows
Microsoft is known for the frequent release of new security as well as optional updates for all its operating systems. It is because of this timely release of security updates, the developers might miss a few things here and there and thus result in an error code.
As far as the error 0x80070424 is concerned, this happens mostly because of these reasons in Windows –
- It is essential to have all update-related services running in the background. Even if a single update service is not running, this may cause Windows Update to fail on some error codes.
- Corruption within the System Files: This happens when you are using some third-party antivirus program and the same corrupt your core files and folders.
Related Post: How to fix Windows Update Error Code 0x80244018
Windows Update Error 0x80070424 Fixes
Now that you know what may result in an update-related issue on Windows 11/10, let’s dive into the solutions that might work in your case –
- Run Windows Update Troubleshooter
- Restart Windows Firewall Service
- Run the CHKDSK Command
- Try System File Checker
- Check and Enable Windows Update Services
- Reset Windows Update Components
1] Run Windows Update Troubleshooter
The Windows Update troubleshooter is the best tool to identify and address the actual reason behind this update Error 0x80070424. Follow the below instructions on how to resolve this error on Windows –
Windows 11:
- Right-click on Start and select Settings.
- Go to System from the left navigation.
- Head over to the right pane, and select Troubleshooters > Other troubleshooters.
- When this expands, locate Windows Update and hit the Run button available on its right end.

- Wait for the troubleshooter to start and when it does launch, hit the Next button.
- Follow the on-screen instructions to find and resolve the underlying causes on your Windows 11 PC.
Windows 10
- Press Windows + I to launch Settings.
- Go to the Update & Security option, and select Windows Update from the left pane.
- Head over to the right pane, and click Additional troubleshooters.
- Locate Windows Update under Most frequent, and click on it once.
- When this box expands, locate and hit over the button – Run the troubleshooter.

- Wait for the troubleshooter to start and when it does start, hit the Next button.
Follow the on-screen instructions to complete the remaining steps. Restart your PC when the troubleshooting completes and check if you can update Windows normally now.
2] Restart Windows Firewall Service
For Windows Update to download and install successfully, the Windows Firewall Service must be running on your PC. Go and check if that’s indeed the case on your computer. If not, you better restart this service by following these easy steps –
- Open the Services app by pressing the Windows key + R and typing “
services.msc“. - Find the “Windows Firewall” service in the list and right-click on it.
- Select “Properties” and make sure the service is set to “Automatic.”
- If the service is not running, click on the “Start” button to start it.
After you enable this service, restart your PC and check if you can update Windows normally now.
3] Run the CHKDSK Command
Though an update error occurs because of file corruption, it may at times also occur when there are some bad sectors on your hard disk. CHKDSK is a great utility command that can check for such sectors on your hard drive. So, before you proceed ahead and resolve file corruption, have a look at how to run this CHKDSK command –
- Launch Command Prompt as administrator first.
- If the UAC prompt pops up, click Yes to authorize the access.
- On the elevated console, type the following, and press Enter –
CHKDSK /f /r

- Since the root drive is already in use, this command will ask the following –
“Would you like to schedule this volume to be checked the next time the system restarts?”
- Type Y, close CMD, and restart your computer.
- The system will restart and open into the CHKDSK command. Wait for this hard drive checkup to complete.
After this is over, you will receive a report on whether you can continue using the same hard disk or go for a new one.
4] Run System File Checker
If the CHKDSK command doesn’t reveal any bad sectors on the hard disk, the problem may lie within your system files. In case you are having some third-party antivirus program, uninstall the same and run the System File Checker utility.
Here’s how to perform this task –
- Press Windows + X, and choose Terminal (Admin). Windows 10 users may go for Windows PowerShell (Admin) instead.
- When the UAC window prompts, hit Yes to authorize opening PowerShell as administrator.
- Copy/paste the following on the elevated console, and press the Enter key.
sfc /scannow
- This tool will take 10-15 minutes to detect and resolve the missing as well as damaged system files on your PC. Wait while the scanning/repairing process is going on.
- After this is over, we suggest running the DISM code as well. This will inspect for any corruption within the System Image. Here’s the DISM restore health code –
DISM /Online /Cleanup-Image /RestoreHealth

- Wait again for 10-15 minutes, while the DISM is resolving the file corruption within the System Image.
- After this is over, restart your PC and check if you can update Windows normally.
5] Check and Enable Windows Update Services
If any single update services are not running in the background, this may result in Windows Update failing on some error codes. So, you must check if the following services are running on your computer or not. To do so, follow these easy steps –
- Press Windows + R shortcut to open Run.
- In the void box, type
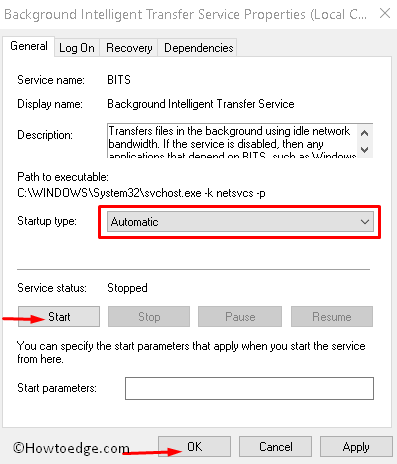
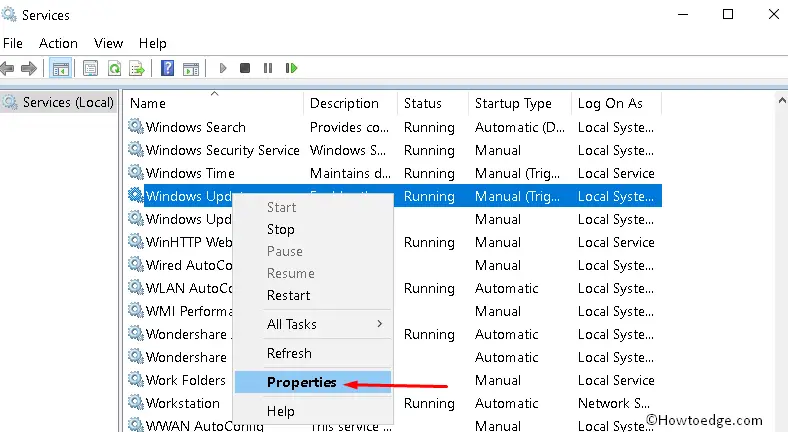
services.mscand press Enter. - Locate and right-click on the Background Intelligent Transfer Service.
Note: Do check if this update service is running under the Status column.
- Select Properties from the context menu.
- On its properties window, use the drop-down menu next to Startup type and change it to Automatic.

- Click OK to confirm this change.
- Next, look for Windows Update from the same list, right-click on it, and select Properties.

- Change its Start type to Automatic as well and hit OK.
After enabling both Windows Services, open File Explorer and navigate to the below path on it –
C:\Windows\SoftwareDistribution
This is the path where all update-related information is generally stored. Use Ctrl + A to select all items and move these files to some other folder. After you have purged this SoftwareDistribution folder, restart your PC.

I hope you were able to update your Windows from the subsequent login.
6] Reset the Windows Update Components
If none of the above fixes work to resolve the error code 0x80070424 on Windows, this must be because of corruption within the Update Components. Stop all update services, clear Windows Cache folders, and then restart all update services might help you to overcome this error code on Windows 11/10.
In case you don’t know how to perform these activities, here’s a guide on how to reset update components –
- First of all, launch Command Prompt as administrator first.
- The UAC window will prompt next, hit Yes to authorize opening CMD as admin.
- On the elevated console, type the following and press Enter –
net stop wuauserv
net stop cryptSvc
net stop bits
net stop msiserver
- The above codes will stop all update services on your computer.
- Copy/paste the following command on CMD and press Enter –
ren C:\Windows\SoftwareDistribution SoftwareDistribution.old
- Now that you have renamed the SoftwareDistribution folder, restart all services that you stopped earlier. For this, run these commands on it –
net start wuauserv
net start cryptSvc
net start bits
net start msiserver
- Close the Command prompt and restart your computer next.
Sign back into your device again and check if you can update Windows normally without getting into the same error code 0x80070424 again.


