If you’re experiencing an update error 0x80070543 on your computer then here is something you may use to fix this issue. This error occurs when a particular update gets failed while trying to download and install it through the Windows Update. Still, there is not much explanation about this issue but it presumably can occur due to misconfigured system files on your Windows 10 PC.
There might be many solutions to this problem but in this article, we have explained some potential methods that will certainly help you to fix this issue.

Solve Windows 10 Update Error 0x80070543
To solve Windows 10 Update Error 0x80070543, use the steps –
1] Check My Computer Properties Settings
In order to fix this error code, make sure that you’re working with an essential component of Windows.
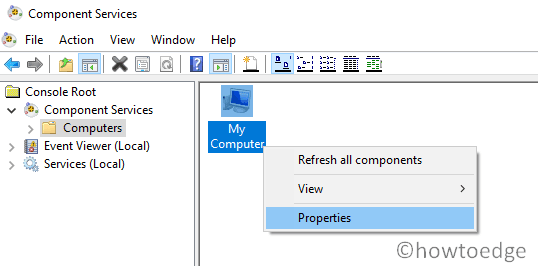
- Click on the Start button and type Component Services.
- Load the result from the search result.
- In the left side pane, expand Component Services, and then click Computers.
- Now right-click on the My Computer and select Properties.

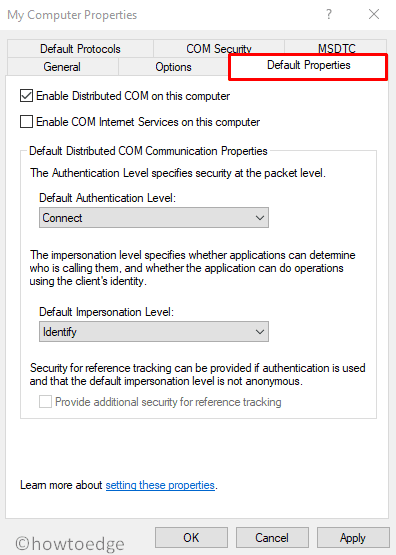
- Navigate to the Default Properties tab and make sure the Default Authentication Level is set to Connect.
| Note: If the Default Authentication Level isn’t set to None, then please don’t change it. Because it might have been set by an administrator. |
- Select Identify under Default Impersonation Level drop-down list.
- Click Apply and then OK to save the settings.

- Close the Properties window and restart your computer.
- Then try the update again and check if it solves the errors.
2] Run Windows Update Troubleshooter
Sometimes Windows Update troubleshooter identifies the problem and solves it on its own which will save you from going through a hassle. The procedure to run this tool is as follows:
- Launch the Settings app using Win & I.
- Select Update & Security > Troubleshoot.
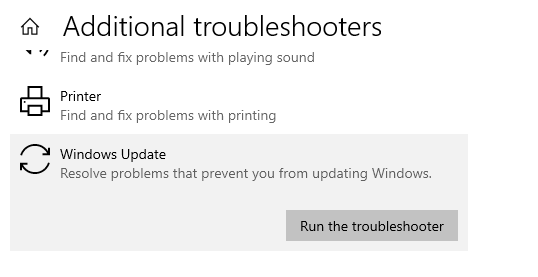
- Move to the right side and click “Additional troubleshooters“.
- Scroll down and select Windows Update.
- Click Run the troubleshooter to begin the repairing process.

- It might take a little while therefore wait for it.
Once it completes the process, restart your computer and try to install the updates again.
3] Run DISM and SFC scan
Another thing that you can do is to run the System File Checker and DISM tool. It can find and resolve the missing as well as corrupted system files present on your computer. Here’s the procedure:
- Run Command Prompt as Administrator on your PC.
- When the console comes into view, type
sfc/scannowand hit Enter to execute the code. - This process may take a while as this tool scans the entire Windows files and also checks for any corrupt entries.
- While running the code, if your system prompts an error message saying, “Windows Resource Protection found corrupt files but was unable to fix some of them” then type SFC /verifyonly and hit enter. This will verify the integrity of your system files to check if the problem has been resolved now.
- If the system file checker tool doesn’t repair the corrupt files then run the following command one by one in the elevated command prompt.
DISM.exe /Online /Cleanup-image /Scanhealth
DISM.exe /Online /Cleanup-image /Restorehealth
DISM.exe /online /cleanup-image /startcomponentcleanup
- Running the DISM tool will download the damaged files from the Windows update servers and replace any damaged files in the local image for Windows 10.
If an error is detected and is solved now then reboot your computer. Once your PC starts up, reinstall the application and check if it is working correctly.
I hope this guide helps to fix the Update Error 0x80070543 on your computer. In case you have any queries or suggestions related to this issue, please let us know in the comment section.
READ NEXT


