Did you recently tried upgrading the Windows 10 OS to newer Builds, however, failed due to the Update Error 0xc1900130. If yes, then follow our six approaches to get rid of this persisting error message. This bug pops in when there is some ongoing network connection issue between the Windows Update Server and the Client Machine. Owing to this, when you attempt to update your OS, you encounter an error message that reads – “MOSETUP_E_INSTALL_HASH_MISSING – 0xc1900130“.
Before proceeding to the solutions, you need to first ensure that you are having proper network connectivity with moderate downloading speed. If this doesn’t help, visit the Update Catalog and manually download/install the latest cumulative update. Most probably, the error gets resolved by now. However, if not, you should try the other five workarounds – Flush DNS Cache, Rename iastorac.sys driver, etc. Let’s explore the solutions in detail –
Ways to Resolve the Update Error 0xc1900130 on Windows 10
To fix the Update Error 0xc1900130 on Windows 10 PC, use the following workarounds –
1. Manually Download & Install the Recent Cumulative Update
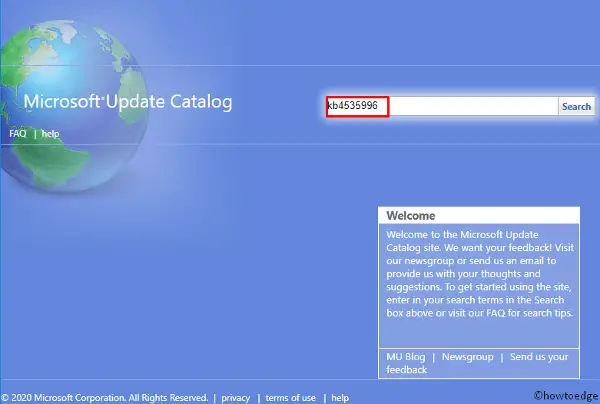
If you face difficulty while upgrading the current OS version on your device, you should manually download and install the recent Standalone package. To do so, go to the Microsoft Update Catalog and type the exact KB number in the search bar. Usually, the company releases new patches every second Tuesday of the month. Here, is the list of Latest Cumulative Updates for different Windows 10 versions.
Note: Make sure to check your system architecture (32 or 64 bit) and download the related update accordingly.
Alternatively, you can find the failed cumulative update visiting the “View Update History”. Just browse to the below location and note down the exact KB number that failed to install on your PC.
Settings > Update and Security > View Update History
You may now go back to the update catalog webpage and type the KB number at the search bar. On the forthcoming window, hit Download next to the specific patch.
2. Use Windows Update Troubleshooter
In general, manually upgrading your operating system does resolve several bugs and issues. However, if you are still receiving the Error 0xc1900130, take the help of Windows Update Troubleshooter. Here’s how to proceed –
- Jointly press Win+I keys together to launch the Settings window.
- Select Update & Security thereafter Windows Update on the next screen.
- Head over to the right pane, scroll down and select Windows Update again.
- When it expands, hit Run the Troubleshooter.
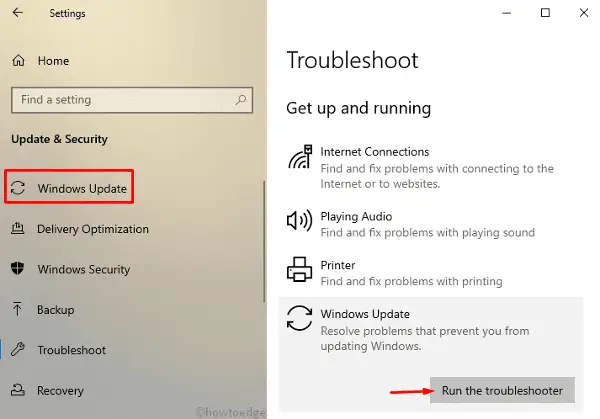
- This tool will then look for any problems and resolve the same.
- Wait for a while as this takes few minutes to complete.
Once this gets over, check whether it solves the underlying causes behind error 0xc1900130 or not. If not, follow the next solution –
3. Rename the iastorac.sys driver
The compatibility issue between Microsoft and Intel often leads to update errors. Error 0xc1900130 is one such bug that you can fix by renaming the iastorac.sys driver. To do so, just add a “.old” extension at the end of the above driver. Performing this will block Windows Update components from using the Intel RST drivers. Here’s how to proceed –
- Press Win+E together to launch the File Explorer.
- Head over to the top bar, click View and tick the checkbox prior to the File Name Extensions.
- Next, copy/paste the below path at its address bar –
C:\Windows\System32\drivers
Note: If you have installed the operating system on some other drive, replace the C: with that drive name.
- On the succeeding window, scroll down and locate iastora.sys.
- Once found, make a right-click on the same and select the Rename option.
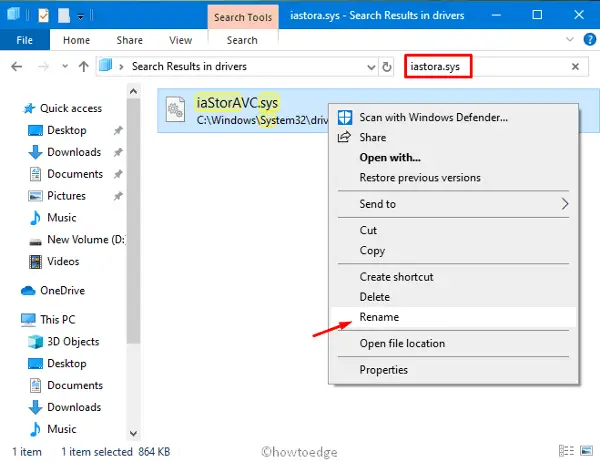
- Now, rename this file to iastora.sys.old so that Windows 10 simply disregard this file.
- When the UAC window pops in, tap Yes to provide your consent.
- Close all of the running windows, and restart your PC.
- When Windows 10 boots up, try installing the problematic update again and see whether you receive the error 0xc1900130 or not.
4. Flush DNS cache
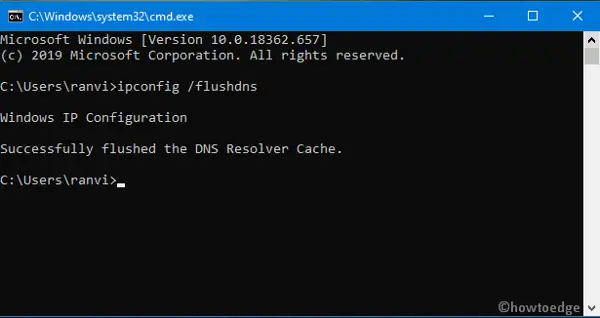
In certain cases, we found flushing DNS cache indeed resolve the Update Error 0xc1900130 on Windows 10 PC. All you need is to launch the Windows Console as an Admin and run the following command –
ipconfig /flushdns
Note: If the above code works, you will receive a message that reads – “Windows IP Configuration, Successfully flushed the DNS Resolver Cache”.
5. Reset Windows Update Services
If any of the update services become corrupt somehow may also lead to the update error 0xc1900130 on your PC. This is why we suggest reconfigure the windows services running a few codes on the command prompt. Just open the Windows console as an Admin and execute the following codes one after another. Make sure to press the Enter key after each command line –
SC config wuauserv start= auto
SC config bits start= auto
SC config cryptsvc start= auto
SC config trustedinstaller start= auto
Note: Running the above command lines re-enable all of the Update Services.
6. Manually Reset Windows Update Components (WUC)
The presence of corrupt windows components can also prevent your system from being updated. If that’s the case, you need to disable and re-enable such components on your computer. Here’s how to manually reset the update components –
- Click the Win icon and type “cmd” in the text bar.
- When the well-matching result pops in, make a right-click and select Run as Administrator.
- If the UAC window prompts, tap Yes to go ahead.
- On the elevated console, run the following commands one by one and hit Enter key at the end of each line.
net stop bits
net stop cryptsvc
net stop wuauserv
net stop msiserver
Note: Executing the above codes will temporarily stop the following services – Updates, Cryptographic, and BITS along with the MSI Installer.
Now, run the following two codes to empty the contents inside the WU components -Software Distribution and Catroot2 folder.
Ren C:\Windows\SoftwareDistribution SoftwareDistribution.old
Ren C:\Windows\System32\catroot2 Catroot2.old
Note: You should now re-enable the previously stopped services running the following commands –
net start bits
net start cryptsvc
net start wuauserv
net start msiserver
After you complete the above steps successfully, Reboot your PC to save the changes performed so far.
7. Use System Restore Point
If you had previously created a System Restore point, it’s time to revert back the current operating system to the state when it was working completely fine. Here’s how to proceed –
- Click the Windows button and type rstrui.
- Make a click on the top result to launch System Restore thereafter tap Next.
- This will automatically enlist the available restore points on your device.
- Tick the box left of Show more restore points.
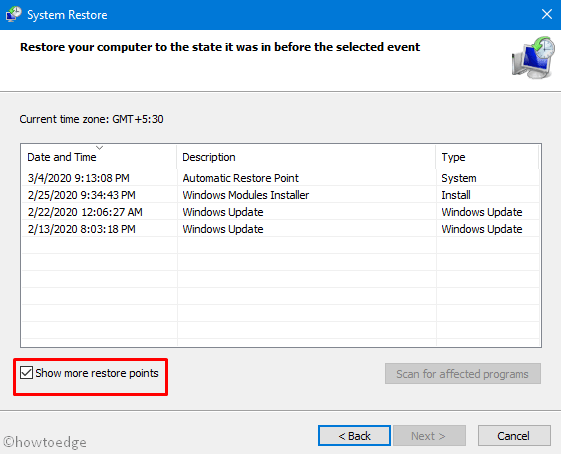
- Select the recently created Restore Point on your computer.
- In the end, hit Next then Finish initiating this task
That’s it, we hope the above article indeed helps you to get rid of the update error 0xc1900130 on Windows 10.


