The update or installation error 0x80080005 is one of its kind issue that users encounter while performing an in-place upgrade to Windows. In this guide, we have discussed all possible causes that might trigger it and four separate ways that resolve this issue.
While you attempt upgrading to Windows 11/10, you will get the below error message in cases where this problem occurred.
There were some problems installing updates, but we’ll try again later. If you keep seeing this and want to search the web or contact support for information, this may help: (0x80080005).
What causes an error code 0x80080005 on Windows?
Windows Updates fail on this error code primarily due to corruption inside the Windows update components or enabled Firewall. Some users even suggested taking control of the System Volume Information directory as this favors them in updating their devices with no error code.
Run Update Troubleshooter, reset SoftwareDistribution and catoot2 folders are two effective ways to solve this bug. In case, both solutions fail, disabling Windows Firewall, or taking full control of the System Volume Information directory might help.

Fix – Update & Installation Error 0x80080005
Before applying any fixes, make sure to create a System Restore Point. This is to avoid loss of personal data, files, or folders. After you have generated a system backup, follow these solutions one after another –
- Run Windows Update Troubleshooter
- Disable Windows Firewall
- Grant Full Control of the System Volume Information directory
- Reset Software Distribution & Catroot2 folders
1] Run Windows Update Troubleshooter
To solve any update-related trouble on Windows 11/10, Update Troubleshooter is the best utility program. Running this tool will look for any suspicious files or applications on the computer and address their underlying causes. Here’s the working procedure –
Windows 11:
- Press Win + I to launch Settings.
- Go to System > Troubleshoot > Other troubleshooters.
- Under “Most frequent”, locate Windows update, and hit the Run button.

- When the troubleshooter window opens up, click Next and follow the on-screen instructions.
Most of the time, troubleshooting Windows Update alone resolves an update error code on Windows PC. So, there’s a possibility that your update issue has already been resolved. Try updating your Windows and check if the error code 0x80080005 resolves this way.
Windows 10:
- Use the Win & I hotkey to launch Settings.
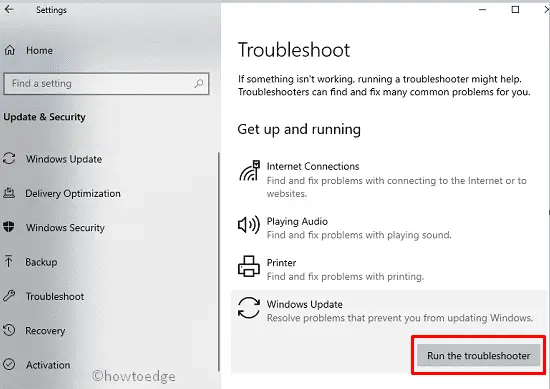
- Select Update & Security followed by Troubleshoot on the left pane.
- Jump to the right-hand side and tap Windows Update.
- Hit Run the Troubleshooter on the extended pane to begin the scanning process.

- Now, follow the on-screen instructions to complete the remaining steps.
After completing the above steps successfully, Restart your device. Sign back into Windows and check if the Error 0x80080005 is still there or is corrected.
2] Disable Windows Firewall
Windows Firewall is known to block certain processes or applications from time to time. The error code 0x80080005 could be the result of this blocking. Disable Windows Firewall on your computer and check if you can update Windows now.
If you don’t know how to proceed, go through the below steps and apply them on your Windows PC –
- Launch Control Panel first.
- When this desktop app opens, select System & Security.
- Go to Windows Defender Firewall next.
- On the left navigation, click “Turn Windows Defender Firewall On and Off“.
- Choose to Turn Off the Windows Defender radio button in both the “public network” and “private network” settings.

- Lastly, hit OK to confirm disabling the Firewall, and restart your PC.
Browse to Settings > Windows update, and check if you can update your device normally. In case the error persists even after this, attempt the next workaround.
3] Grant Full Control of the System Volume Information directory
Several users reported fixing this error code when they get control over the System Volume Information directory. Not having full control over this directory might cause problems including an update error 0x80080005, or Windows installation stuck at a certain percentage.
The following steps will help you take full control of the above-mentioned directory and then update your Windows 11/10 PC without any glitches. So, follow the instructions below and apply them on your computer –
- Press Win + R, type “CMD“, and hit ctrl + shift + enter keys together.
- The UAC window will prompt next, click Yes to authorize opening it.
- Doing this will invoke Command Prompt having admin rights.
- On the elevated console, copy/paste the following and press Enter –
cmd.exe /c takeown /f "C:\System Volume Information\*" /R /D Y && icacls "C:\System Volume Information\*" /grant:R SYSTEM:F /T /C /L

- Let this command run successfully and once this is over, come out of Command Prompt.
Restart your PC next and check if you can update Windows normally without receiving any update error code.
4] Purge Software Distribution & Catroot2 folders
If the trouble persists even after following the above fixes, you must purge the Software Distribution & Catroot2 folders on your PC. You can’t directly open these two folders and clear their contents. This is because the update services are running in the background and when they don’t find the required files, it might corrupt your operating system.
Here’s how to purge both Windows Cache folders without corrupting your Windows 11 OS –
- Press Win + X, and select Terminal from the Power Menu. If you are on Windows 10, choose Command prompt or Windows PowerShell, whichever option is available there.
- Use the drop-down menu and select Command Prompt. You may execute the below codes on PowerShell as well.
- Type the below codes one by one and press Enter at the end of each command. These codes will stop all update-related services on Windows PC.
net stop wuauserv
net stop bits
net stop cryptSvc
net stop msiserver

- Now that you have stopped all update services, run these two codes –
ren C:\Windows\SoftwareDistribution SoftwareDistribution.old
ren C:\Windows\System32\catroot2 catroot2.old
- The above two codes will rename both Windows Cache folders by adding .old extensions to their names. For example, SoftwareDistribution will change to SoftwareDistribution.old. Similarly, the catroot2 folder name changes to catroot2.old.
- After you rename both these folders, restart all the services that you stopped earlier. To do so, run these codes –
net start wuauserv
net start bits
net start cryptSvc
net start msiserver
pause

- At last, type exit and press Enter to come out of Command Prompt.
- Reboot your device next so that the changes made become effective from the next login.
Two new Windows Cache folders will generate automatically with the names “SoftwareDistribution” and “catroot2” at their respective locations. You may check the same by navigating to the below locations –
SoftwareDistribution – C:\Windows
Catroot2 – C:\Windows\System32
Go to Settings > Windows Update, and hit Check for updates. I hope the error code 0x80080005 must have been fixed by now and you are able to upgrade your system.
Manually download and install pending updates on Windows
If for any reason, the update error 0x80080005 is still appearing, you may solve it temporarily by manually downloading and installing the pending updates on your PC.
- Manually update and install cumulative updates on Windows 10
- Manually update and install cumulative updates on Windows 11
The setup file downloads as .msu file format, and all you require is to double-click on it and the installation completes with no error code. Let’s know in the comment section if you face any difficulty following the above sections.


