Today, in this blog post, we depict the probable reasons behind the White Screen of Death error and different methods to fix the same. WSOD appears primarily when you perform a Windows 10 boot. When it appears, you can’t access your login screen.
What causes a WSOD Error in Windows?
Oftentimes, a minor fault results in the White Screen of Death error, which you may resolve by simply restarting your PC. Just make sure to unplug all the USB drives and search for the faulty ones while plugging them one by one separately.
The faulty device driver, faulty cumulative updates, or third-party apps may also lead to similar WSOD errors. Repair obsolete apps, using System Restore point may diagnose the issue as well. Additionally, this error could also be the direct result of failing hardware or software.
Fix – White Screen of Death Error on Windows 10
Here, we depict eight easy workarounds that may solve the White Screen of Death issue on your PC-
1] Force shut down your PC
If the WSOD (White Screen of Death) abruptly appears in Windows, there might be a minor glitch or certain apps have stopped working. Performing a fresh restart may reset the apps and hence solve the underlying fault on the OS.
To perform a reboot, press & hold the Power key for a few seconds until the system completely shuts down. After the PC is turned off, release the power button to boot the Windows and check whether you get the normal screen by trying the below fixes.
2] Unplug all the connected peripheral devices
In case rebooting doesn’t resolve the WSOD error on your system, there is the possibility of faulty peripherals attached to the system. To repair this White Screen of Death bug, unplug all USB devices even Mouse and Keyboard then perform a hard boot.
In case, everything starts running normally, connect the secondary devices one by one and see if anyone leads to this WSOD error. If you do find a buggy device, replace the same to fix this issue.
3] Open the system into Safe Mode
Usually, the third-party installed application may also start the White Screen of Death error on your system. The Safe mode uses the basic functions to launch the Desktop Screen and temporarily disable all external applications. Using this, you can easily diagnose the app which is not working. Henceforth, just remove the problematic app. Here’s how to proceed –
Step-1: Press the WIN logo and R hotkey together to open the Run dialog.
Step-2: Next, type msconfig in the text area and hit the OK key.
Step-3: The System Configuration window will appear immediately after, tap the Boot tab.
Step-4: Subsequently, go to the lower pane and select the Safe Boot checkbox.
Note: If you want to use an internet connection while using Windows, select the Network radio button.

Step-5: When finished, Restart your system and re-login using safe mode.
If this process doesn’t help to fix the issue, uninstall the third-party app to fix the White Screen of Death error.
4] Update the Graphics driver
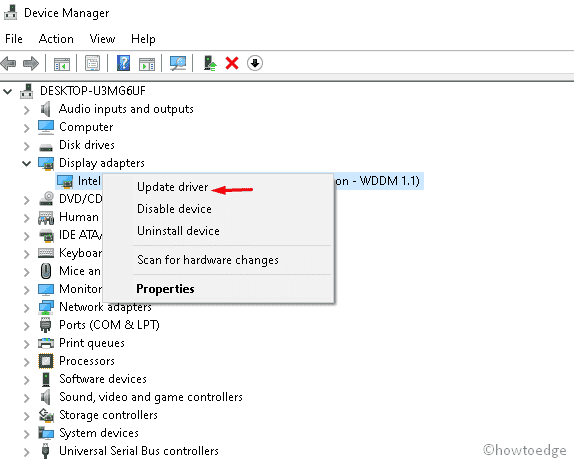
Sometimes the existence of a faulty or outdated graphics device driver may cause the White Screen of Death bug. Hence, reach out to the installed device driver and look for any pending updates. Here is the complete procedure to follow-
- First of all, right-click on Start Menu and select Device Manager using the Power menu.
- From the available list, expand the Display adapter (Graphics card driver).
- Perform a right-click on each driver separately and select Update driver on the context menu.

- On the next window, tap the “Search automatically for updated driver software” option.

- Henceforth, wait till the particular driver is properly updated.
- Once finished, Reboot your system normally and check if the WSOD issue has been fixed or not.
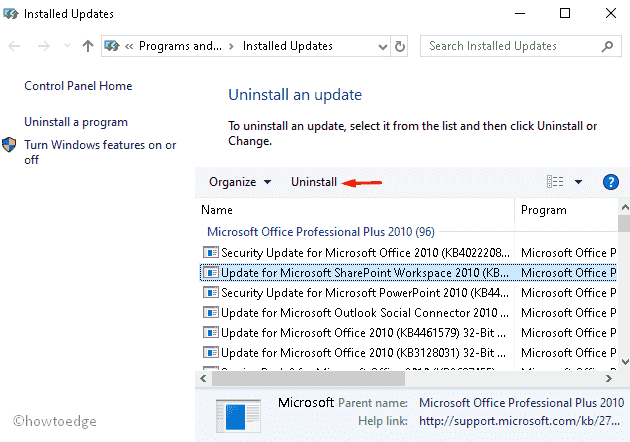
6] Uninstall the recently installed Windows Update
In general, when you install a new application and restart your system, the White Screen of Death appears suddenly and prevents accessing the desktop. Thereupon, uninstall the specific patch to avoid this bug following the below tutorial.
- Click on the Windows icon and select Settings from the left pane.
- When the app launches, select Update & Security category.
- Jump to the right pane, scroll down, and click View update history link.

- Next, hit the first option Uninstall updates option to show the list of installed patches.
- Succeeding after, go to the recent cumulative updates and hit the Uninstall button on the top ribbon.

- Once over, Restart your system and check if you can get the normal Windows.
7] Use System Restore Point
If the above workarounds fail to resolve the White Screen issue, the probable chance is due to recent changes like installing new apps or updates. To overcome this situation, System Restore is the best workaround. Here are the steps to proceed-
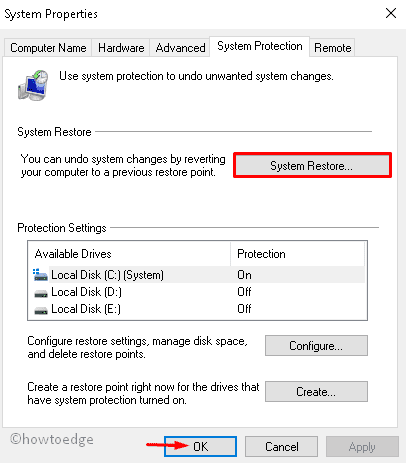
- Click on the Search bar and Type Create a restore point thereafter hit the well-suited result.
- Under the System Protection tab, click System Restore button followed by the Next on the visible screen.

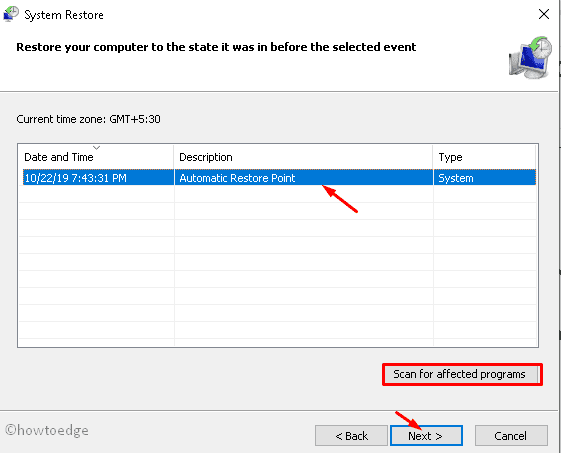
- Henceforth, pick the lately created restore point and hit Scan for affected programs option.

- When the scanning process gets over, click Next then Finish to let complete the remaining process.
- At last, Restart your system to save the changes made so far.
8] Perform certain hardware tests
If all of the above tests fail to resolve the White Screen issue and you can’t access the login screen, the problem may lie within the hardware components. There’s a possibility that the following hardware components have corrupted your PC – Graphics card, Monitor, Hard drive, or Motherboard itself.
It is better to consult the authorized service center and repair the faulty device as soon as possible.
Note: Sometimes the power fluctuation and improper voltage output also cause the White Screen issue, so also check your meter connection or similar parameters.


