The error 0X80242FFF mostly occurs when you were trying to install a pending Windows 10 Update on your PC. This problem appears because of varied reasons. A few of them include missing system files, corrupted update components, outdated .NET Framework, etc. Apart from these, a buggy update download might also result in similar issues.
When you encounter this bug, you may also see an error message that reads the following –
“
0x80242FFF -2145112065 WU_E_UH_UNEXPECTED An update handler error not covered by another WU_E_UH_* code“.
Today, in this tutorial, we will discuss five different ways that should help you to get rid of this problem on your device. They are as follows –
- Run Windows Update Troubleshooter
- Run SFC/DISM Scans
- Download and Install Latest .NET Framework
- Manually Install pending updates
- Reset Windows Update Components
Windows 10 Update 0X80242FFF Solutions
If you are not able to update Windows 10 because of an error code 0X80242FFF, try applying these workarounds –
Note: Before you apply any solution, make sure to create a system restore point. The generated backup might help if some new issue arises while restoring the system’s default configuration.
1] Run Windows Update Troubleshooter
Microsoft provides an in-built tool to find and fix all update-related problems in Windows 10. The same goes by the name “Update Troubleshooter” and is pretty effective in scrutinizing critical bugs and solve them automatically. To do so, use these steps –
- Right-click on the Windows icon and select Settings.
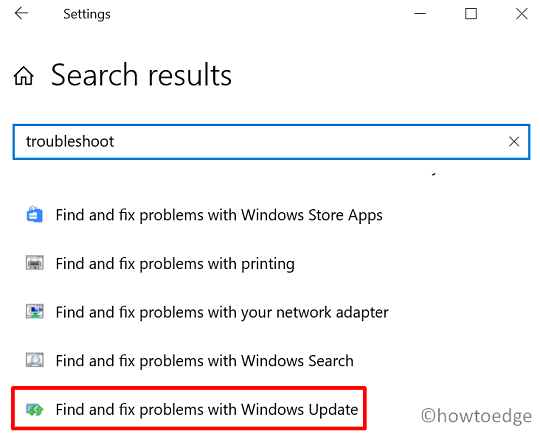
- Type “Troubleshoot” in the search field and press Enter.
- Scroll down and locate – “Find and Fix problems with Windows Update“.

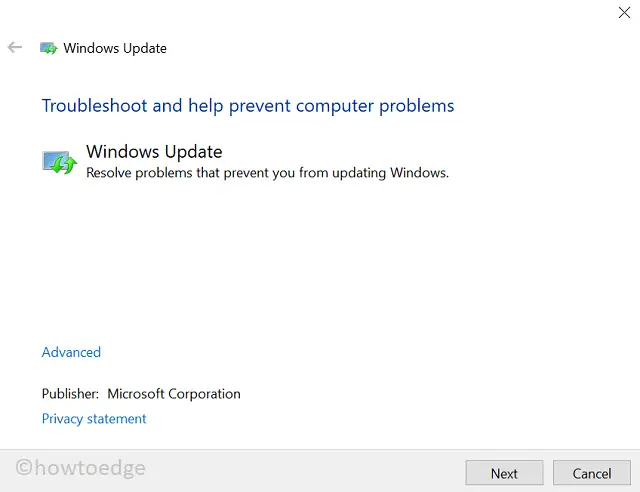
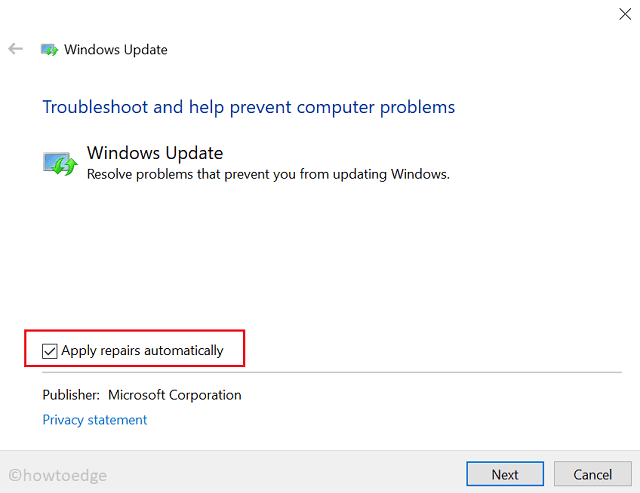
- On the subsequent screen, click Advanced then tick the box that reads – “Apply repairs automatically“.

- Click Next to start the diagnosis.

- The troubleshooter will stop and restart update-related services, check problems with restart, and others.
- After this tool completes troubleshooting, click View detailed information. Here, you will find the bugs that it finds and repairs.
- Reboot your PC next and see if this indeed solves the 0X80242FFF error or not.
2] Run SFC/DISM Scans
Sometimes, this error may also appear because of damaged or missing system files. There’s no direct way to determine if this indeed is the case. However, you may run a utility program i.e. “System File Checker” to find and repair the buggy update download. Here’s how to run an SFC scan in Windows 10 –
- Press Win + R to invoke the Run dialog.
- Type “cmd” and press Ctrl + Shift + Enter keys altogether.
- Doing so will open the Command Prompt as an Admin.
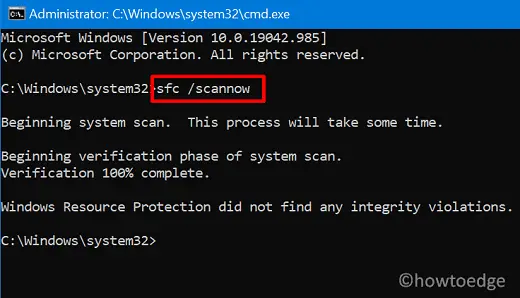
- Type “
sfc/scannow” near the blinking cursor and press Enter.

- Let this process reach 100% to get if there was indeed an issue with system files or not.
If the process results in fixing system files or replacing missing files, restart your PC. Else, execute the below code to inspect any issue on Windows 10 image –
DISM /Online /Cleanup-Image /RestoreHealth

- The above code will run to check if there lie any issues on the Windows 10 Image or not. In case, this finds any problem with it, the same gets automatically resolved as well.
- Reboot your computer next so that changes made come into effect.
3] Download and Install Latest .NET Framework
The error code 0X80242FFF may also occur if you are on an outdated .NET Framework in Windows 10. If that’s the case, you should try downloading and installing the latest framework on your device.
After you install the latest .NET Framework in Windows 10, restart your PC. From the next logon, check if the problem still persists or has been resolved by now.
4] Manually Install Pending Updates
If you are still not able to install pending updates on your computer, visit Update Catalog and manually download the required update. For this, you need to have the specific KB number that you are going to install. Here’s how the process goes –
- First of all, visit Windows 10 Update History page.
- Select Windows 10 version on the left pane that is running on your computer.
- On the extended pane, select the latest update and note down its KB number.
- Next, visit the Update Catalog site and type the cumulative update number on the search bar.
- Press Enter to get a list of well-matching results.
- Pick your system configuration i.e. x86, x64, or ARM64, and hit the Download button.
- On the next screen, tap over the available link. The standalone package starts downloading on your device.
- When the download completes, open the folder containing this file.
- Double-click over the setup file to begin its installation.
- Your PC may restart several times during this process, just wait till this is over.
Your PC is now on an updated build version of Windows 10.
5] Reset Windows Update Components
Though the above method must have resolved the issue that you were struggling with, we suggest resetting Windows update components as well. Performing this will resolve any issue related to Windows 10 update and you might not get into any additional errors moving ahead.
Resetting Windows Update Components implies stopping/restarting all update-related services and renaming the cache folders. Here’s how to perform this task –
- First of all, get rid of any network connection on your device. For Example – Ethernet, WiFi, etc.
- Next, launch Command Prompt having administrative rights.
- If the UAC window comes into the display, hit Yes.
- Copy/paste the below codes one by one followed by the Enter key separately.
net stop wuauserv
net stop cryptSvc
net stop bits
net stop msiserver
- The above four codes will stop all update-related services on Windows 10.
- Run the below two codes to rename the cache folders –
ren C:\Windows\SoftwareDistribution SoftwareDistribution.old
ren C:\Windows\System32\catroot2 catroot2.old
- Now that you have renamed the above two folders, restart the services that you have stopped earlier. Once again, run these commands separately –
net start wuauserv
net start cryptSvc
net start bits
net start msiserver
- In the end, type “exit” and press Enter to come out of the Command Prompt window.
- Restart your PC next so as to save the changes made above.
From the next logon, you should not get into any update issue in near future. I hope you find this guide useful in fixing error code 0X80242FFF on Windows 10.


