Having the right fonts will keep your design looking sharp. Fonts are the key to transforming your computer screen into an artistic work of art. If you are looking for a way to make your Windows PC look more personal, here are some methods you can use to install fonts on Windows 11.
What will you do if you want to use many other fonts that are available? You can easily install any font on your computer by following these steps. There are three ways to go about installing fonts, making them appear in your list of fonts or using them as they are on your computer.
How to Install Fonts on Windows 11
You can find multiple fonts in Windows 11, but you may wish to add more fonts to your computer so you can use the right font for any situation. Here’s how to do it –

- Download and Install font from the Store app
- Install font manually after downloading from the web
- Install fonts from the Windows Settings page
1] Download and Install font from the Store app
This method requires you to download the fonts from the Microsoft Store app and then install them on your device. The following steps will help you do that:
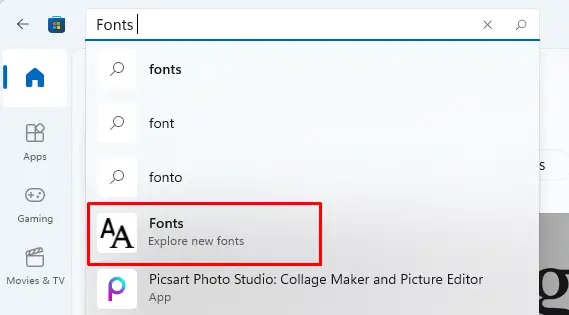
- Visit the Microsoft Store app and then search for ‘fonts’ you want to download.

- Once you get the recommendations, select “Fonts – explore new fonts” from the search result.
- This will provide you with a wide selection of fonts. Click on the one that grabs your attention.
- To install the free versions, click Free.
- Paid fonts will have a blue price indicator. You can buy the product by clicking on it and following the on-screen instructions.
- When the file has been downloaded, click on Launch to install it.
- That’s it! You are now able to use your newly installed fonts on your device.
2] Install font manually after downloading from the web
You can download fonts from third parties if there is nothing that suits your taste in the Microsoft Store. Downloading fonts is easy with so many sites available. Here are some you might be interested in Google Fonts, DevianArt.
- After downloading the font, right-click it and choose to Show more options from the context menu.
- You can then extract the file using the file archiver. A good example would be 7-zip or WinRAR.
- Once your computer has the font file, you simply need to install it.
- You can do this by right-clicking the font’s file, and then selecting Show more options.
- Select the Install option from the menu. The installation will occur automatically.
- You can also double-click the font files and then click on the Install button to install them.
3] Install fonts from the Windows Settings page
If you have already downloaded font files from the Store app or a web page, go to the Settings page and install them. Here’s how you do it.
- Right-click on the Start button and select Settings from the menu list.
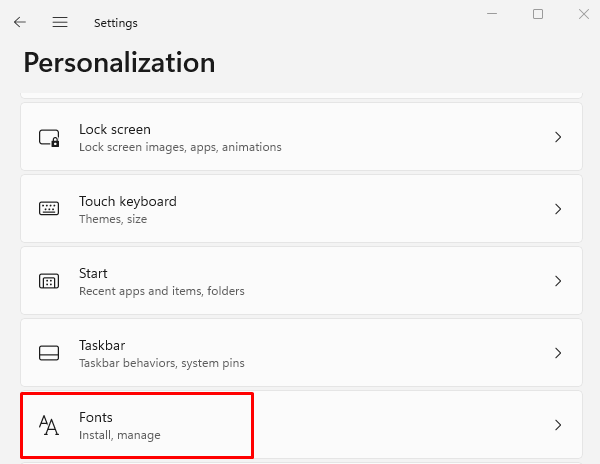
- Go to the left panel and select Personalization.

- Click Fonts at the bottom of the right side.

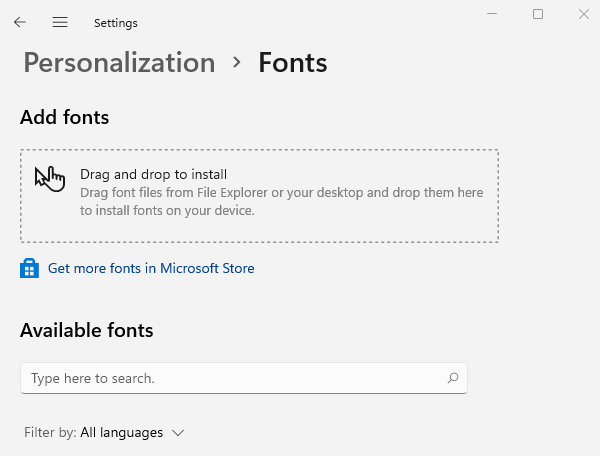
- In the Add fonts section, you will see a Drag and drop to install option.
- You will now need to drag and drop the extracted fonts to the Drag and drop to install area in Settings.
- Font files will either be available in .TTF or .OTF file formats.
Note: If they aren’t in these two formats, don’t drag and drop the files. Otherwise, you will not be able to install them.
How to Delete Fonts from Windows 11
If you want to remove fonts from your Windows 11 computer, follow these steps:
- Press the Windows+I keys to open the Settings menu.
- From the left pane, click on the Personalization tab.
- Then select the Fonts section from the right.
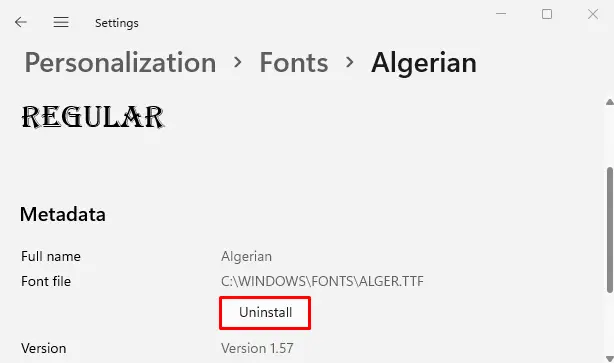
- Under the Available fonts section, select the font you want to delete.
- It can be found either by searching for its name or by scrolling down the page.

- Next, click the Uninstall button, and then confirm it in the pop-up window.
Note: When you want to remove more than one font at one time, simply follow the below steps.
- Open the File Explorer window using the Windows+E keys.
- Navigate to the path in File Explorer.
C:\Windows\Fonts
- Now select the fonts you want to remove.
- Click on the Delete option at the top:
Read Next: How to Block New Fonts from downloading in Windows 11/10


