By default, Windows 11 installs with so many bloatware including apps like Prime, Netflix, Spotify, FB, Instagram, and others. If you use your Windows PC for office work, these apps mean bloatware. In this post, we have come up with a single-step solution that helps perform a clean install of Windows 11 without bloatware.
Does Windows 11 Install Bloatware?
Windows 11 is no doubt one of the most advanced and error-free operating systems by Microsoft. However, when it comes to bringing in bloatware, Windows 11 excels here as well. This new OS even comprises some apps that are not commonly used by average users.
If you want to have Windows 11 with a clean out-of-the-box experience, this post will help you achieve this fast.
Clean Install Windows 11 without any Bloatware
As stated above, Windows 11 doesn’t contain any bloatware in its raw form. Microsoft adds bloatware as a part of its collaboration with famous third-party apps and you can’t get rid of them that easily.
However, if you are considering clean installing Windows 11, you may attempt installing the core operating system on your PC. Here’s how to proceed ahead with this task.
1. Boot from Windows 11 USB Drive
First of all, you require a bootable installation media of Windows 11. If you do have such a file in one of your Flash drivers, connect the same to one of your device’s ports, and restart your PC.
When your PC reboots, press any key to continue with Windows installation.
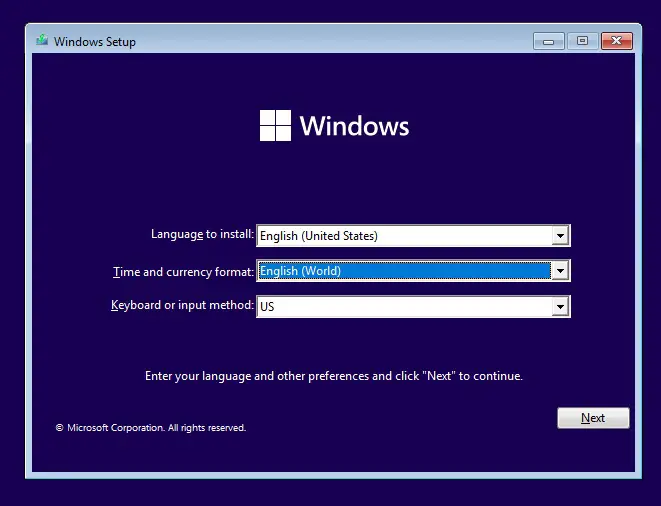
2. Select Time and Currency Format
While you remain on the Windows Setup Screen, you will see the option to choose your preferred time and currency format. Well, use the drop-down menu and select English (World).
3. Proceed ahead with the installation
Click Next, and your device will start attaining all files and folders required for a quick installation of Windows 11. After this is over, you must follow the regular installation steps for Windows 11.
This includes selecting the installation partition, creating or signing in with a Microsoft account, and finally customizing settings as per your preferences.
4. Complete Installation
After the installation completes, check if you can see any bloatware inside Windows 11. Hopefully, there is none as you have installed the World version of Windows 11 on your computer.
Note: Though the World version claims to remove all third-party bloatware apps from your PC, the built-in apps will still be there. This includes having Mail, Calculator, Teams, Microsoft Edge, and Calendar.
What’s next?
Since you have installed the World version of Windows 11 on your computer, you must manually change the language, region, time, and date settings separately.
You may change these by pressing Windows + I and selecting “Time and language.” If you fail to do so, you won’t be able to download any recent updates from Microsoft for your PC.
Can I remove bloatware without performing a clean installation?
If you don’t want to perform a clean installation on your Windows 11 PC owing to losing important files, folders, and app settings, you may use PowerShell to clean up all your bloatware.
This way, you will have some more control over your system and you may thoroughly clean up bloatware. Making any changes to the system using PowerShell requires utmost attention. This is because you may accidentally uninstall some core apps, without which your operating system will simply break.
I hope you find this article useful and easy to follow the steps. If you have any queries related to this article and others, you may ask us in the comment section.
Read Also: How to Fresh Start Windows 10 without any Bloatware.