Have you recently bought a brand new Windows 10 PC and want to set up all the essential settings. Well, you have come to the right place as here in this tutorial, we explain all the key aspects that you must ensure to get a well-functioning computer.
You might already know the basic things to start with. If not, don’t worry as we start with the basics to some pro tips that you must enable in case some bug pops in your device. Let’s explore the key settings in detail –
How to set up a brand new Windows 10 PC
Below are the essential settings that you must ensure or set up before using a brand new Windows 10 PC –
1] Check Network Connectivity
The first thing before setting up a brand new Windows 10 PC is to ensure having a good internet connection. This is essential because you need to connect your computer to Microsoft for the first time use. You may skip this by signing up for a local user account. However, to install the latest security patches, you must connect your PC to good net connectivity.
- Press “Windows key + I” using your keyboard.
- Select Network and Internet.
- On the left pane, click Wi-Fi then select your specific network connection through your mobile hotspot or by broadband.
Alternatively, if you do have an ethernet connection, attach the net cable at its respective port. Wait for the connection to start automatically.
2] Create An Email Account/Sign-in
The next essential thing to do is to create or use an email account for signing into your device. Here’s how to perform this task –
- Press WinKey + I together to enter the Settings app.
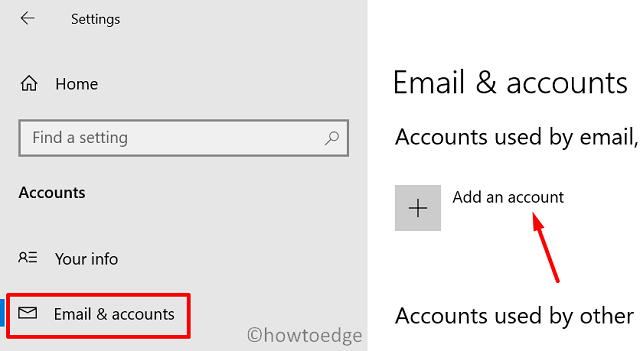
- Here, select the Accounts option thereafter Email and Accounts on the left column.
- Hit
Add an account, and use your Microsoft credentials to log in to your official account.

Note: In case you don’t have a pre-existing account, you may first create your account then re-follow the above steps.
Although you may skip this step, we suggest otherwise. This is because setting your PC with an official email id helps in recovering your account if you forget your password at some later stage. In addition to this, it also helps automatic signing up to the applications downloaded from Microsoft Store.
3] Create Passwords For Protection
This step is more of a personal choice. If you are the sole user of the computer, you may choose to go passwordless. However, if you let your friends or family use your computer quite often, we suggest protecting your privacy by creating a passkey. To do so, use these steps –
- Press “Windows key + I” on your keyboard.
- Click on the Account option.
- Go to the left pane and click on the sign-in option go to the privacy and turn ON the last option (Use my sign-in info to automatically finish setting up my device after an update or restart).
- And lastly click on the password icon/windows hello pin/windows hello fingerprint, as per your choice or according to options available on your device, and create your password.
4] Choose Your Default Apps
After setting up the right password to your PC, it’s now time to choose the right application to open the regular files like media, documents, etc. To do so, use these steps –
- Press the Win key and click over the setting icon.
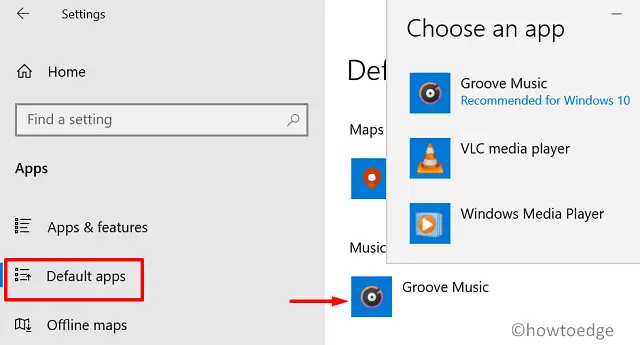
- Subsequently, click
Apps > Default Apps. - Jump to the right side and select the default app for different services such as – Music Player, Photo viewer, Web Browser, etc.
- Just click over the existing software thereafter choose an app from the list.

- You may choose the default apps at your convenience.
5] Windows Updates
Keeping your PC updated with the latest security patches is the most important thing to do. Even if you don’t update the existing build OS version on your computer, your device will just work fine. However, we suggest upgrading Windows 10 so that there’s no vulnerability left on your computer. Here’s how to download and install the latest cumulative updates –
- Press “Windows key + I“.
- Click on the Update and Security option.
- Select Windows update on the left column.
- On the right pane, click Check for Updates.
- Your PC will then look for any pending updates. If it finds any available updates, this will automatically download/install them to your computer.
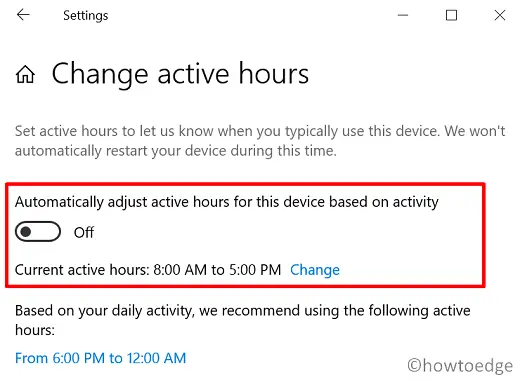
Note: To get updates automatically at some fixed interval of time, click over the Change Active Hours option. On the next screen, slide the toggle switch and click the change button next to the Current active hours.

- Restart your PC after performing the above changes.
6] Turn On Find My Device
This is an optional thing to activate on your computer. If you keep your laptop constantly with yourself while on a run, we suggest enabling this using the below guideline –
- Press Win + I.
- When the Settings app starts, click Update and Security.
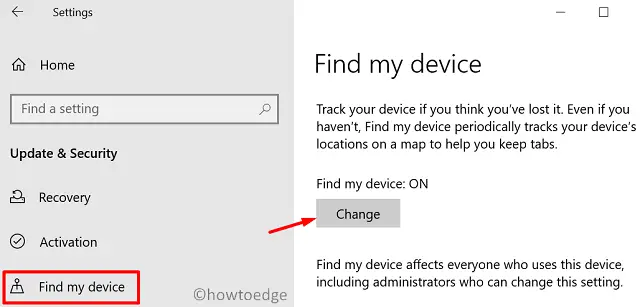
- Next, click Find My Device.
- Move over to the right pane and click the Change option under the Find my device section.
- Slide the toggle switch to the right on the pop-up window.

7] Create A Restore Point
Keeping a system backup is an important thing to do these days as Windows 10 OS is known to get into trouble every now and then. Here’s how to generate a restore point that you can use to restore your PC to an initial state when everything was working pretty fine –
- Press “Windows key + S” using the keyboard.
- Type Restore Point in the search bar.
- Select Create A Restore Point.
- Select the Local Disk(C:)(system) and hit the Configure button.
Note: In case you have installed the operating system on some other disk drive, select that particular disk.
- On the succeeding window, click Turn on system protection followed by the OK button.
- Coming back to the System Properties window, click Create.
- Put a name (preferably the current date) under the name field and press Create.
- Now, wait for a few seconds while the system generates a restore point on your computer.
- When you receive the message – “The restore point was created successfully”, click close then OK again.
Restart Windows to incorporate the recent changes to your device.
Read Also: Create a System Restore Point using Command Prompt or PowerShell
8] Restore Your Files And Data
If you do have used Windows at some earlier point and saved your work somewhere on the OneDrive, connect to it to restore all your files and data. If not, simply skip this step.
- Press the Windows key and type “OneDrive” in the search bar.
- Click the top result to start the OneDrive application.
- When a new window opens up, click on the Get Started button.
- Sign in to your account using Microsoft’s account credentials. The files start downloading automatically from the cloud.
9] Enable Microsoft Defender
There’s no need to download and install any third-party antivirus on Windows 10 PC. Enabling Microsoft Defender may take care of different virus-types and malware on your device. Here’s how to enable this program –
- Click the up arrow key on the taskbar and select the shield icon.
- Doing so will launch the Windows Security application.
- Look for any yellow flags inside this and follow the on-screen instructions to avoid them.
- Once you are sure everything is OK, close the application, and Restart Windows.
10] Update all device drivers
Since this is a new PC, the available drivers might be obsolete or outdated. So, you must update each one of the device drivers using the below steps –
- Press “Windows key + X” to launch the Power Menu.
- Click on the Device Manager option.
- Expand the section that contains a yellow exclamatory sign.
- Right-click over the available device driver inside and hit the update driver option.
- Subsequently, choose “Search Automatically for drivers”.
- Now follow the on-screen instructions to complete the remaining process.
When all your device drivers are up to date, Reboot your PC.
Your brand new Windows 10 PC is all set up, welcome to the new world.


