The Gaming environment is rapidly influencing the enjoyment market. Every gamer wants to capture their audio and upload the same on platforms like Youtube or Twitter. Keeping this in mind, Microsoft brought a new attribute for Windows 10 users that allows Record Game Screen in Windows 10 without using any third-party software.
Today, in this blog, we discuss how to capture the desktop clips via the XboxOne screen recorder (Game bar) app. Using this tool, you may record unique voices like only game sound, your own voice, etc. Indeed this comprises some other functionalities as well such as All and None. Let’s explore their usage in detail-
How to Record Game Screen in Windows 10 without using Third-Party apps
Here, we guide you on how to record the Game display screen of Windows 10 PC without using 3rd party software.
System requirements for Recording Screen in Windows 10
There are a few criteria that you must meet beforehand to record the Display Screen on Windows 10 device. Your PC must support the appropriate Graphics User Interface then only move to the other necessary conditions. They are as follows-
- AMD: AMD Radeon HD 7700 series, HD 8500 series, HD 7700M series, HD 8500M series, and R9 series, and R7 series.
- NVIDIA: GeForce 600 series, GeForce 800M series, Quadro Kxxx series.
- Intel: Intel HD graphics 4200, Intel Iris Graphics 5100.
Note: The above data depict the minimum system requirements. You may run their upgraded versions as well.
How to Enable Game bar in Windows 10
If your computer meets all of the necessary system requirements, you may enable the Game bar easily. Here’s how to proceed-
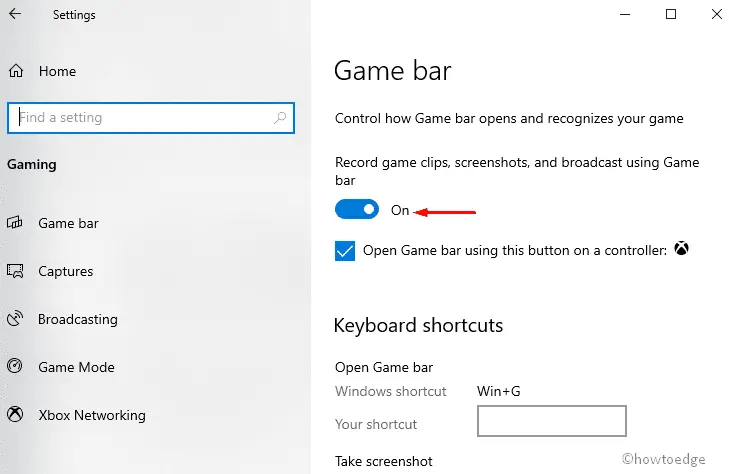
- Right-click on Windows icon and select Settings using the Power Menu.
- Once the Settings app launches, select Gaming followed by Game Bar on the left pane.
- Next, switch to the right panel and turn on the toggle switch of “Record game clips, screenshots and broadcast using Game bar”.

How to Record Game Screen in Windows 10
After you enable the above toggle switch, follow below steps to start capturing the Xbox clip on your system-
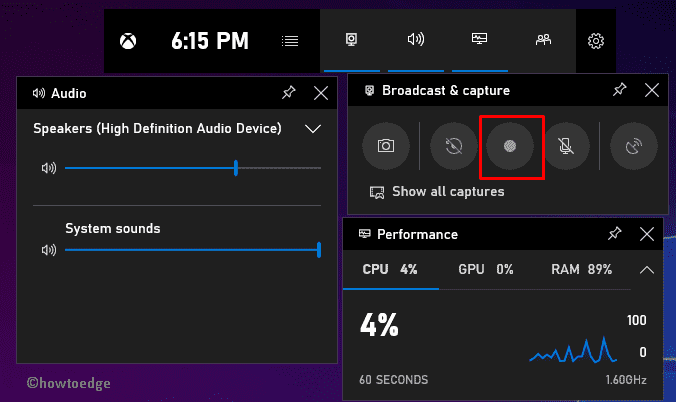
Step-1: Press the Win logo and G at the same time to open the Game bar. The game’s interface on the latest version of Windows 10 may vary as compared to the earlier versions.
Note: In case, you can’t access the Game bar (pressing Win and G), download its setup file by visiting the Store.
Step-2: Henceforth, hit the Start recording button (the circle with a black dot). This, in turn, starts recording Audio as long as you want to continue this.

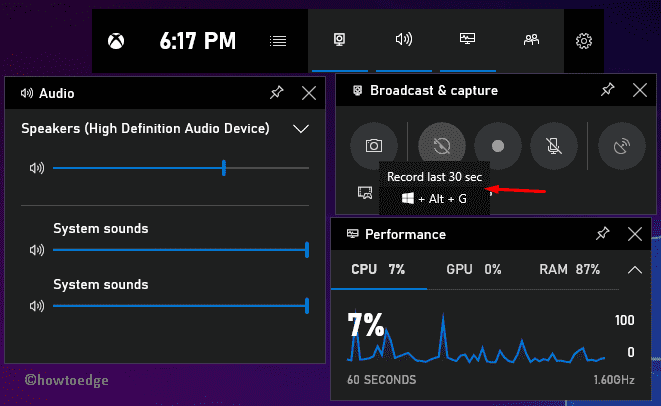
Step-3: If you want to capture the audio that lasts only 30 seconds, press Win+ Alt+ G (record last 30 seconds) hotkey.

Step-4: Once the recording is over, press the Windows logo & Alt and R to stop this.
Step-5: The recorded data will be stored on your PC. To play the recent file, navigate to the following path then locate the latest recording.
File Explorer-> This PC-> Videos-> Captures
Note: If you want to record the HD quality audio, press Win and G together to open Xbox.
Step-6: When the app opens up, click on its Settings option henceforth Capturing category.
Step-7: Now, choose any of the radio buttons (Game, All, None) as per your choice.

- The Game feature will capture the exact game sound.
- Moreover, if you select the “All” option, it will record all the voices echoing around us.
- Similarly, None option doesn’t record any audio.
Step-8: When you alter all the setup changes as per your need, click the circle button to start recording again.
Game Bar Keyboard Shortcuts
Below are some of the remarkable shortcut keys that allow the quick access while configuring Game bar-
- Open Game Bar – Win + G
- Start/ Stop Recording – Win + Alt + R
- Start/ Stop Microphone Recording – Win + Alt + M
- Take a screenshot of your game – Win + Alt + Prt Scr
- Record the last few moments of the gameplay – Win + Alt + G
- Start/ Pause the Broadcast – Win + Alt + B
- Show Camera in the broadcast – Win + Alt + W
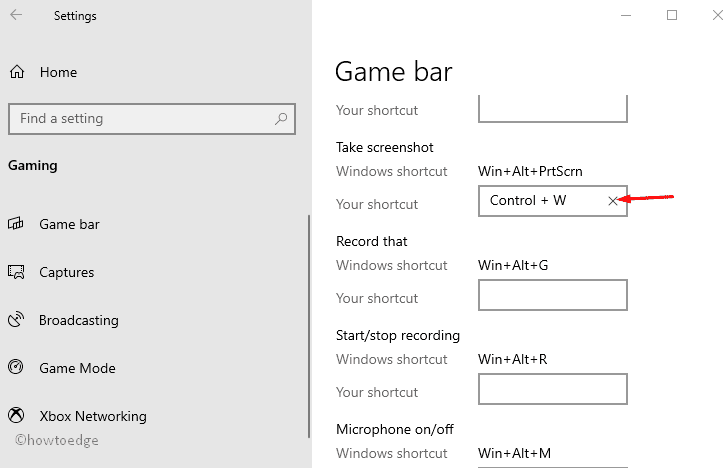
If you want to create your own customized shortcut keys, Press Win & I to launch the Settings app.
Here, select the Gaming category thereafter Game bar from the left column.
Move to the corresponding right pane and create your own shortcuts instead. See the Snapshot below-

That’s it.


