If you are someone who loves keeping a track of how well your system is performing, read this tutorial in detail. While doing multitasks or playing a heavy game on Windows 10 PC, it becomes a necessity to constantly monitor the CPU and GPU temperatures. There are hundreds of applications that can easily achieve this milestone for you. However, they all have their own constraints like – occupying a separate space, using extra system resources, and whatnot.
HWiNFO is one such application that can properly do both tasks without consuming extra resources, or creating its own window on the Desktop. The best thing about this tool is that it can display all the relevant information directly on the taskbar. So, if you are interested, let’s have a look at its core functions and ways to pin the CPU and GPU temperatures in Windows’ system tray.
Display CPU & GPU Temperatures on the System Tray
Here’s how to view the CPU and GPU temperatures on the system tray in Windows 10 –

Read: Fix – High CPU usage issue in Windows 10 after installing Updates
Download and Install HWiNFO
- First of all, you need to download a third-party app i.e. HWiNFO. Alternatively, you may start your favorite browser and type “HWiNFO” in the address bar. When you press the Enter key, a list of matching results comes into the display, click over the first link.
- Click the Download button available at the top-right corner.
- Hover the mouse over the “Free Download” under the section “Installer for Windows 10 (32/64 bit) version 7.0” and select “Local (U.S)”.
- Clicking over this option will immediately start downloading the software.
- When the download completes, double-click upon the setup file to start its installation.
How to use HWiNFO
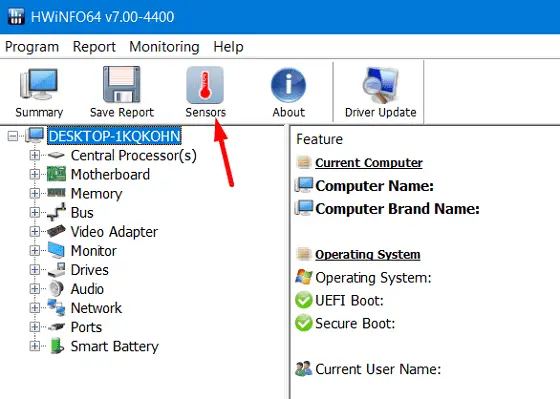
- After HWiNFO gets installed, open this application. Hit the Run button on its interface.
- This might take a few seconds to load up the application in two tabs containing all the information regarding your device CPU or GPU.
- Close the first page, and then click on the sensors option on the second page. See the Snapshot below –

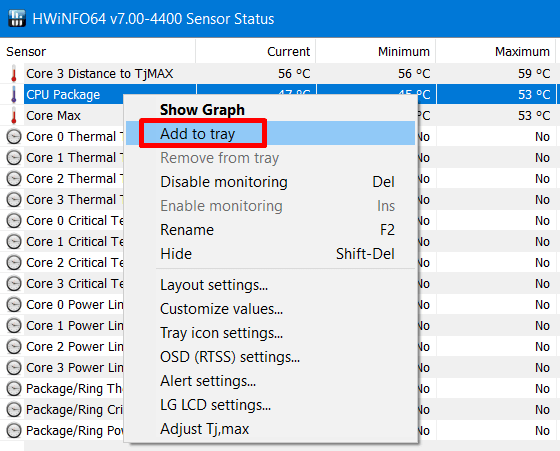
- Subsequently, look for the options – CPU package and GPU Temperature.
- Right-click on the CPU package and choose “Add to tray” on the context menu. The CPU temperature must be now visible on the system tray.

- Do the same for GPU temperature i.e. right-click over it, and choose the “Add to tray” option.

That’s it, you may now see both the temperatures of CPU or GPU on the system tray. However, as you close this application, the newly added information gets lost as well.
How to make certain parameters affix to the System Tray
In case you don’t want the newly added data to lose while closing the HWiNFO app, you may do so by following the below guideline –
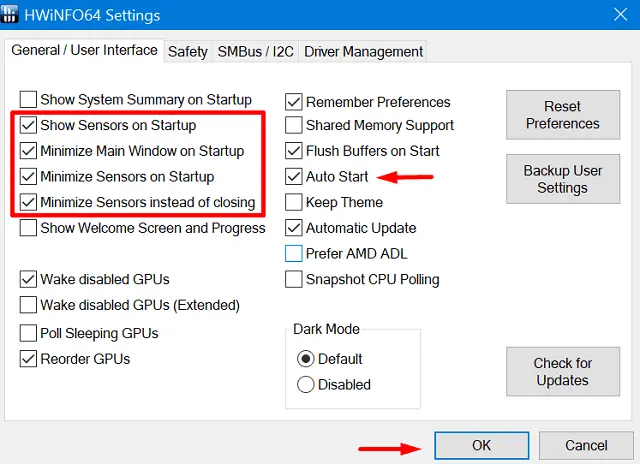
- Open the HWiNFO app. Go to Programs then Settings.
- Here, uncheck the first option and mark the subsequent options i.e. second, third, and fourth.
- Do mark the Autostart option as well and hit the OK button.

- After making the necessary changes, restart your device.
- From the next logon, you may see the CPU and GPU temperature clearly on the system tray in Windows 10.
How to customize Tray Icon Colors
If you don’t like the current background of either CPU or GPU temperatures displaying on the system tray, you may change them using the below steps –
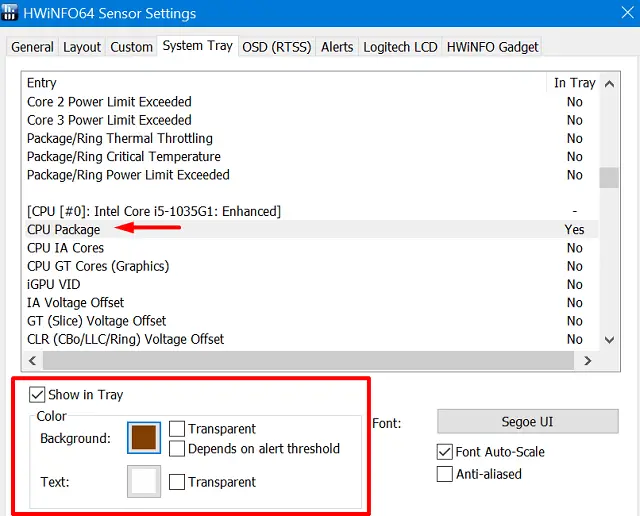
- Right-click over any sensor and select “Tray icon settings“.
- Once you are inside the System Tray tab, mark the checkbox next to the Show in Tray.
- Hit once over the current color next to the background, and select your preferred color.

- By doing so, you may even change the text color that displays the real-time temperature.
I hope this article was easy to follow. In case you have any queries or suggestions, let’s know in the below comment section.


