In this guide, we will discuss three different ways that you can use to show hidden files and folders in Windows 11.
Hidden files are the ones that normally don’t appear in the search query, inside any folder, or even under settings. They can be of two types – core system files or those that you intentionally hide on your computer. If we talk about the core files, Microsoft keeps it that way to prevent unwanted user interference. However, there may arise some instances when you must access them so as to properly configure them.
Sparing such situations, you might also require when you simply forget the path location of hidden folders that you had created a while ago. Whether you are in dire need of configuring the core files or learning this for fun, we will let you know all the ways that can help to show hidden files and folders in Windows 11.

How to view Hidden Files and Folders in Windows 11
To show hidden files and folders in Windows 11, you may use any one of the below methods –
1] Using File Explorer
This is the easiest of all three methods that we are going to explore in this post. However, this will work only when you know of the folder that might contain any hidden files inside it. Here’s how this method works –
- Press Win + E to open File Explorer.
- When it does open, browse to the location that might contain hidden files.
- Click View on the top bar, and then proceed as follows –
Show > Hidden items
- If the visited folder indeed carries some hidden folders, the same starts displaying on your screen.

This method works only if you indeed know the location of the files or folders hidden on your PC. In case, you don’t remember the path location, you may try out the next workaround –
2] Configure System Settings
By default, the system settings are kept in such a way that you can’t view the hidden files or folders on your Windows 11 PC. If you had made some files and forgot their location, you should go for this approach –
- Press the Windows key and type “hidden” on the search bar.
- Click the top result i.e. “Show Hidden Files” under system settings.
- On the next screen, hit “Show settings” next to “Change settings to show hidden and system files“.

- When the File Explorer Options window comes into view, turn on the radio button next to “Show hidden files, folders, and drives“.

- At last, tap Apply then OK to implement the changes made so far.
You may now head over to any folder on your device and see if that contains any hidden files. Indeed this is a bit lengthy process.
What you can do at max is type “hidden” again on the Search bar, and see if it displays any files/folders that are faintish yellow in color. If you do find some folders, check if they are the ones that you are looking for.
3] Tweak the Registry
Each and every function that we perform on our computer corresponds to an entry on the registry. Hence, it is possible to tweak that entry itself to show hidden files and folders in Windows 11. To configure the registry, follow these steps –
- Hit Win + S, and type Regedit on the search bar.
- Press Enter to start the Registry Editor.
- A user account control window will prompt next, tap Yes to authorize the access.
- Use the left-side navigation to browse the path below –
HKEY_CURRENT_USER\Software\Microsoft\Windows\CurrentVersion\Explorer\Advanced
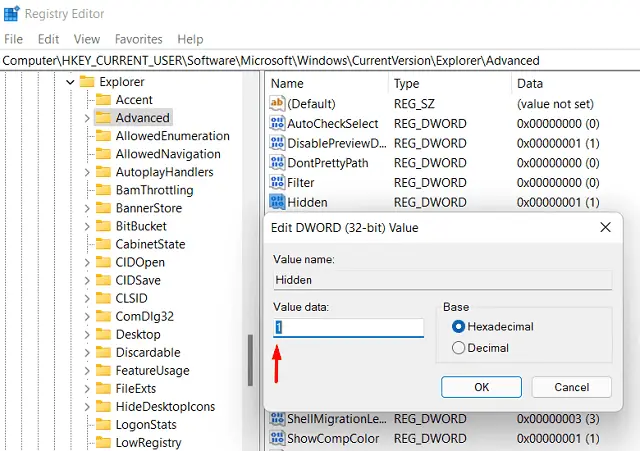
- Move to the right pane and double-click on the Hidden entry. This is basically a REG_DWORD entry that keeps certain files and folders hidden on Windows 11 PC.
- When this entry opens up, put “1” inside the Value data, and hit OK.

- That’s it, all your hidden files and folders will start displaying in a faintish yellow color.
Note: In case you want to undo viewing of hidden files and folders, re-visit the above path, and put “2” instead of “1”.
How to hide files and folders in Windows 11
Before you proceed to hide any files or folders on your device, make sure to remember its path location. Otherwise, it would be pretty hectic to get them back.
Note: Though it’s quite annoying to find a hidden folder in Windows 11, one may access it by applying a few tricks here and there.
Keeping this in mind, let’s see how to hide a file in Windows 11 –
- Open the folder that you want to hide on your computer. In case, you don’t want to hide all the files inside this folder, copy the content that you want and paste it into a new folder.
- Right-click anywhere inside this folder, and choose Properties.
- On its Properties window, tick the box left of Hidden, and hit Apply then OK.

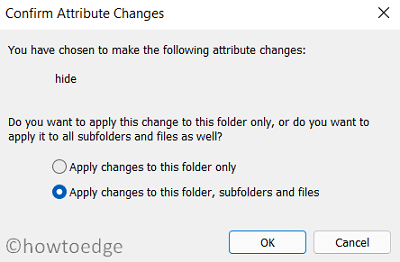
- A pop-up window will appear next asking what to do with the current folder.

- Choose whichever option suits you the most and hit OK.
If you had the “Show Hidden Files” setting enabled, the folder icon will turn faint yellow. Otherwise, the folder goes missing from its position.
I hope this post helps to meet your search query.


