By default, when you open a new excel sheet, there’s a row as well as a column heading on the left and top navigation. If you are looking for ways by which you may hide Row and Column headers in Excel, you have come to the right place. In this post, we will discuss how to disable the heading on a spreadsheet in two easy ways.
A column is basically a vertical line and is numbered alphabetically. On the other hand, rows are horizontal lines and are numbered numerically. Both columns and rows create a maze and we say it “Table”.

What’s the purpose of hiding Rows or Columns in Excel?
Headers bear a meaning only when you are working on a small set of information. The moment you start working big with huge data, you require using a huge number of columns and rows. In such cases, you can opt to print from one column to another without ever worrying if it is A to F or H to J.
In all such cases, you don’t necessarily need a column or row. So, you can hide it by disabling headers on an Excel sheet. Let’s discuss how you may perform this task without affecting existing files in Microsoft Excel.
How to Hide Row and Column Headers in Excel
If you want to hide row or column headers while working on an excel sheet, do the following –
1] Using View Tab
- Press Win + S, type Excel, and double-click on the top result.
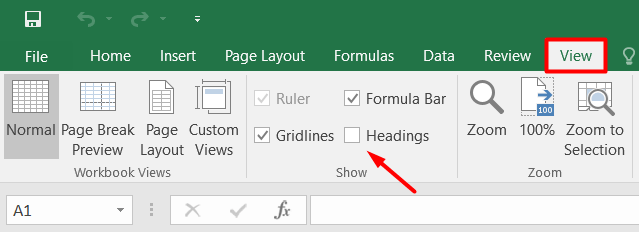
- When Microsoft Excel opens up, go to the View tab.
- Uncheck the box present left of Headings.

That’s it, the row and column headers turn off automatically leaving only the cells visible.
2] Via File Tab
Alternatively, you may also turn off the row as well as column headers using the File tab. Keep in mind that this method will take a little longer time than the previous one. Here’s how to do this –
- Open Microsoft Excel app on your computer.
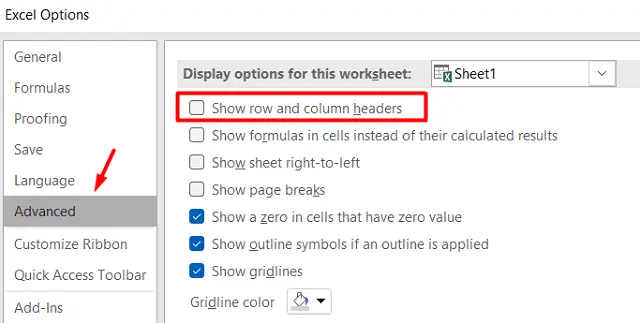
- Go to the File tab on the top left corner and select Options. You may find “Options” on the left pane.
- Excel options window will come into view next.
- Go to the Advanced tab on the left navigation and uncheck the box – “Show rows and Column headers“. You may find this setting under the section – “Display options for this worksheet“.

- Click OK to confirm the recent changes.
The spreadsheet’s row and column headers will now be hidden, leaving behind the cells only.
How do I duplicate every row in Excel?
At times, you might feel the necessity of copying a single row or a set of lines on your ongoing excel project. Well, if that’s the case, you may follow the below steps to duplicate as many rows you want on your device –
- Select the row or set of data you want to copy and put a right-click on it.
- Choose Copy from the context menu.
- Go to the row where you would like to duplicate things.
- Right-click again and this time, hit Insert copied cells.
An entire row will generate comprising of all the copied information.
What’s the total number of rows and columns in Excel?
As we all know, a row is something that runs horizontally and the column goes vertically. On Microsoft Excel, you have a vast number of rows and columns where you would add information, edit them, and put the stored data to good use. If you would like to know the exact number of rows and columns in an excel sheet, see the figures below –
Rows – 1,048,576
Columns – 16,384
I hope you find this article useful and easy to follow. Let’s know in the comment section if you encounter any difficulties following this guide.
Read Next:


