The backup error 0x80070032 normally occurs when users try to either create a restore point or use the previously generated ones. There are several reasons that may trigger such an issue on your computer. This includes not having enough free storage spaces, hardware issues, or too many old backups. In this tutorial, we discuss four workarounds that should resolve this backup problem on your computer. Let’s explore the solutions in somewhat more detail.
Upon encountering this bug, you may receive an error message as well that reads the following –
Sorry, but it didn’t work. To learn more, look for error code 0x80070032
Note: Error 0x80070032 may also occur for Windows update, Microsoft Store, or while copying/moving files. Go for the exact reason that is triggering this issue on your computer.

Backup Error 0x80070032 Solutions
If you are getting an error code 0x80070032 while creating restore points or using them then attempt these fixes one after another –
1] Perform a system restore
If you had not yet tried going back to a previous restore point, do the following –
- Press Win + R to launch the Run dialog.
- Type “
rstrui” and hit OK to open the System Restore window. - Click Next.

- Click “Show more restore points” to view all backups ever created on your computer.
- Select the restore point to which you want your system revert back to.
- Click Next and then Finish to start restoring your computer.
Note: Once you hit the Finish button, there’s no turning back. Don’t turn off the PC as this will corrupt the entire operating system.
2] Change the Disk Space Usage
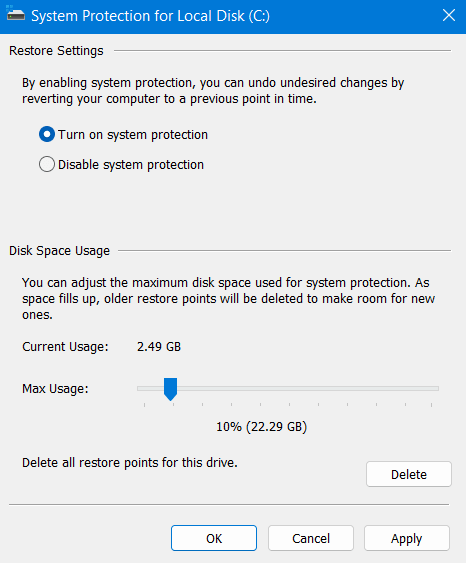
When the Max usage of a disk drive is set to 100%, this may also cause system backup failing on error 0x80070032. In order to fix this issue then, one should check the current disk max usage and bring it down to around 10%. Here’s how to perform this task –
- Launch the System Properties window as explained above.
- Go to the System Protection tab and hit Configure.
- Under Disk Space Usage, move the usage slider to the left to about 10-12%.

- Click Apply and then OK to save this configuration.
- Restart your PC next and see if this fixes the system backup issue on your computer.
3] Delete Old Backups
The presence of too many system backups may cause this issue on your computer. This is why we suggest deleting all old backups that you find not useful. Here’s how to delete old restore points on your Windows PC –
- Press Win + S to launch the Search window.
- Type “Restore” and click over “Create a restore point“.
- Doing so will launch the System properties window.
- Go to the System Protection tab and click Configure.
- Locate and press the Delete button beside “Delete all restore points for this drive“.
- Make sure to check the radio button – “Turn on system protection”. If it has been disabled, re-enable it by ticking over its radio button.
- Hit Apply then OK to confirm this configuration.
- Restart your PC next and see if this resolves the issue that you were struggling with.
Create a new restore point
Now that you have deleted all old backups, retry creating a restore point on your PC. I hope you may now create system backups without getting into an error code 0x80070032. Here’s how to perform this task –
- Press the Windows key and type “Create a restore point”.

- Click the top result to launch the System Properties window.
- Subsequently, find and click the Create button to start generating a new system backup.
- This might take a few minutes to complete generating the restore point.
I hope you are able to take system backups without getting into an error code 0x80070032.
4] Reset PC
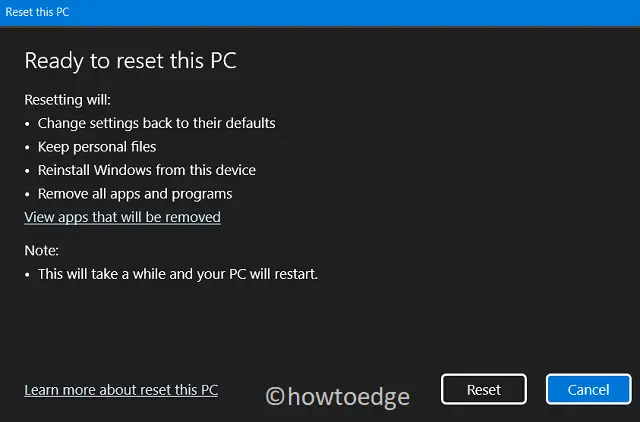
If none of the above solutions fix the 0x80070032 issue, there must be some complex issues. You can fix such issues only by resetting your PC. Here’s how to perform this task –
- Press Win + I to launch Settings.
- Click System and then Recovery on the right pane.
- Under Recovery options, you may see an option to Reset this PC.
- Well, click Reset PC.
- Click Keep my files and the system starts getting your files ready.
- When you see your device ready to reset this PC, click Reset.

- Follow the on-screen instructions and do as told to.
How to fix Windows backup issues?
Whenever you encounter problems creating Windows backups or using them, you may go for the following fixes –
- Try related troubleshooter
- Get rid of old backups
- Format hard disk
- Turn Off and On System protection
Does changing Background to Solid color fix the System backup issue?
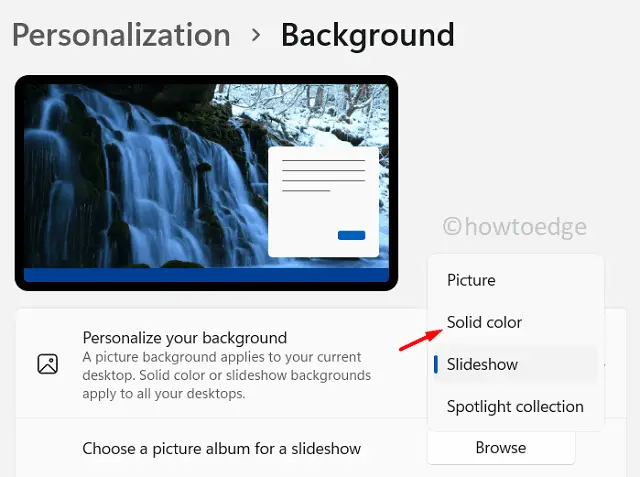
Normally, it shouldn’t. However, there are reports where users confirmed that they address the backup issues on their PCs simply by changing the Background color to Solid ones. You may confirm this by applying it to your machine only. Here’s how to opt-out for Solid color for your desktop background.
- Right-click anywhere on the Desktop screen and select Personalize.
- Go to Background and select Solid Color using the drop-down menu.

That’s it, I hope the solutions discussed above help you to overcome the Backup Error 0x80070032 on your Windows PC. Let’s know if you are still facing troubles creating or using a restore point.


