In this post, we will discuss a network error code 0x800704b3, what triggers this error code, and the six fixes that might resolve this network connectivity issue on Windows PC. This error normally occurs when you are trying to connect to a network or accessing the internet over it.
Upon encountering this network problem, you might see an error message that says –
|
|

Several users reported receiving a completely different error message that reads the following –
|
|
What causes a network error 0x800704b3?
When you read the error message, it is quite clear that the network path has to do something with this error code. Either you have typed an incorrect network path, or the typed-in path doesn’t exist.
In cases where you are entering a correct network path and the network provider is available, this error could be a direct result of the following conditions –
- Presence of some malware or viruses on your system
- Corruption within the system files or folders
- You have accidentally enabled SMB version 1.0
- A few network services are not running in the background
Now that you know the reasons behind a network issue, let’s learn the working ways to overcome this error code.
Ways to Fix Network Error Code 0x800704b3
Before you apply any solution, make sure to double-check the typed-in network path. If the network path is correct and yet you are receiving an error code 0x800704b3, attempt the below fixes one after another.
- Troubleshoot Network Adapter
- Check and activate Network Control Services
- Remove external security apps
- Run SFC and DISM Scans
- Disable SMB 1.0 Protocol
- Create a new user account and log in using that
1] Troubleshoot Network Adapter
The most effective way to resolve a network issue is by running the built-in troubleshooter. This tool will check for the underlying causes on your system and if it finds any trouble, the same will be resolved automatically. Here’s how to perform this task –
- Press Win + I to enter the Settings page.
- Go to System > Troubleshoot, and click Other troubleshooters.
- Scroll down to Network Adapter under the Other section, and click the Run button available on its right end.
- When the troubleshooting window appears, click Next.

- Now, follow the on-screen instructions that come moving forward.
Wait for a few seconds while the troubleshooter is scanning and repairing the issue leading to a network error. After its work is completed, check if you can now connect to your saved network. Before you do so, make sure to execute the below command on an elevated console having administrative privileges.
Alternatively, you may also copy/paste the below code on the Run dialog and press the Enter button.
msdt.exe /id NetworkDiagnosticsNetworkAdapter
Now that you are done with the diagnostic part, let’s check if you can connect to a network online.
Five Ways to Fix “Network discovery is turned off” Error
2] Check and activate Network Control Services
Users are able to connect to a network only when certain network-related services are running in the background on their PCs. When either of these services gets corrupted or stopped working, you might start encountering error codes.
So, it is essential to check all the network services and restart them if any service is not running on your device. Here’s how to check and restart a stopped network service on Windows 11/10 –
- Press Ctrl + Shift + Esc altogether to launch Task Manager.
- Select Services on the left navigation, and head over to its right side.
- Scroll down and locate DHCP and check its current status.
- If it displays Stopped, right-click on it and select Start.

- The chosen service will start immediately afterward.
Now, repeat the above steps for all these services –
DHCP
DNS Client
Network Connections
Network Location Awareness
Remote Procedure Call (RPC)
Server
TCP/IP Netbios helper
Workstation
Function Discovery Resource Publication
UPnP Device Host services
Wired Auto Config
WLAN Auto Config
COM+ Event System
Computer Browser
Wireless Zero Configuration
Now that you have restarted the stopped services, check if the network error code 0x800704b3 resolves afterward.
How to Add and Connect to a Wi-Fi Network in Windows 11
3] Remove external security apps
Network connectivity problems may also arise because of the presence of some buggy apps, especially when it is a third-party antivirus program. If that’s the case, disable your external antivirus and check if you can connect to your network. In case the network issues resolve afterward, you must get rid of that particular application.
Network errors might also occur when you are using some proxy, a VPN, or have bypassed Firewall. Undo the recent changes on your Windows PC and check if the problem resolves this way.
Fix: WiFi Connected But No Internet Error on Windows 11/10
4] Run SFC and DISM Scans
After you have removed the third-party apps from your system, make sure to run the SFC and DISM tools on your PC. These utility programs will check for file corruption and resolve them automatically. Here’s how to perform this task –
- Press Win + R to launch the Run dialog.
- Type “CMD” on it and press Ctrl + Shift + Enter keys altogether.
- When the UAC prompts, hit Yes to authorize opening Command Prompt as an administrator.
- On the elevated console, execute this code first –
sfc /scannow

- The SFC will look for the integrity of the system files, so this whole process will take some time. When this tool finds any missing or damaged files, the same will be replaced with their correct versions.
- Now that you have repaired all system files and folders, run the DISM command, as outlined below –
DISM /Online /Cleanup-Image /RestoreHealth
- The DISM tool will check for any file corruption inside your System Image and repair the corrupt ones.
- Wait for this command to complete 100%. After this is over, close CMD, and restart your PC.
Sign back into your Windows PC again and check if you can connect to your Network without encountering an error code 0x800704b3.
How to Reset the Network Settings on Windows 11/10
5] Disable SMB 1.0 Protocol
The Server Message Block (SMB) is basically a network file-sharing protocol and is used for sharing access to printers, files, and other resources on a network. At present, Windows supports three different versions of SMB and they are SMB 1.0, SMB 2.0, and SMB 3.0. By default, the SMB v1 comes disabled on recent PCs. If you have accidentally enabled this version, your device will face trouble accessing the network.
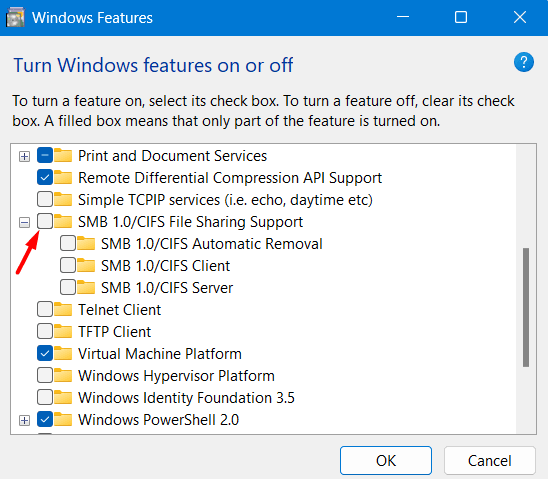
Disable SMB v1 by opening the Windows features page and your network will start working as usual. Here’s how to perform this task –
- Press Win + S to launch Windows Search.
- Type “Windows Features” on it and click the top result.
- On the succeeding screen, scroll down to SMB 1.0 and uncheck the box available on its left end.

- Click OK to confirm this action, and restart your PC.
When Windows 11/10 reloads, check if you can connect to a network now.
How to Forget a Saved Wi-Fi Network on Windows 11
6] Create a new user account and log in using that
If none of the above workarounds help to resolve the network error code 0x800704b3, your user profile must have been corrupted. It could be because of some virus attack, or some system files behaving strangely.
Create a new user profile having admin rights, and log into your PC using that. Hopefully, the network error must have been resolved by now. If you find any section difficult to follow, let’s know in the comment section.


