Recently, some Windows users encountered the error code 0x80070437 while installing the latest security patches on their computers. This is a very irritating error that disrupts the personal workspace of the users. The error results in automatic system restarts, sudden freezes of the screen, and in some cases, all active programs will close themselves. You may come across this issue in the form of an error message that looks like this:
“The account specified for this service is different from the account specified for other services running in the same process“
So, if you’re also facing the same issue on your computer, here is the way to fix it.

Fix Windows Update Error Code 0x80070437
The following methods will help you repair error codes on your computer –
1] Turn on Windows Defender Firewall Services
Windows Update Error Code 0x80070437 can be resolved by enabling the Windows Defender Firewall Services. It seems that your firewall is somehow disabled during the installation of the Windows Update, so the system displays the error.
Microsoft recommends using Windows Defender Firewall before installing updates to avoid errors since it first scans the patch to make sure that it matches the information available on Microsoft Servers. Here’s how you can enable the Firewall in Windows Defender
- Click on Start, type Services, and press Enter.
- Search for the Windows Defender Firewall service and then right-click on it.
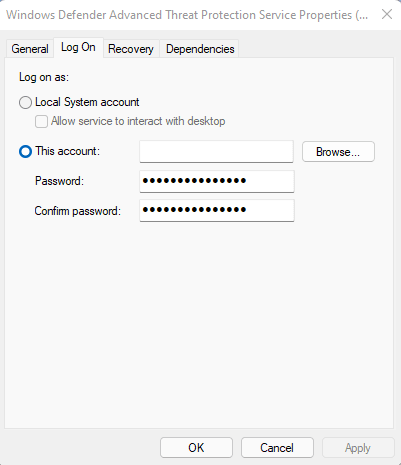
- Select the Properties option and then switch to the Log On tab.

- Select the This account option on the pop-up window, then type Local Service in the available field
- Please enter your password twice in the respective fields and click Apply. You will then be able to enable Windows Defender Firewall on your PC with your Microsoft Account.
- From the General tab, choose Automatic as the Startup type, and then click OK.
It is important to restart your PC once you’ve made changes in order to avoid the junk files that might be building up in the memory cache. As soon as Windows is loaded fully, you should go to Update & Security to update your Windows
2] Run Windows Update Troubleshooter
Windows 10 comes with a built-in application named Windows Update troubleshooter that will assist you in identifying and fixing update-related problems. If you encounter such an issue with your device, you should use this tool. The following steps can help you achieve this:
- Click on the Windows icon and select the Settings option.
- Select the Update & Security category.
- Choose the Troubleshoot submenu.
- On the right panel, click on Additional troubleshooters.

- Expand Windows Update and click Run the troubleshooter.
- Proceed as instructed on-screen.
- When there is a resolution available, click the Apply this fix button.
Restart your computer after completing the steps, and then check whether you were able to update your Windows.
3] Restart the Windows Update service
To restart the Windows Update service, you first need to stop it manually and then start it again. Here is the process to do it:
- Search for Services and then open it.
- Scroll down through the list and search for Windows Update.
- Right-click on Windows Update and click on Stop.
- Now press the Win+R keys to open the Run dialog.
- Type the following text and press Enter:
C:\Windows\SoftwareDistribution
- Select all the items using the Ctrl+A keys and press Delete.
- Again open the Services application.
- Right-click on the Windows Update service and select Start.
4] Reset Windows Update Service
If that does not work, manually reset the Windows Update Service to fix this error code. Here is the procedure to do that:
- Open Command Prompt as an administrator.
- Type the following commands one by one followed by the Enter key:
net stop wuauserv
net stop cryptSvc
net stop bits
net stop msiserver
Ren C:\Windows\SoftwareDistribution SoftwareDistribution.old
Ren C:\Windows\System32\catroot2 Catroot2.old
net start wuauserv
net start cryptSvc
net start bits
net start msiserver
- Now close the Command Prompt window and try Windows Updates again.
5] Install the update manually
If nothing helped you fix the error code, download and install the updates manually that failed to install:
- Click on Start and select Settings.
- Select Update & Security > Update & Security > Windows Update.
- On the right pane, open View Update History and choose the update that failed to install.
- Navigate to the Microsoft Catalog page.
- On this page, search for the update, then download and install the update manually.
Once you complete the above guidelines properly, you will be able to update your Windows properly. In case the error still appears on your PC, you may contact the Microsoft Agent for assistance.


