Wireless network usage has increased two to three folds as compared to the usage of Ethernet. The same can be visible in modern laptops as well where you can see the missing RJ45 port. In this post, we will discuss how to add and connect to a new Wi-Fi network in Windows 11 (the latest OS by Microsoft).
Before you establish a wireless network connection, you must know the basic details of the network to which you are willing to connect your device. They are Network Name, Security Type, Passkey, etc. Without any further ado, let’s see how to add a wireless connection in Windows 11.

Add and Connect to a new Wi-Fi network in Windows 11
To add a new wireless network connection and connect to it on Windows 11, you may try either of the following two methods –
- Windows Settings
- Control Panel
Let’s see the complete procedure of both these ways.
1] Add a wireless network connection using Settings
Before you connect to a Wi-Fi network in Windows 11, you need to first add that network. Here’s how to perform this task –
- Press Win + I shortcut to open Settings.
- Head over to the Network & Internet on the left navigation then Wi-Fi on its adjacent right panel.
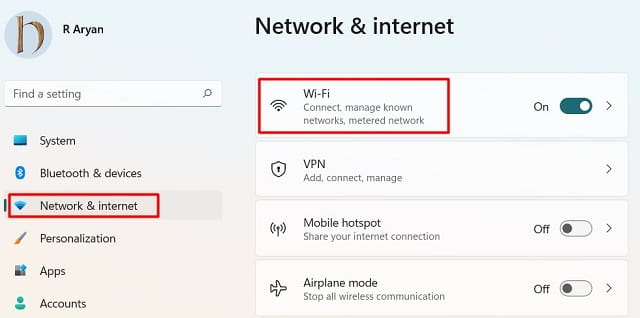
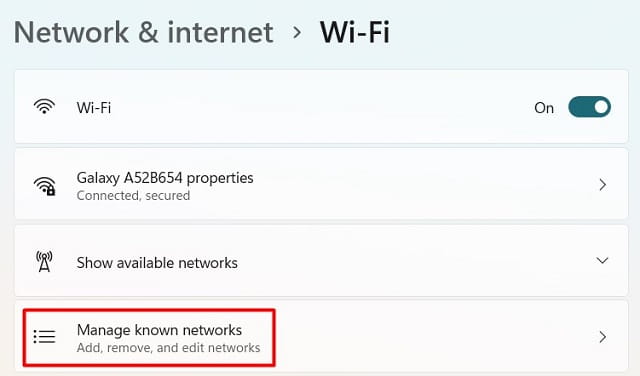
- Scroll down to the Manage known networks option.
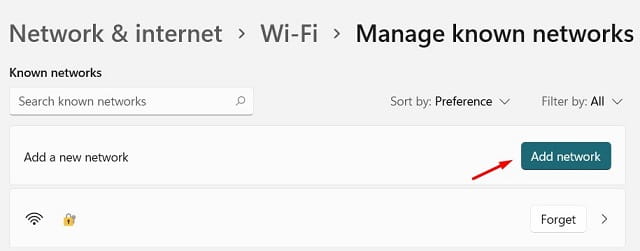
- When this option expands, tap Add network next to Add a new network.
- On the next window, type the Network Name to which you want your device to connect.
- Select the Security type (WEP, WPA2-Personal AES, etc) using the drop-down menu.
- Type the password of the network to which you are going to connect your device.
- Tick the checkbox – “Connect automatically” and hit the Save button.
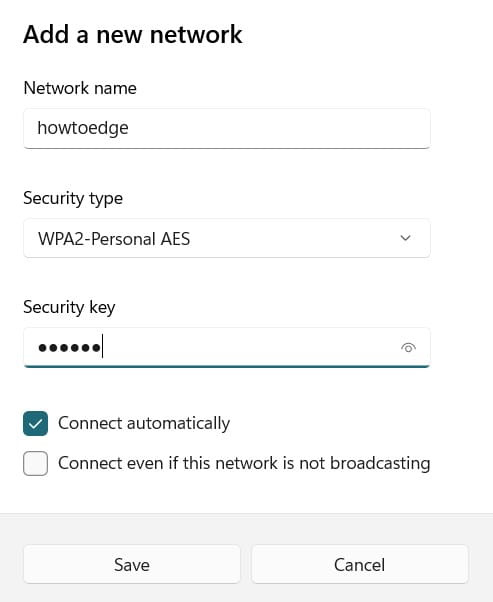
Note: You may also check the box – “Connect even if this network is not broadcasting“, however, it is optional.
That’s it, your system will automatically check if the added Wi-Fi network is available for connection. If it is, your device will connect to the added network automatically.
Tip: Following this way, one can add several Wi-Fi networks to his or her device.
2] Connect to a Wi-Fi network using Control Panel
Microsoft is planning to get rid of its older features like Control Panel, Device Manager, etc. However, as Control Panel is accessible for now in Windows 11, you may use it to add and connect to a new Wi-Fi network. To do so, follow these easy steps –
- Launch Control Panel first on your Windows 11 PC.
- Click Network and Internet then select the first option i.e. Network and Sharing Center.
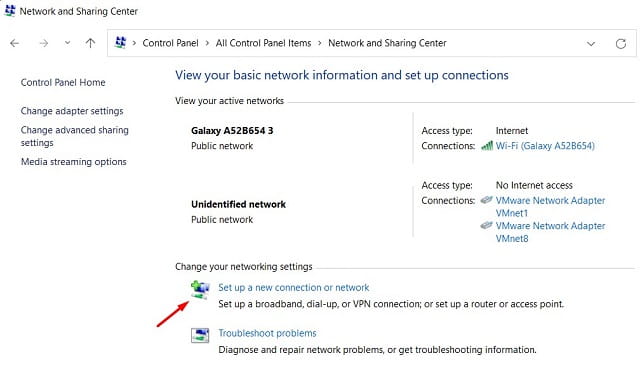
- Under Change your networking settings section, click the link – Set up a new connection or network.
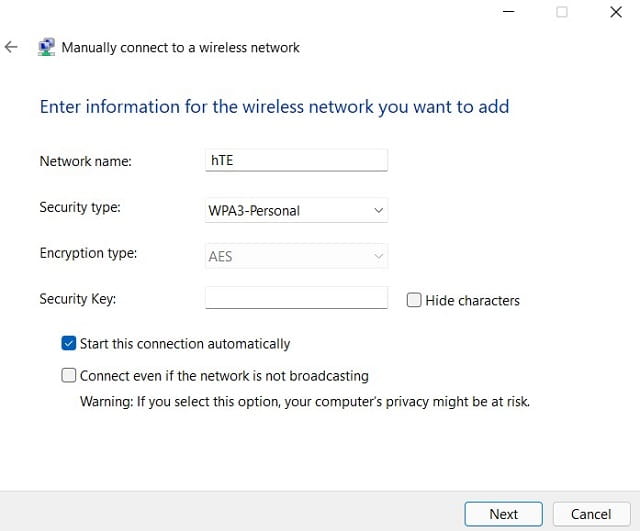
- Choose “Manually connect to a wireless network” followed by Next to proceed further.
- Type a valid Network Name, and select the security type. The encryption type will be filled in automatically.
- Type the security key and hit Next.
- If you had typed the Network Name and its password correctly, your device will connect to the chosen wireless network.
How to forget a saved network in Windows 11
If you want to forget a saved network on your computer, do the following –
- Click the network icon available on the taskbar.
- Go to Manage Wi-Fi connections, right-click on the network, and select the option – Forget.
Though this method should work, this may fail in certain cases. You may read two alternate methods in this post.
WiFi Connected But No Internet Error on Windows 10
In case your device gets connected to a Wi-Fi network, however, you are not able to browse anything online, there must be some network issues. Try resetting or clearing DNS on your computer. Here’s how to do this –
- Launch CMD as administrator, and execute these two commands –
ipconfig/release
ipconfig/renew
- Check if the problem resolves. In case the network issue still persists, run this code –
ipconfig/flushdns
I hope this article helps you to add or connect to a new Wi-Fi network on your Windows 11 PC. Let’s know in the comment section if you face any difficulty following this tutorial.


