Are you concerned about the Antimalware Service Executable High CPU Usage on your Windows PC? Relax – it’s not just you. Many Windows users have reported the same issue and they’re worried about what’s wrong with their system. Why is it consuming so much CPU resources? All your questions regarding this issue will be answered in this blog post.

What is Antimalware Service Executable
Microsoft Windows Defender includes an Antimalware Service Executable as a background service. This service is also known as MsMpEng.exe and can be found in Task Manager under the Details tab. The Antimalware Service Executable runs when you visit websites to scan them for malicious programs. This utility detects malicious programs and scans your system for malware automatically. It provides Windows Defender with real-time protection against malware in addition to monitoring potential threats to your computer.
Fix Antimalware Service Executable High CPU Usage
If your Windows PC is consuming a high amount of CPU resources because of the Antimalware Service Executable, use the following methods to fix it:
- Scan for malware infections
- Stop the Exploit Protection Service
- Change Windows Defender scheduling options
- Turn off Windows Defender
- Add Antimalware Service Executable to Windows Defender Exclusion List
Note: It is important to note that you can fix this problem on your own without consulting a technician.
1] Scan for Malware Infections
If Windows Defender is bogging down your computer’s performance, your computer may be infected with malware. For such a situation, you must open Windows Security and perform a full scan using it.
2] Stop the Exploit Protection Service
This method requires you to stop the Exploit Protection Service, which can result in a significant reduction in CPU usage.
Exploit protection provides protection against malware that uses exploits to spread onto devices. However, the problem here is that it can sometimes cause a loop in which Windows Defender tries to disable a program, and when it fails, it tries again and again, which results in excessive CPU usage.
To do so, follow these steps:-
- Run Command Prompt as an administrator.
- Copy and paste the below command and press Enter:
powershell “ForEach($v in (Get-Command -Name \”Set-ProcessMitigation\”).Parameters[\”Disable\”].Attributes.ValidValues){Set-ProcessMitigation -System -Disable $v.ToString().Replace(\” \”, \”\”).Replace(\”`n\”, \”\”) -ErrorAction SilentlyContinue}”
- Don’t worry about any warnings, just let the process run.
- After you’ve finished, restart your computer and see if it resolves the problem.
3] Change Windows Defender Scheduling Options
Antimalware Service Executable is sometimes responsible for consuming MsMpEng.exe too much memory while Windows Defender runs a full scan. If you experience this issue, you may want to try changing the Scheduling settings of Windows Defender. Here is how you do it:
- Open the Run dialog box by pressing the Windows+R keys.
- Type taskschd.msc in the text box and click OK to open Task Scheduler.
- On the left, expand the Task Scheduler Library section.
- Then navigate to the following path:
Microsoft > Windows > Windows Defender
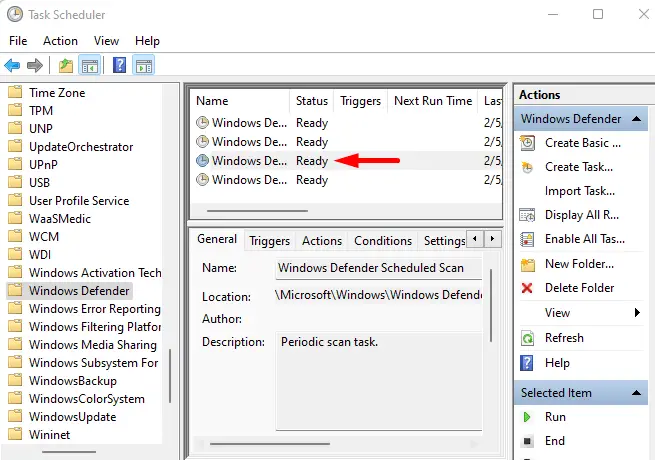
- Now go to the middle pane and double-click the Windows Defender Scheduled Scan entry.
- Click the General tab, and uncheck the checkbox next to Run with the highest privileges.
- Then go to the Conditions tab and uncheck all the checkboxes.
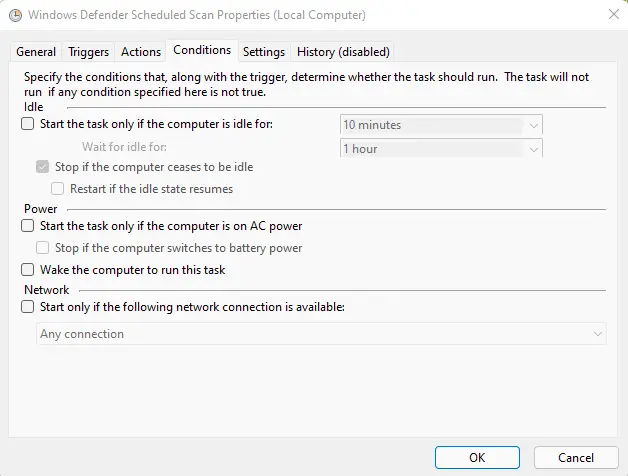
- Click on the OK button to clear the scheduled scans.
As a computer security measure, there is a need to schedule some new scans. Here, it is possible to do this in a way that won’t adversely affect your computer’s performance.
To do so, do the following:

- Double-click Windows Defender Scheduled Scan.

- Switch to the Triggers tab then click the New button.
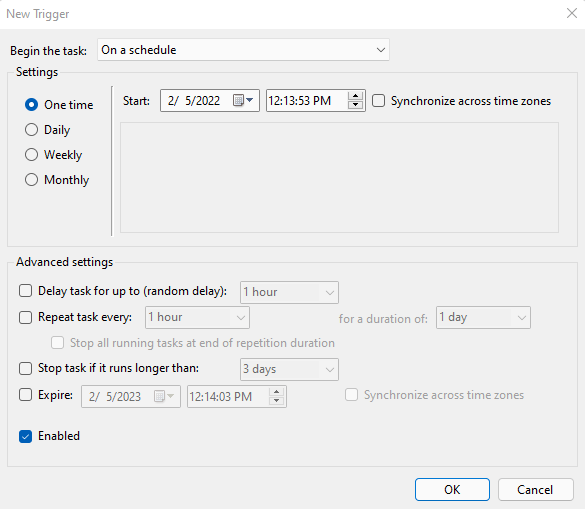
- Now you have to create a scan schedule that is suitable for your needs. As a general rule, perform scans at least weekly, when your CPU is not overloaded.
- After completing the scan, click OK.
Repeat this action for the remaining three schedules in the Windows Defender folder. This includes Windows Defender Cache Maintenance, Windows Defender Cleanup, and Windows Defender Verification.
After you make the above changes, check whether it resolves the MsMpEng.exe high CPU usage issue problem. If it still occurs, move on to the next workaround.
4] Turn off Windows Defender
Some users reported that disabling Windows Defender fixed the issue. Taking this step makes you prone to a wide array of cyberattacks. Therefore, you must install a lightweight third-party security program before disabling Windows Defender on your Windows computer.
5] Add Antimalware Service Executable to Windows Defender Exclusion List
The CPU consumption of MsMpEng.exe might be considerably reduced if you add it to an exclusion list. Here’s how you do it:
- Open the Run dialog box using the Windows+R keys.
- In the text box, type windowsdefender: and press Enter to open Windows Security Center.
- Click on Virus & threat protection menu.
- Under Virus & threat protection settings, click on the Manage link.

- Scroll down to the Exclusions section and click on the Add or remove exclusions link.
- When UAC appears on the computer screen, click on the Yes button.
- Click the +Add an Exclusion button on the Exclusions page.
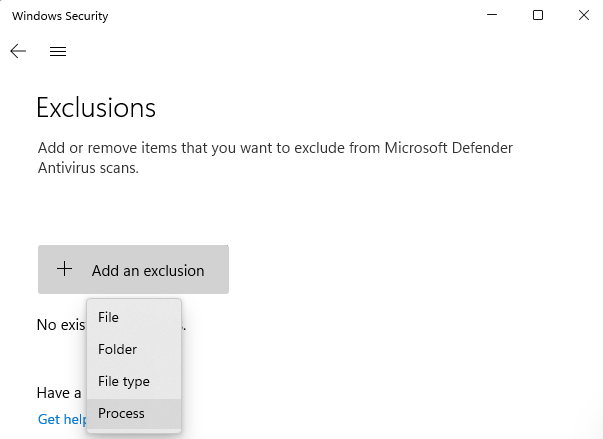
- Then select Process from the drop-down menu.
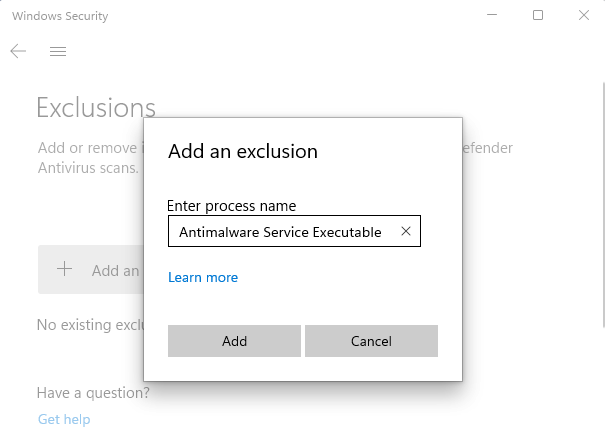
- In the popup window, type Antimalware Service Executable.
- Click the Add button.
Can I stop the antimalware service?
As long as Windows’ built-in antimalware engine or Windows Defender is running, you cannot stop the antimalware service. Although, if you disable real-time scanning or use another antivirus application, you won’t be able to see the process in your task manager.
Read Next:


