Have you ever wondered why does a normal Windows Security Scan take a huge time? Well, this is due to Windows Defender Scan type and you can change the same to reduce overall CPU utilization. Windows Security is the by-default application on Windows 10 that secures your PC from any malicious attacks. You should frequently search out for Windows Defender updates even after applying the latest cumulative updates on your device.
When you change the Windows Defender Scan type, this will alter the limit of maximum usage of CPU without affecting its performance. Usually, Windows users have the option to schedule a quick scan, the same disappears after changing its scan type. You will have access to only Full Scan afterward. Here, we discuss three different ways to Set the limit over high CPU usage during a Windows Defender Scan. These are using PowerShell, Group Policy Editor, and Registry Editor. Let’s explore these tweaks in detail –

Note: One can disable Windows Defender temporarily. This is because it gets re-enabled automatically after a certain period of time. To change the Windows Defender Scan type, make sure that this feature stays enabled.
Set limit to CPU Usage during Windows 10 Defender Scan
To alter the Windows Defender Scan type in Windows 10, use the following workarounds –
1] Using PowerShell
The PowerShell is a command-line application that one can use to perform several tasks in Windows 10. Using this app, you may manually set a limit to the maximum usage of CPU by Windows Defender while scanning system files. Here’s how to proceed –
- Press Win and X shortcut keys to launch the Power Menu.
- From the appeared list, select Windows PowerShell (Admin).
- When the UAC prompt pops in, tap Yes to permit the access.
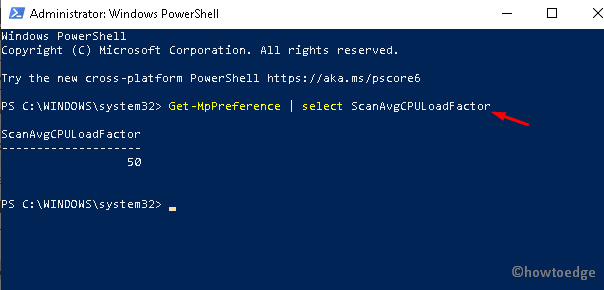
- On the elevated page, copy/paste the given code and hit the Enter key –
Get-MpPreference | select ScanAvgCPULoadFactor

- The above command will display the percentage limit usage by CPU for Windows Defender.
- To change the value, type in or copy-paste the following command line –
Set-MpPreference -ScanAvgCPULoadFactor <percentage>
- Here put the value (between 5 to 100) under <percentage> section.
Note: If you enter the percentage value “0”, this will dismiss any limit. This simply implies that one can use the maximum available capacity of the CPU.
2] Via Group Policy Editor
The Group Policy provides another alternative way to set the Windows Defender Scan type limit in Windows 10. All you need is to perform the below steps –
- Open the Run dialog (using Win+R) and type gpedit.msc in the text bar.
- The Local Group Policy Editor will start immediately afterward.
- Here, expand the Computer Configuration option.
- Thereafter navigate to the following sections one after another –
Administrative Templates->Windows Components->Windows Defender Antivirus->Scan

- Double-click on the Specify the maximum percentage of CPU utilization during a scan option.
- Next, tick the checkbox left to the Enabled option and scroll below.
- Now put the desired value (5 to 100) under Specify the maximum percentage of CPU utilization during a scan.

Note: The value indicates the scanning performance of the CPU. Higher the percentage implies maximum utilization of CPU memory for the Scanning purposes.
- Select Apply then OK to confirm the changes.
Once you complete the above steps successfully, your system will adjust the CPU usage limit during a Scan.
3] With the help of Registry tweak
The registry is the unique application of Windows to make internal changes on the system such as Windows Defender Scan type. Follow the below guide to do this –
Note: Making changes under Registry is a risky task as any wrongdoings may corrupt the entire OS. Hence, we recommend enabling automatic registry backup before performing any changes.
- Right-click on the Windows icon and select the Run option.
- In the void bar, type regedit.exe and press the OK button.
- If the UAC prompts, tap Yes to authenticate the access.
- Now expand the key-value on the left pane and reach out to the following path –
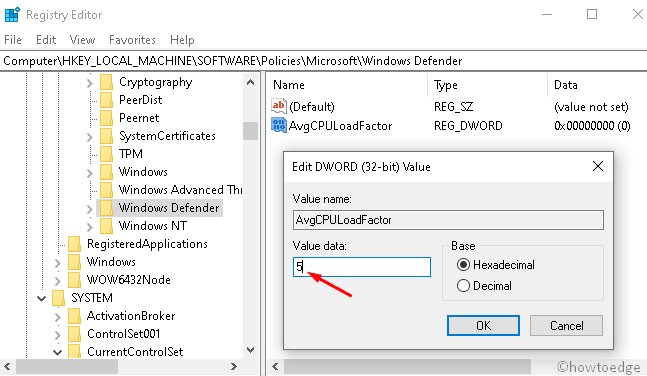
HKEY_LOCAL_MACHINE/SOFTWARE/Policies/Microsoft/Windows Defender
- Right-click anywhere and select New thereafter DWORD (32-bit) value.
- Put AvgCPULoadFactor in the Value name data field.
- Now, double-click this entry and type number ranging between 5 to 100.
- Lastly, press the OK button.

Note: To go back to the previous state, just delete the recently created DWORD value.


