Windows 10 receives quite a number of updates every now and then to improve its overall security and functionalities. The update can be of anything like security patches, servicing stack, installed apps, device drivers, and many more. When there are so many updates going on, there is a chance that a few of them get corrupted somehow and start failing the basic operations. This might also come into effect when you download and install buggy software.
To find and uninstall problematic patches, you obviously need access to them. Well, in this post, we have come up with four handy ways that you can use to check Windows Update history. They are using the Settings app, Control Panel, CMD, and PowerShell Module. Let’s explore these methods in detail –
How to check Windows Update history on Windows 10
To look into Windows 10 Update history data on your device, try any one of the below-discussed methods –
1. View Windows 10 update history using Settings
To get the list of Windows 10 recent updates via Settings, use these steps –
- Press Win & X and select Settings on the Power Menu.
- Expand Update & Security category.
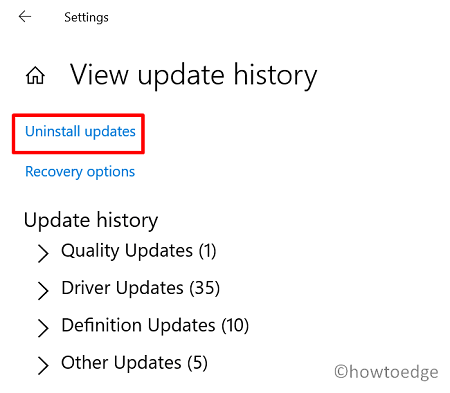
- Under Windows Update, click on the View update history link.
- The system will then display all of the installed updates including quality updates, drivers, definition updates (Windows Defender Antivirus), or the optional ones.

- Click on the individual update to visit the Microsoft Official site wherein you can get to know more about the chosen one. You will get information like changes, improvements, and known issues (if persists any).
Note: In case you are facing issues after installing a particular update, you may uninstall it right on the Settings page itself. Here’s how to proceed –
- On the View update History page, you will find a link to Uninstall updates, click once over it.
- Doing so will redirect you to the Control Panel.
- Select the individual update on the right side, and hit the Uninstall button.
2. Check the installed Windows 10 updates via Control Panel
Some patches like SSU, Microcode, Visual studio are not listed directly on the Settings page. Thanks to Control Panel, you may find all the additional updates here. To view them, use these steps –
- Press Win & S to open the Search window.
- Type Control Panel and hit over the best-matched result.
- When it opens, go to Programs > Programs & Features.
- To check Windows Update history, click View Installed Updates available on the left column.

Remove an update: If you want to find and remove a specific update, search by typing the KB number in the search box.
- Removing any security or non-security patches on the Control Panel is quite easy. Make a right-click on the individual update and hit Uninstall using the context menu.
3. Check the installed update history via Command Prompt
Users may view or remove a buggy update using Command Prompt as well. All you require is to execute a few codes on the elevated console. To do so, read and apply the steps discussed below –
- Open Command Prompt as Admin first.
- Execute this command next to view the list of all installed updates on the computer.
wmic qfe list

- To find a particular update, run this code instead –
wmic qfe | find "KB number"
- Running the above command will open the Microsoft support link containing all the relevant information about the typed-in KB number.
- The command Prompt also provides a feature to remove an installed update. If you do want to uninstall a security/non-security patch, run this code –
wusa /uninstall /kb number /quiet
4. Check update history using PowerShell
Similar to that of Command Prompt, users may also use PowerShell to view and manage Windows 10 updates. However, in this, you need to install a module on the computer i.e. PowerShell Module. Here’s the process goes –
- Open Windows PowerShell as Administrator.
- When it does, install the PSWindowsUpdate Module on your device. To do so, copy/paste the code below and press Enter.
Install-Module PSWindowsUpdate
- PowerShell will then prompt a message asking if you really want to proceed further.
- Type “A” and press Enter to accept installing the module.
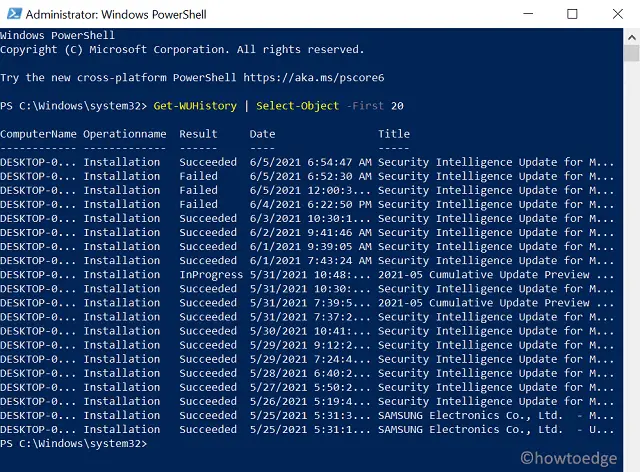
- Next, run this command to see a list of recent 20 updates on the computer –
Get-WUHistory | Select-Object -First 20

Note: You may sometimes receive error messages if PowerShell is not allowed to run scripts locally. Well, in such a scenario, you must tweak a few settings. To do so, read this tutorial.
- To view, even more, replace “20” with the desired number.
Note: If any latest Windows 10 installation is causing you problems, get rid of the same by executing the code below –
Remove-WindowsUpdate -KBArticleID KBNUMBER
- Replace ‘KBNUMBER’ with the actual cumulative update number.
That’s it, if you face any difficulty performing either of the above methods, tell us in the comment section.


