Disk Management is a built-in system utility that allows you to perform different advanced storage tasks like hard disk partition size, merge or reduce the size. However, recently some users have reported that Disk Management is not opening in Windows 10. Whenever they try to access the Disk Management tool, it shows an error message – Unable to connect to Virtual Disk Service.
There might be multiple factors responsible for this issue. In this article, we will show some effective solutions that might help you fix this problem. So, let’s see how to fix this error.

Windows 10 Disk Management is not opening
If the Disk Management is not working on your Windows 10 PC, you won’t be able to access the service like file system, disk info, and volumes. However, this post comes with some effective solutions that might help you to solve the issue.
1] Using the Services Manager app
To fix this problem, you need to open the Service Manager app and restart the concerned Disk Management Service. Here are the steps to do so –
- Click on Start, type Services, and hit Enter. If you see an Admin prompt, click Yes to proceed.
- Inside the Windows Service Manager, you will see all the services listed there.

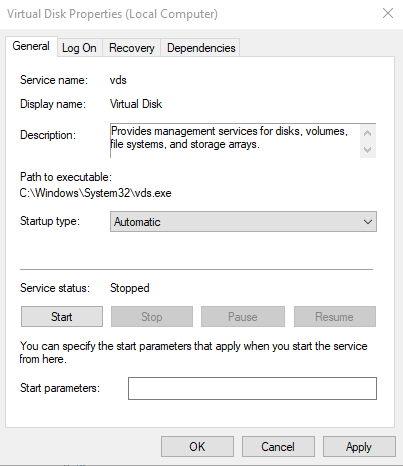
- Scroll down and locate the Virtual Disk service. Once you find it, double-click on it, and change the Startup type from Manual to Automatic.

- Also, make sure the Service status is Running, if it’s Stopped, click the Start button to make it run.
- Click Apply > OK button to save the changes.
After performing the above steps, close the Service window and restart your computer. Once it starts up, see if you’re now able to open the Disk Management tool.
2] Run System File Checker and DISM Scan
Sometimes this problem also occurs due to having the file corruption in the PC. So, if the Disk Management tool is still not opening, you might need to repair the corrupted files by running the System File Checker and DISM scan.
- Run Command Prompt as an Administrator.
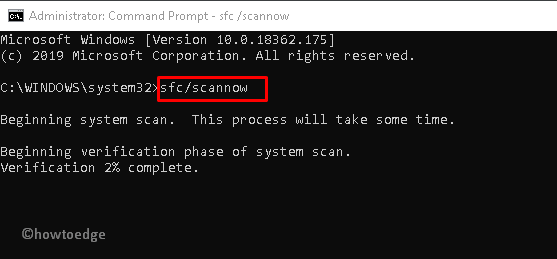
- Type the given command in the Command Prompt and hit Enter.

sfc /scannow
- After performing the scanning process, restart your Windows and see if it solves the issue.
If running an SFC scan doesn’t solve your issue, you might want to run the DISM tool to repair the corrupted files and replace them as well. Follow the instructions given below to run DISM –
- Press Win+X keys and select Command Prompt (Admin) from the list.
- Then input the following commands and hit Enter after each.
DISM /Online /Cleanup-Image /RestoreHealth
- Please note that this process may take around 20 minutes to complete therefore don’t interrupt it. Once it is finished, restart your computer and check if the problem still persists.
3] Use Diskpart to fix the issue
If none of the above methods help, you can use Diskpart to fix the issue. But using this tool is not a cup of tea. If you don’t follow the instructions properly, you may lose everything that is available on the selected drive and you cannot take back the changes. So, before you proceed, we suggest you back up your data so that if things go bad you can revert it back.
- Click on Start, type “
diskpart“, and press Enter. - Select the Yes button if UAC appears on the screen.
- Type the following command and press Enter. This will show you the list of all the active drives.
list disk
- Then type the following command and press Enter. This will select the drive you need to work with –
Select disk <Disk-number>
Note: In the above command-line, replace Disk-number with the disk number you want to repair. The Disk number must be accurate otherwise there is a chance of deleting any other disk. So, please confirm the Disk number one more time before you proceed.
- If it’s required to create a partition, type the below command and hit Enter. This will show you a list of options.
create
- Select the one you want, type the below command, and hit Enter:
create <new option>
Note: There are two types of partitions you can create – Primary and Extended. The primary partition is the only option using which you can make the disk bootable. Therefore, it’s needed to install an OS, select the Primary option. However, for backup purposes, you can go with the Extended partitions.
- Now type the following command and press Enter to see which number is linked with the volume you’re intending to work with:
list volume
- This will show you a list. To select one type, type the following command
select volume <number>
Note: Sometimes it shows select partition <number> depending upon the case may be.
- Typing the following command and press Enter to list out the options.
help
- Now type the below command and hit Enter to terminate DiskPart:
exit
After running all the commands, close the command prompt window and restart your computer. Once it starts up, you should now be able to open the Disk Management tool.
How do I restart Disk Management?
To start Disk Management, log into your computer as administrator first. Press Win + R to start Run, type “compmgmt.msc“, and hit OK. Well, this should start the Disk Management window on your desktop screen.
Alternatively, you may also start this in-built tool by following these easy steps –
- Press Win + X.
- Select Computer Management.
- Click Disk Management on the left navigation and you will view all your disk drives on the central pane.


