Some users reported Not enough Quota is available to process this command error message on their Windows 10 PC. This error mostly occurs while attempting to copy a file from their computer to a network folder. It normally appears with the error code 0x80070718.
If you’re also facing such an issue on your Windows 10 device then this post might help you fix this error code. In this tutorial, we have explained various potential solutions that have helped various users to solve this issue.
With this error, you may see the following error message:
Rename File An unexpected error is keeping you from renaming the file. If you continue to receive this error, you can use the error code to search for help with this problem. Error 0x80070718: Not enough quota is available to process this command.
Rename File Error 0x80070718 on Windows 10
To fix the Rename File Error 0x80070718 on Windows 10, use the following methods:
1. Close All Unnecessary Applications
This type of problem commonly occurs if you run multiple applications simultaneously on your computer. Therefore, in order to avoid such an issue, we suggest you close all the running applications and programs and see if it resolves the “Not enough quota is available to process this command” error.
2. Change the Disk Usage Settings
If closing applications doesn’t solve the issue, then the disk usage limit on your computer might have set to a lower value. In this case, you need to increase the disk quota on your computer and you’ll certainly get rid of this issue. Here is a quick guide to do:
- Open Control Panel on your Windows 10 computer.
- Make sure the “View by” category is set as “Large icons” or “Small icons”.
- Click on the Sync Center option.
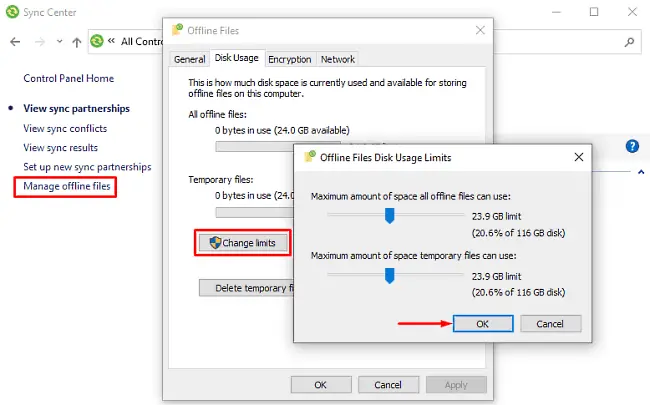
- On the left side, click on Manage offline files category.
- When the Offline Files wizard opens, switch to the Disk Usage tab and then hit Change limits.
- Now drag and adjust the range slider to increase or decrease the amount of space for offline files and for temporary files.
- Click OK to apply the changes.
- Then click Apply > OK on the Offline Files window and then close it.
- Now restart your computer and your problem should be fixed now.
If you’re still encountering the same issue on your PC, try the next solution.
3. Change the default Save location
Many users have confirmed that changing the default Save location helped them to solve their issue. Follow the below steps to change the default location to HDD on your PC.
- Click on the Start button and type “default save locations” and select the same from the top of the result.
- In the Default Save Location window, change the default save location (C: drive) to other HDD drives using the drop-down menu. Then click on the Apply button to save the changes.
- Similarly, make these changes for each field in this window.
- Once you have done, close the Settings window and restart your computer.
- Now check if it fixes the issue. If not, try the next solution.
4. Set Paging File Size in the Virtual Memory
Sometimes this issue also appears if the paging file size in the Virtual Memory settings is low. To increase the paging file size in the Virtual Memory settings, use the following steps:
- Right-click on the Start button and select Settings.
- In the Settings app, click the System option.
- Scroll down in the left pane and select the About section.
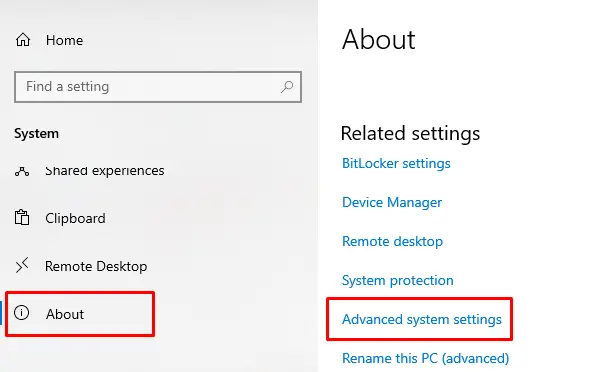
- Now move to the right pane and click Advanced system settings (under Related settings).
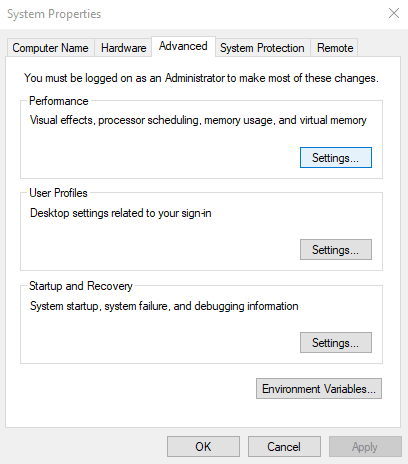
- When the System Properties window opens, go to the Advanced tab.
- Under the Performance section, click on the Settings button.
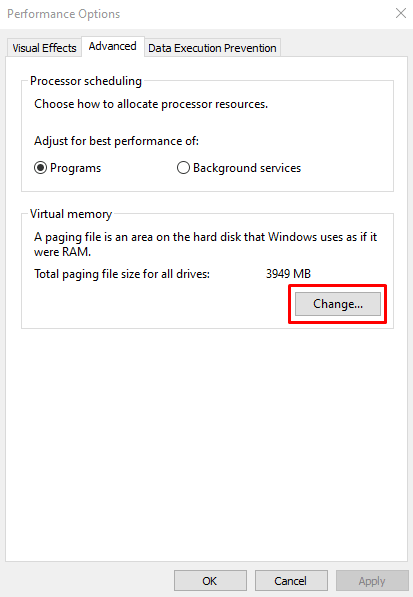
- In the Performance Options window, switch to the Advanced tab.
- Then go to the Virtual memory section and click on the Change button.
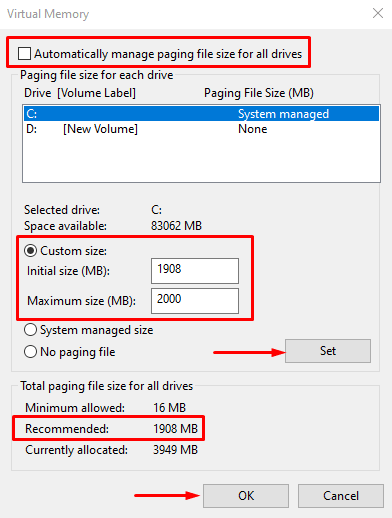
- In the Virtual Memory window, uncheck the Automatically manage paging file size for all drivers box.
- Select the Custom size box. Then enter the Recommended size in the Initial size box.
- In the Maximum size box, enter an amount larger than the Initial size.
- Then Click Set and OK to save the changes.
- Reboot your computer and then check if the error 0x80070718 is gone.
That’s it.
