If you are encountering the Boot sector issue Oxc000000f on your Windows PC and are searching for ways to fix it, read this article till the end. This is a fault in Windows Boot Manager that prevents the Operating system from signing in.
The boot Sector plays an important role in loading the operating system in Memory. If somehow this section fails, BCD stops reading Boot Manager; As a result, it leads to Oxc000000f error.
What may cause this error in Windows 11/10?
Corrupt peripheral devices connected to the system can originate from this trouble, so remove them. In case, you failed to manage the Boot sector issue Oxc000000f on your system, create a Media Creation tool then apply fixes like Repair system files, BCD code, and Bootrec.exe tool to encounter this bug. Let’s explore these methods in detail-
- Remove additional cables/ Hardware Device
- Repair your System using the Media creation tool
- Via bootrec.exe Tool
- Repair existing Boot Configuration Data
- Create an EFI Partition
Fix- Boot sector issue Oxc000000f in Windows PC
Here, we describe five different ways to solve the Boot sector issue Oxc000000f on your Windows 11/10 PC. They are –
1. Remove additional cables/ Hardware Device
The faulty peripheral devices plugged into your System may generate such an error. Hence, it is best to disconnect external devices like USB, DVDs, or Memory cards (except keyboard and mouse) from their specific port and Reboot your PC again. In case you are still struggling with the above error code, try the next workaround.
Make sure to create a system restore point before applying any of the methods mentioned below.
2. Repair your System using the Media creation tool
If BCD error code Oxc000000f persists on your PC, the fault might be in the system files and can be managed using the Media creation tool only. Follow the below steps to create a media creation tool –
Create installation media manually
Note: You require two different PCs to complete these steps.
- First, go and download the Windows 10 Media Creation Tool on another PC. Windows 11 users may visit this link to get the respective media creation tool.
- After the download is completed, double-click on its setup file to begin the process.
- If the UAC prompt appears up, tap Yes to allow access.
- Succeeding after, select Edition, language, Architecture then press Next to go ahead.

- Now choose a USB drive (at least 4 GB) to store this file followed by Next.
Keep patience till the setup file is copied on this peripheral drive. Once the installation media is ready, it is now turn to repair the existing faults using these steps –
- Turn Off the problematic computer and attach Windows installation media at its respective port.
- Press the Power button to log into the system henceforth tap continuously the function keys like F2, F9, F10, Del, etc. (depending upon your system architecture) to launch BIOS Settings.
- Here, switch to the Boot Order section (use the Up and Down arrow keys) to select the First Boot Device as DVD/USB.
- Press F10 (or suggested key) to apply the changes then Reboot the system again.
Note: Make sure you have used the original Windows installation media on your system.
3. Via bootrec.exe Tool
The bootrec.exe is an in-built application for Windows PC, that usually works to rebuild the BCD (Boot Configuration Data). This process helps to manage files that may hinder Windows startup, here is the procedure-
- At first, attach Windows installation media (DVD/USB) at its respective port and Reboot the system.
- On a Bootable screen, press any key using the keyboard to skip the prompt.
- On the following wizard, select language, time, currency, and keyboard thereafter press Next.
- Under the system setup page, click Repair your computer option.
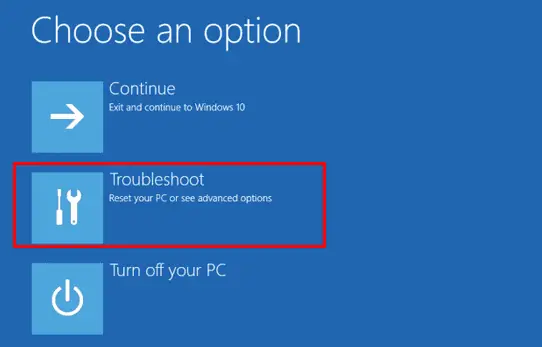
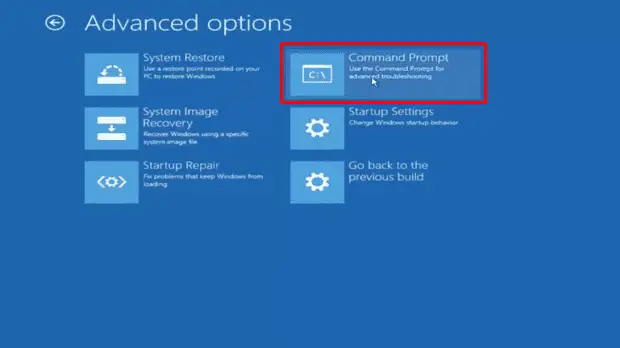
- Henceforth select Troubleshoot followed by Advanced Options on the next screen.

- Succeeding after, choose Command Prompt from the bunch of items to let open this wizard.

- When the Command prompt opens up, type Bootrec.exe then hit enter to begin repairing BCD files.
- Once finished, Restart your PC normally so as to save the changes made so far.
In some cases, Bootrec.exe doesn’t repair the faulty BCD files. If that’s the case, you need to delete the previous Boot Configuration Data and rebuild it again. To do this you need to apply these codes one by one and hit Enter at the end of each command.
bcdedit /export C:\BCD_Backup

c:

cd boot

attrib bcd –s –h –r

ren c:\boot\bcd bcd.old

bootrec /RebuildBcd
I hope, this will definitely solve Boot Error code 0xc000000f and thus System starts running normally.
4. Repair existing Boot Configuration Data
If Boot configuration data is corrupt somehow, it may lead to the Boot sector issue Oxc000000f. If that’s the case, create a separate Boot Configuration Data file from scratch. To do this, first, conceal the present partition of BCD files then generate another. Here are the steps to follow-
Imp: Before proceeding ahead, make sure to create a Windows 11/10 media creation tool (USB/DVD) formatted with the FAT32 file system. The UEFI-based PC won’t identify an NTFS format USB drive as installation media.
- At first, insert Windows installation media to its respective port and Restart your system.
- Simultaneously press function keys like F2, F9, Del, or Esc depending upon your computer’s architecture to invoke BIOS Settings.
Note: In case, you can’t boot your system using a connected USB drive, it might be due to CSM and Secure Boot options set as Disabled in your Boot Manager.
- On the visible Boot device category, select the specific USB to install Windows using an external device.

- Furthermore, hold the Shift key and tap F10 to start the Command Prompt.
- Here, type
diskparton elevated Prompt followed by the Enter key. - Succeeding after, write the list disk near the blinking cursor and press Enter again.
It will display all of the Storage disks that are attached to the system.
- Henceforth, type select disk 0 and tap Enter, choose your disk.
- Again, write list vol followed by the Enter to get the details of all volumes.
Here you need to locate two volumes, one EFI and another Boot (one which contains Windows 11 or 10 OS). EFI volume consists of 100 MB with FAT32 in its Fs column and System under Info. Windows partition is in general assigned as C drive, still, confirm the same. Note down the initial letter of each volume then go ahead.
Now you should assign the key number to the EFI volume. To do this, type select Volume 1, and then press Enter key. Here we have assumed that Volume 1 is your EFI volume.
- Assign the letter P and hit Enter.
- Go ahead and write exit then hit Enter to come out of the currently running process.
- Now navigate to the following path- cd /d P:\efi\microsoft\boot\ and tap Enter.
- Subsequently, type
bootrec /fixbootand hit the Enter key to generate a new boot sector. - Type ren BCD BCD.bak to render the old BCD file useless as it may be corrupt.
Go ahead and permit us to create a new BCD file.
- To do this type
bcdboot C:\Windows /l en-us /s k: /f ALLand press Enter key.
Here C:\ is the connected drive volume where Windows is installed.
Finally, close the Command Prompt and reboot your system normally. Hope this time your system starts working fine, if not try the next workaround.
5. Create an EFI Partition
If none of the above methods solves the Oxc000000f bug on your PC, there might be the possibility of missing the EFI partition. Hence you have to recreate the same. This task is a little bit complex, so follow these steps-
- First of all, acquire a genuine Media Creation tool with at least 200 MBs of space on your disk drive.
- Insert Windows installation media at its specified port and Reboot the system.
- When the PC restarts, press function keys such as F2, F9, Del, Esc, etc. to launch Boot Manager.
- Here select USB as the first Windows installation on the Boot device section.
- Thereafter, hold the Shift key and press F10 to open Command Prompt.
- On the elevated Prompt area, type the following codes one by one followed by the Enter at the end of each command.
Diskpart


list disk


select disk 0 (will select specific disk where you wish to generate EFI partition)


list partition (will show the list of all partitions).


Select Partition 1 (Ensure you have at least 200 MBs free space on your disk drive)


shrink desired=200 minimum=200


create partition efi


list partition


partition 2 (Suppose the newly created 200 MB partition is partition 2)


format fs=fat32


list vol (will show the list of all newly created 200 MBs space volumes)


Select vol 3 (assume the volume number of EFI partition named as 3)


assign


list vol
Note: You need to recognize and note down the drive letter of the volume in which the Windows partition. For this, simply look for the Boot in the info column. By default, this is assigned C. Anyways, find out yours and use the same in the above commands.
Again, type bcdboot C:\Windows /l en-gb /s B: /f ALL code near the blinking cursor then press Enter.
Here C: denotes the Windows drive and B: is the drive letter assigned as the EFI partition.
Once this task is over, Restart your system to save the changes made so far.
Note: If you still experience this trouble, there might be a fault in the Hard Disk drive. Therefore, repair or change the same to solve this error in your System.


