Did you experience Error Code 0x80070017 recently while installing the Tuesday patch or upgrading the existing Windows 10 versions? If yes, then read this post to know the exact reasons that cause this bug in the first place along with a few working solutions.
This error message may also appear while attempting to create a system restore point. The presence of corrupt device drivers, missing system files, or an Enabled Firewall may trigger this issue.
There are different ways to resolve the Error Code 0x80070017 depending upon its nature of occurrence – Installation, Update, or System Restore.
Re-create ISO files, Using the online troubleshooter, Disable Firewall, and Reset Windows 10 update components are a few working solutions for this error. If none of the above fixes solve this error, users should fresh install Windows 10 on their devices. Let’s explore these tweaks in detail –
How to fix Error code 0x80070017 on Windows 10 PC
To solve the Windows installation error 0x80070017, use the following workarounds –
Windows Installation Error 0x80070017
Windows 10 users may receive this error message while installing a fresh operating system on their PC. This problem mainly appears either because of a corrupt ISO image or the damaged USB drive itself. To solve this issue, you should perform the below solutions one after another –
1] Re-create the ISO File of Windows 10
First, visit the official Microsoft server and fresh download the ISO file. While doing so, you must format the USB drive at hand and make this bootable using a genuine tool like – Rufus. In case, you are using DVD as the Windows Media, burn the same keeping its settings low to either 4x or 8x. Here’s how to proceed –
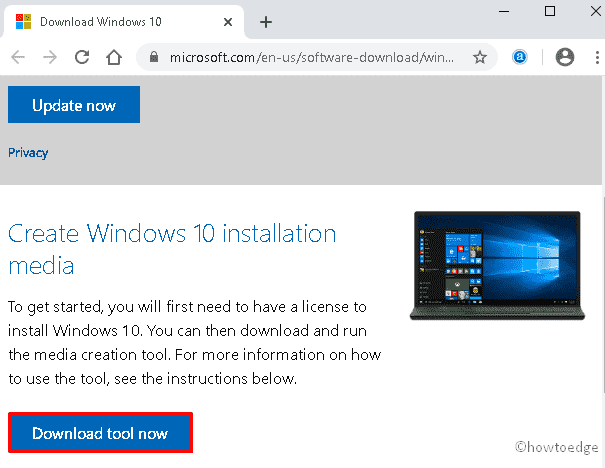
- Go to the Microsoft website to download the Media Creation tool.
- When the webpage loads, click the “Download tool now“.
- Open the Download folder and double-click the setup file.
- If the UAC window appears, tap Yes to permit access.
- Here, select the Create installation media (USB flash drive, DVD, or ISO file) For another PC radio button followed by Next.

- On the Windows 10 setup page, select your preferred language, Edition, and Architecture, and hit the Next button again.
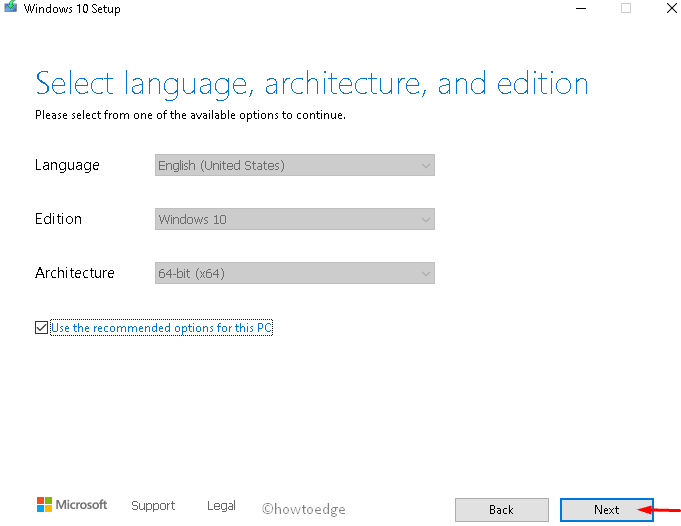
- Afterward, choose the ISO file option followed by the Next, this will create the Windows 10 ISO file.
- If you want to use it as the bootable drive for another PC, burn the same into a DVD.
2] Use Microsoft’s Online Troubleshooter
Some of the pre-existing conditions on your system may also prevent the installation of new Windows 10 versions. To detect and resolve such faults, Microsoft provides an in-built Online troubleshooter tool that you can access following the below steps –
- Browse the Official website so as to start the Online troubleshooter.
- Scroll down and select the specific Windows 10 OS that you want to troubleshoot.
- Now, click the Troubleshoot problem updating Windows 10 link.

- Under the Advanced section, you need to opt into a few update-related questions.
- Next, follow the on-screen instruction to complete the remaining steps.
- The Troubleshooter will scan the entire system for any error and report back the same if found.
- Just do as asked above and restart your computer. After the next login, you should be able to install the Windows 10 OS without receiving any error message.
Update Error Code 0x80070017
If you encounter the same bug code i.e. “0x80070017” while installing recent patches, you should try these simple yet effective methods. Here’s how to proceed –
1] Run Windows Update Troubleshooter
The first solution after receiving the error code 0x80070017 is to run the troubleshooter. Just follow these steps –
- Launch the Settings app by pressing Win + I.
- Browse to the below location next –
Update & Security > Troubleshoot > Additional troubleshooters > Windows Update > Run the Troubleshooter
- You need to wait for a few minutes while the system is troubleshooting for any errors.
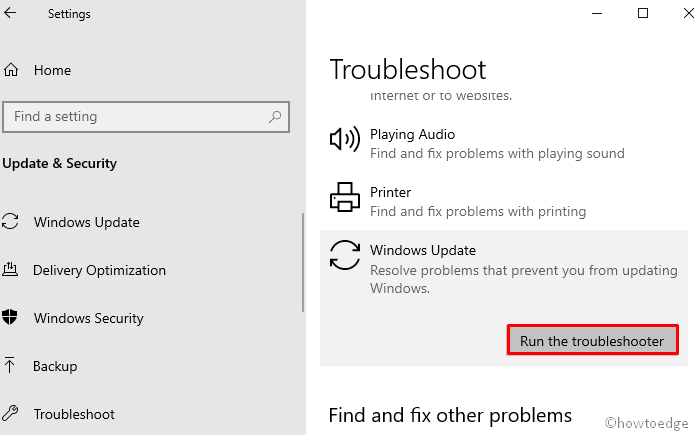
- When the troubleshooter resolves this issue, Restart your PC so as to confirm the recent changes.
2] Disable third-party Antivirus or Firewall
The presence of viruses or malware on the PC may also lead to the error 0x80070017 stopping any further updates. In such cases, one should disable the Firewall that might block Windows 10 upgrades. Follow the steps below to overcome this issue –
- Jointly press Win & R to cite the Run dialog.
- Type Control Panel In the text area followed by the OK.
- Next, click the Windows Defender Firewall option.
- On the left column, hit the Turn Windows Defender Firewall On or Off link.
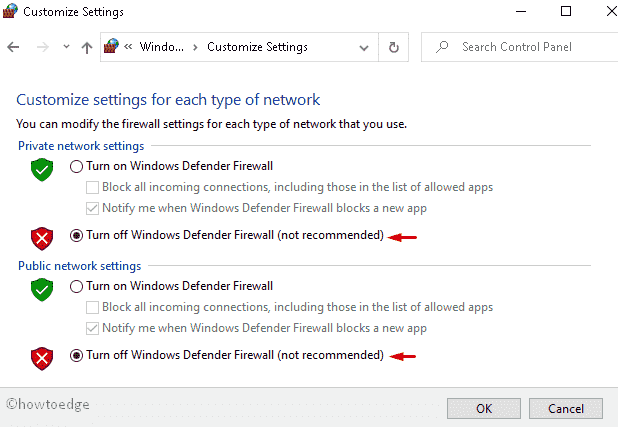
- Activate the Turn Off Windows Defender Firewall radio button under both – Private/Public network settings.
- Click OK and after a PC restart, install the pending updates.
3] Reset update components
Sometimes, there may arise corruption in the Windows components causing similar errors. If that’s the case, we suggest resetting the Update components to get rid of the current situation. Here’s how to proceed –
- Press the Windows key and type cmd in the text bar.
- From the available list, right-click on the best match and select Run as administrator.
- If the UAC prompts, tap Yes.
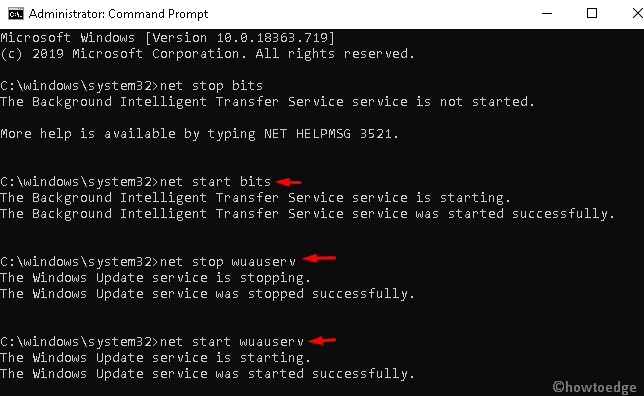
- Before proceeding ahead, you should stop these services from running the following codes on the command prompt –
net stop bits
net stop wuauserv
net stop appidsvc
net stop cryptsvc
- Now, execute the below codes to reset the Windows components –
rmdir %systemroot%\SoftwareDistribution /S /Q
rmdir %systemroot%\system32\catroot2 /S /Q
- Afterward, reset the system’s configuration by running these simple command lines –
netsh winsock reset
netsh winsock reset proxy
- Restart the Windows services that you have previously disabled.
net start bits
net start wuauserv
net start appidsvc
net start cryptsvc
- Finally, Restart your PC and attempt to install the pending updates.
4] Update the Driver
Often, the outdated/corrupt driver generates the error code 0x80070017 during Windows 10 upgrade. To wipe out this problem, you must find the problematic device driver and update the same to its latest version. Here is the complete procedure –
- Jointly press the Wind and X shortcut keys and select Device Manager.
- Here, expand each section and locate the old driver that needs an update.
Note: The yellow exclamation mark next to the driver implies the application has become obsolete.
- Once found, do the right click and choose Update driver on the context menu.
- Click Search automatically for updated driver software.

- Wait for a while as this takes a few minutes to complete, next Reboot the computer.
- Sign in to Windows 10 again and try to download/apply the cumulative updates.
System Restore Error 0x80070017
Some users also report getting the error code 0x80070017 when they try creating a system restore. Here’s how to get rid of this error message during a System Restore –
1] Login into the Safe Mode
If the normal sign-in fails to create a system restore, you should enter the Safe Mode and then approach to create a backup point. This is possible as the safe mode uses only a few applications and drivers restricting any third-party programs. Here’s how to do this –
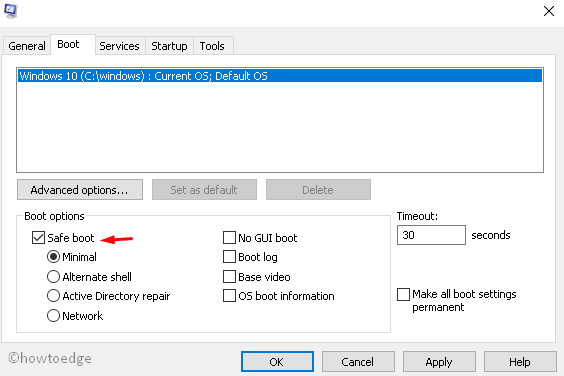
- Start the Run dialog (using Win & R hotkey), type
msconfig, and tap the OK button. - Head over to the Boot tab and tick Safe boot under the Boot options.
- Next, press OK to enter the Safe Mode on your PC.
- The system will then reboot and open the PC into safe mode. Since you are here, you won’t get any error messages while creating the restore point.
2] Reset the Repository
If you are still unable to create a backup of Windows 10 OS, resetting the repository may fix this issue. Here’s how to proceed –
- First, start your PC and enter into safe mode without networking.
- Type the command prompt in the search bar and right-click on the top result.
- Using the context menu, select Run as administrator.
- If the UAC prompts, press Yes.
- Copy/paste the following codes and hit the Enter key separately –
net stop winmgmt
winmgmt /resetRepository
- Lastly, Restart your computer and check whether this solves the re-occurring error 0x80070017.
3] Reset Windows 10
If none of the above solutions fix the error code 0x80070017, one should reset Windows 10 using the below steps –
- Right-click on the Windows icon and select Settings.
- Select the Update & Security category thereafter Recovery on the left column.
- Move to the adjacent right-side and click Get Started under Reset this PC section.
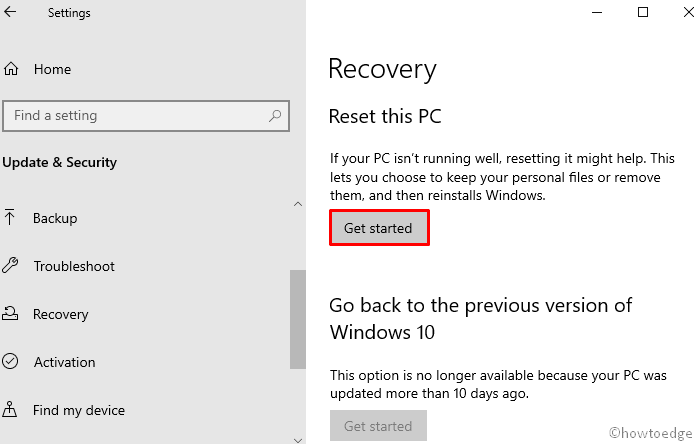
- Click the Keep my files option to save all your personal files. However, doing so will remove all apps and their related settings.

I hope this article helps you to fix the error code 0x80070017 whether it is installation, update or system restore.
