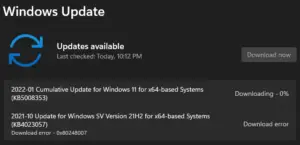
If you are getting an error code 0x80070157 while installing pending Windows updates or during Windows 10 to 11 upgrade, follow this guide till the end. In this post, we have discussed the possible reasons causing this error code and three working ways that should fix this error code.

Ways to Solve Error Code 0x80070157 on Windows 11/10
By default, Windows automatically downloads and installs the pending updates on your computer. You get a prompt afterward suggesting restart your PC. However, as you are encountering this error code 0x80070157, this process doesn’t occur automatically. Instead, you need to first resolve the reasons causing this error code. Or, you can manually download and install the available updates, that otherwise are not happening.
The three solutions that may resolve this error on your Windows 11/10 PC are as follows –
1. Troubleshoot Windows Update
Windows 11/10 includes a troubleshooting tool that can look for the underlying causes preventing Windows Updates and solve them. All you need is to reach out to this tool and activate it. Here’s how you can perform this task –
Windows 11:
- Press Win + I to launch Settings and reach out to the below path –
Settings > System > Troubleshoot > Other troubleshooters
- Locate Windows Update under Most frequent and hit the Run button.

- The troubleshooter will launch next. Follow the on-screen instructions on it to address this error code.
Windows 10:
- Press Win + I to launch Settings and navigate to the below path –
Settings > Update & Security > Troubleshoot > Additional troubleshooters
- Locate Windows Update under Most frequent and click on it.
- When it expands, hit Run the troubleshooters.

- The troubleshooter will launch next. Follow the on-screen instructions on it to address this error code.
The troubleshooter will try its best to find a solution to this problem and provide you an option – “Apply this fix”. When you click on this button, the update issue will resolve automatically. If it doesn’t find a solution to this problem, you may skip to the next workaround.
2. Reset Update Components
There are two cache folders on Windows 11/10 that store all the essential information about an update inside them. Over a period of time, you need to purge these folders. Otherwise, errors like 0x80070157 are prone to occur. If you go and clear the contents inside these two folders, this will do more harm than good. There is a possibility that clearing Windows cache folders will crash your operating system.
There’s a way of doing this and that includes stopping all Windows Update services and then you can proceed with clearing Windows Cache folders. Follow the below guideline on how to perform this task on your Windows PC –
- Press Win + X and choose Windows Terminal (Admin). The UAC window may appear next, Click Yes to authorize opening it as an administrator.
- By default, the terminal opens into Windows PowerShell (Admin). Press and hold the “Ctrl + Shift + 2” keys on your keyboard to launch Command Prompt.
- On the elevated console, run these codes one after another. Make sure to separately execute all these commands.
net stop bits
net stop wuauserv
net stop appidsvc
net stop cryptsvc
- Run the below code to delete any network profile added to your system.
Del "%ALLUSERSPROFILE%\Application Data\Microsoft\Network\Downloader\*.*"
- Purge the two cache folders as we talked about by running these two codes.
rmdir %systemroot%\SoftwareDistribution /S /Q
rmdir %systemroot%\system32\catroot2 /S /Q
- As you are working on resetting Windows Update Components, make sure to reset your network as well. For this, you need to run the below codes one by one.
netsh winsock reset
netsh winsock reset proxy
- Solve the system file corruption by running this code.
sfc /scannow
- Reactivate those services that you had stopped earlier.
net start bits
net start wuauserv
net start appidsvc
net start cryptsvc
- Restart your PC and I hope the error 0x80070157 resolves.
3. Manually Install Windows Updates
The error 0x80070157 should have been resolved after you reset the Update Components on your computer. However, if it hasn’t, you may manually download the relevant standalone packages and install them on your device. Proceeding this way will let you install a particular update, and it doesn’t resolve the underlying cause. So, there is a possibility that you might encounter that error again on your PC.
Here’s how to manually get the latest cumulative updates and install them on Windows 11/10 –
- First of all, visit Windows 11 Update history. If you are getting this error code on your Windows 10 PC, navigate to this webpage instead.
- Use the left navigation and select Windows 11/10 version installed on your system. Select the top link and you will get the required KB number. Note down this KB number and visit Microsoft Update Catalog.

- Copy/paste the cumulative update number (the number starting with “KB”) inside the search bar, and press Enter.

- You will see a list of updates matching this number. Pick the one that best matches your system architecture and hit the Download button. In the Snapshot below, I have opted for ARM64. If the same differ on your computer, go for the 64-bit option. On Windows 10, you have three options to choose from as it supports 32-bit as well.

- Click the top link on the succeeding window and browse to the folder where you would like to save this file.
- After the setup files downloading completes, double-click on it to begin its installation.
That’s it, you have successfully bypassed the error code and installed the required update on your PC. Let’s know in the comment section if you still face trouble installing pending Windows updates.


