Cumulative updates are necessary for all Windows 10 users as well as for Insiders. However, at times, installing pending updates causes high CPU usage, and thus results in systems running slow. When there is excessive CPU usage, the system may stop responding even during basic operations.
If you are struggling with High CPU usage issues on your Windows 10 device, this post enlists a few solutions that can reset your device like before. Running Troubleshooter or uninstalling recent security patches may unearth the underlying cause. Command Prompt and Registry Editor both provide some unique ways to address the High CPU utilization issue in Windows 10.
High CPU usage issue in Windows 10 after installing Updates
Here, we discuss some key workarounds that can help to resolve the High CPU usage issue in Windows 10 after installing Updates –
1] Run the Troubleshooter
Running troubleshooters is the prime workaround to minimize CPU usages. Here’s how to proceed-
Step-1: First of all, jointly press Win & I to launch the Settings app.
Step-2: Further, select Windows Update & Security from a different list.
Step-3: Go to the Troubleshoot on the left pane then hit Search and indexing in the right panel.
Step-4: Next, click on the Run the troubleshooter button to let the process begin.

Performing the above steps may resolve the High CPU utilization on your Windows 10 PC.
2] Using Command Prompt
In case, the above method fails to perform the task, the Command Prompt provides an effective way to fix the high CPU usage bug. Here are the required steps-
- Go to Start and type Command Prompt.
- Right-click on the well-suited option and select the Run as administrator option.
- When the UAC prompt appears, tap Yes to permit access.
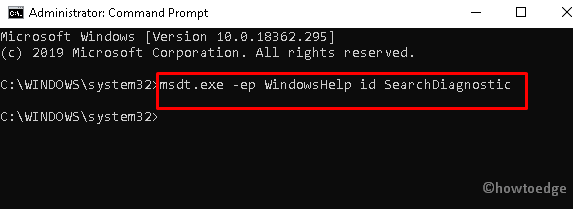
- On the elevated command prompt execute the following codes followed by the Enter key.
msdt.exe -ep WindowsHelp id SearchDiagnostic

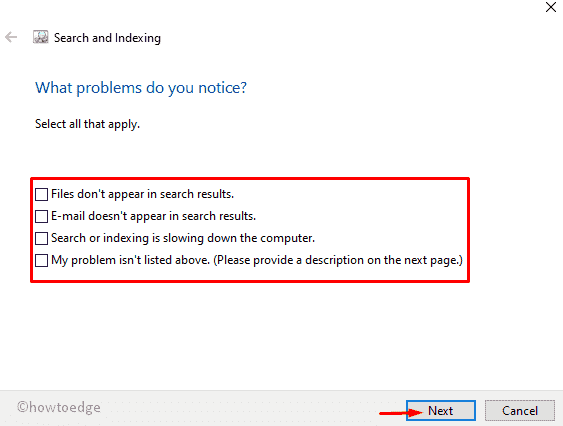
- This will invoke the Search and indexing window, click Next to go ahead.
- After a few seconds, tick against the below-encircled checkboxes. Thereafter, hit the Next button.

- Now go through Onscreen instructions.
Lastly, Restart your computer so as to let the changes come into effect.
3] Uninstall the problematic Updates
In certain scenarios, the monthly patch doesn’t get installed properly hence creates a nuisance afterward. This may even cause a High CPU usage issue on your PC. If that’s the case, uninstalling the problematic cumulative update will surely work. Go through the following steps to disable automatically installed updates.
- Do the Right-click on Start and select the Settings option.
- Henceforth, hit Update & Security then Windows Update on the next screen.
- Switch to the adjacent right pane and tap the View update history link.
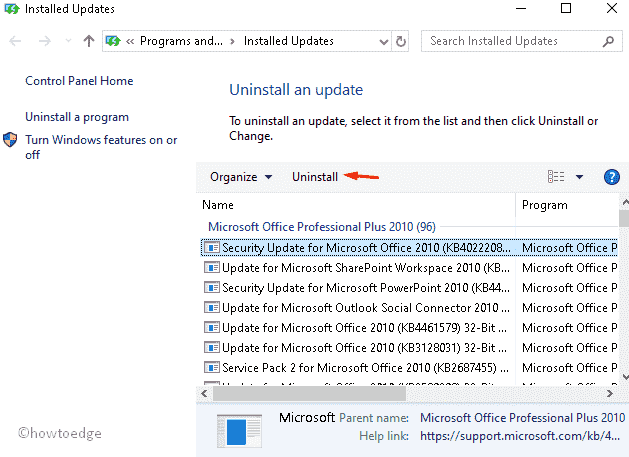
- Succeeding after select the first Uninstall Updates option to display the entire list.

- Subsequently, select the recently installed or problematic patch-up file and press the Uninstall button.
- If any warning message appears, click Yes to allow the authorization.
- Restart your computer and check if your processor is affected or not due to high memory utilization.
Here’s how to download and install the fresh copy of the Windows update.
4] Via Registry tweak
If you are not able to uninstall the latest cumulative reason for whatsoever reasons, try editing a few entries on Registry Editor. Here are the essential steps to follow-
Be careful: Editing keys inside the registry might be risky for your system. Sometimes, this may even crash the running OS. To avoid repercussions owing to incorrect changes, do create a full backup of the system files.
- Press Win & R altogether to launch the Run dialog.
- Type Regedit in the text area and tap OK to let start the Registry Editor.
- Next, you will receive a UAC prompt, tap Yes.
- Now copy the following code and paste it on the address bar.
HKEY_CURRENT_USER\Software\Microsoft\Windows\CurrentVersion\Search
- Switch to the corresponding right-hand side and do the right-click on the BingSearchEnabled key.
- Thereupon, alter the DWORD value from 0 to 1 then OK to confirm the changes.

- Restart your system and check if the process is still appearing or not.
Once the high CPU usage issue is fixed permanently, repeat the above steps and set its DWORD value back to 0 again.


