The Invalid Reparse Point Buffer error 0x80071128 mostly occurs when you try to delete a particular folder or its contents. This error may also appear while copying or moving that respective folder from one location to another. If you are encountering this issue on your device, this post should help you.
The error 0x80071128 often comes with a message that reads the following –
An unhandled exception has occurred in a component in your application. If you click Continue, the application will ignore this error and attempt to continue.
The data present in the reparse point buffer is invalid [Exception from HRESULT: 0x80071128]
NOTE: Before applying any solutions outlined below, make sure to create a restore point. This will help you to revert back your PC to this state in case something else goes wrong.

Fix Error 0x80071128 – The data present in the reparse point buffer is invalid
If you are getting an error code 0x80071128 while deleting a folder or the contents inside, try applying the below workarounds and see if any helps –
1] Run System File Checker
The error 0x80071128 mostly occurs because the folder that you want to delete has somehow become corrupted. You need to fix it first then only you can delete either the entire folder or its contents. System File Checker is an in-built tool on Windows that can help you to find and repair missing/damaged files.
Follow the below instructions to run an SFC scan –
- Press “Win + S” and type CMD in the search bar.
- Right-click on the top result and hit Run as administrator.
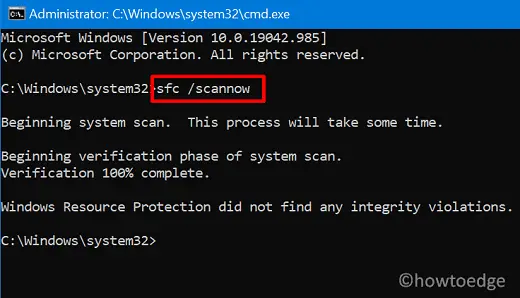
- When the Command Prompt comes into the view, execute the command –
SFC /Scannow.

- Wait for a few minutes while this tool searches and repairs the issues that it finds.
- After this process completes 100%, the system will generate a message displaying the issues that it finds and resolves.
- Type “exit” and hit Enter to come out of the Windows Console, and restart your PC.
Log back into your device and check if this resolves the error code 0x800171128 or not.
2] Perform a DISM Scan
If the SFC scan did not help to overcome the Invalid Reparse Buffer Error 0x800171128, there may lie some issues with the Windows Image itself. To find and fix any issue on Windows Image, you may take the help of DISM. Here’s how to perform a DISM scan on Windows 11/10 –
- Press Win + X, and select Windows PowerShell (Admin).
- When the UAC window appears, hit Yes.
- Type the following near the blinking cursor, and press Enter –
DISM /Online /Cleanup-Image /ScanHealth
- This scanning process will also take a while to find missing or corrupted files, so wait till this gets over.
- When the scanning completes, run the below code to repair the damages DISM found above.
DISM /Online /Cleanup-Image /RestoreHealth

Note: If there is heavy corruption on the Windows Image, you need to run some advanced codes –
To repair an offline image using a mounted image as a repair source –
Dism /Image:C:\offline /Cleanup-Image /RestoreHealth /Source:c:\test\mount\windows
In case you have an online image and want to repair it including your own sources, run this code instead –
Dism /Online /Cleanup-Image /RestoreHealth /Source:c:\test\mount\windows /LimitAccess
Now that you have resolved any issue with the Windows Image, restart your PC. From the next logon, check if you can delete the corrupted folder that you were earlier facing difficulty with.
3] Check hard drive corruption using CHKDSK
It is quite possible that this error occurs simply because of bad sectors on the hard drive. To find or solve this then, you should try out this tool i.e. CHKDSK.
- Launch Command Prompt as an administrator.
- On the elevated console, type the following, and press Enter –
CHKDSK C: /f /r /x
- This command will run and check if any volume is in use or not. Since you are on the root drive, you will get this message –
Chkdsk cannot run because the volume is in use by another process. Would you like to schedule this volume to be checked the next time the system restarts? (Y/N).
- Hit the Y key using the keyboard and restart your PC.

- The CHKDSK will resume its operations the moment after you shut down your device.
Note: Applying this workaround will only tell you if your hard drive requires a replacement or not.
I hope this article was useful and easy to follow. Let’s know in the comment section if you face any difficulty following this guide.


