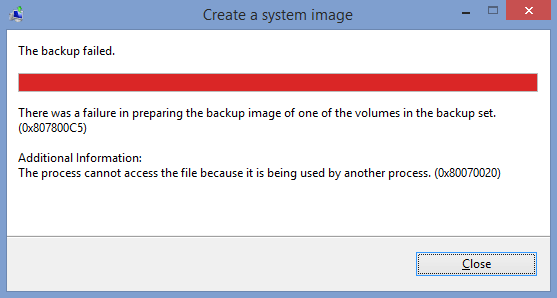
Sometimes users end up losing their data permanently after hardware failure or different types of threat attacks like ransomware. Therefore, it is always a good job of having a backup copy of the personal data to protect important information from corruption or to avoid permanent loss. Recently some users have reported a System Image Backup Error Code 0X807800C5 on their Windows 10 PC while trying to create a system image backup.
The error message you may see with this error code is – There was a failure in preparing the backup image of one of the volumes in the backup set (0x807800C5). This error code comes with additional information that states – The mounted backup volume is inaccessible, please retry the operation (0x80070020).

How to Fix Error Code 0x807800C5 or 0x8078004F
To fix System Image Backup Failed Error 0x807800C5, follow the below steps:
1. Turn off antivirus protection in Windows Security
Temporarily disable your protection software and see if it works. Here is how to do:
- Right-click on Start and select Settings.
- Select Update & Security > Windows Security > Virus & threat protection.
- Under Virus & threat protection option, click on the Manage settings link. If you have the previous version of Windows 1o, you may see the Virus & threat protection settings option.
- Now turn off the Real-time protection toggle button and that’s it.
2. Run the Chkdsk Utility
Damaged or corrupted files on the hard drive are the major cause to occur this issue. In such a case, run the CHKDSK utility to examines disk space and disk use. Follow the below steps to run the utility:
- Right-click on the Start button and select Command Prompt (Admin).
- If UAC prompts on the screen, click on the Yes button.
- Once it opens, type the following commands and press Enter:
chkdsk /r X:
Note: In the above command line, X denotes the hard drive partition.
- After executing the above command, see if the drive has any corrupted files.
3. Run System File Checker
This solution requires you to run the System File Checker (SFC) utility to scan the damaged Windows system files and restore them. Read out the following steps and check if it repairs missing or corrupted system files that is causing the issue –

- On the next page, type the following command –
sfc /scannow
- Press the Enter key to scan the system files.
When it completes the procedure, exit the window and see if it fixes the problem while performing the backup operation. If not, continue to the next method.
4. Restart Volume Shadow Copy service
In the next solution, I recommend you to check if the Volume Shadow Copy service is enabled. Follow the below steps to do it:
- Open Run dialog box using Windows+R keys.
- In the text field, type services.msc and then hit Enter.

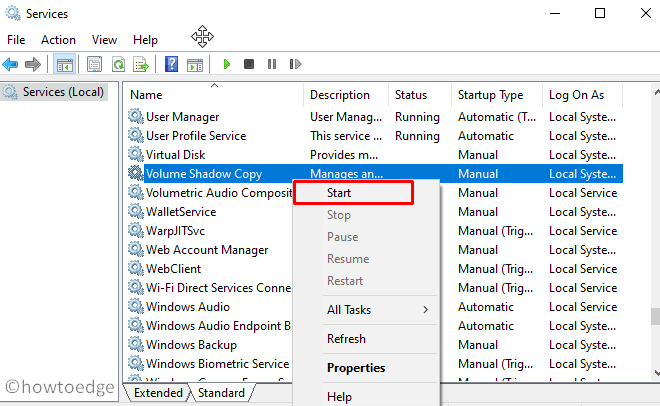
- On the Services page, search for the Volume Shadow Copy service.
- Once you find it, right-click on it and select the Start option.
- Then close the Services window and see if it works.
5. Create System Image using PowerShell
If you’re still facing the issue, it is possible that the application is undergoing a sudden malfunction or breakdown. In such a case, you need to create the system image using PowerShell. Here is how to do:
- Open Windows PowerShell as administrator.
- Once it opens, copy and paste the following commands and hit Enter:
wbadmin start backup-backup target: E:-include: C:-quiet-allCritical
Note: In the above command line, E: is the target drive that will be used to save the system image. However, C: is the system root drive. You can change these variables as per your requirement.
- In order to extract the created system image, open the Run dialog box, type the following text, and then press Enter:
C: \ Windows \ System32 \ Shutdown.exe / r / o
- On the following page, you can now find and extract the file.
6. Disable the System Protection Settings
If none of the above solutions work, try disabling the system protection settings and see if it works:
- Open Windows Settings using Windows+I keys.
- Click on the System category.
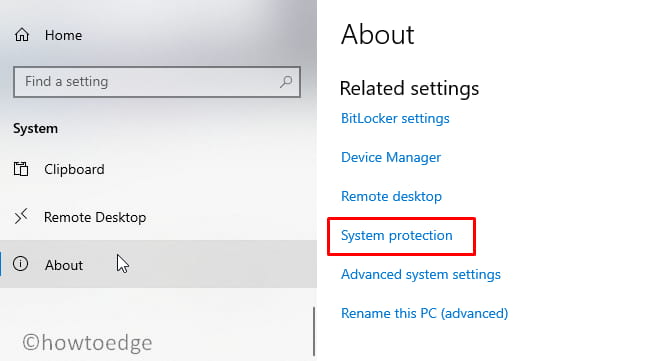
- In the left pane, scroll down to the bottom and select About.

- Under Related settings, click on the System protection option.
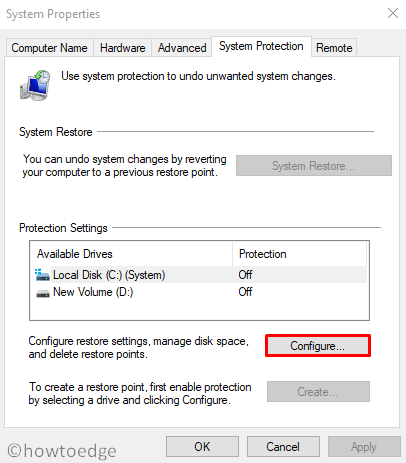
- Select the disc that is currently being used for system image backup storing.

- Then click on the Configure button.

- On the next screen, mark the Turn on system protection checkbox.
- Now go to the Disk Space Usage section and slide the toggle up to 10-15%.
- Click Apply > OK to apply the changes.
- Restart the system and try to create System Image Backup.
Hope it helps.


