Thumbnails play a crucial role in recognizing an image or video beforehand playing it. Almost all users prefer using thumbnails over displaying images as icons. So, when thumbnail previews stop showing or not displaying, it is quite worrisome to all. In this post, we will look into the reasons behind this problem along with eight potential fixes.
Thumbnails appear blank mostly when there are some internal issues within the File Explorer settings. Configuring folder view options or restoring Explorer to its default resolves this issue. In rare cases, where you transfer images from an iPhone to Windows, the thumbnail previews also fail. This is primarily because of the fact Windows doesn’t support the HEIC file format. Download and install the right codec and this problem will be resolved on your computer.
Though there is a lesser possibility of this, this could also be the work of infected files and folders (malware attack). Run your default antivirus and get rid of this possibility first.
Thumbnail Previews Not showing, what causes this?
Thumbnails give a fair idea of what an image or video is really about. When a picture is not showing its thumbnail, this could be because of the following reasons –
- Relevant codecs are not installed in Windows.
- File Explorer has corrupted somehow.
- The default photo viewing application is corrupt or outdated.
- Issues within the folder containing the images.
There could be a few other reasons as well which we have explained while outlining the right fixes to this problem.
Fix the Thumbnail Preview Not Showing in Windows 11
If thumbnail previews are not appearing inside Windows 11, attempt the below fixes and get this problem resolved.
1. Install the Supporting Codecs
Windows 11 doesn’t support certain file formats of images like HEIC photos taken from iPhone. This is because the supporting codecs are not installed on Windows by default. Right-click on an image and select Properties. Check what’s written next to “Type of file”. If this file format is not supported on Windows 11, you need to download and install the relevant codecs.
To view HEIC photos in Windows, you need to install HEIC Image Extensions from Microsoft Store. Similarly, if you can see video previews, get the supporting codecs of that particular video format.
2. Check Folder View Options
You face this problem mostly when viewing photos or videos inside File Explorer. Well, there’s a way by which you can check and modify Folder View Options. Follow the below instructions and make Thumbnails appear on your Windows 11 PC –
- Press Win + S and type “File Explorer options” in the search bar.
- Click on the top result to enter the “File Explorer options” window.
- Go to the View tab, and uncheck the box – “Always show icons, never thumbnails“.
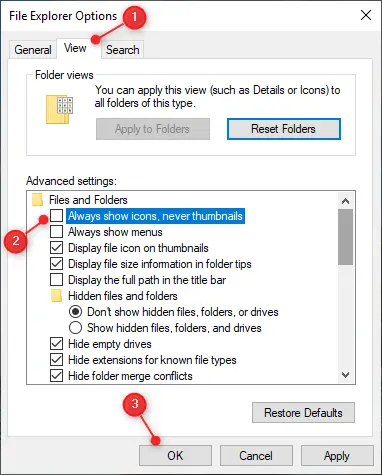
- Click Apply and then OK to confirm the recent changes.
Go back to the folder where thumbnail previews were not appearing. You must be able to see the thumbnails now on your Windows 11 PC.
3. Restore File Explorer to its default settings
If you are still not seeing the thumbnail previews inside a folder, reset File Explorer to its default settings. Restoring the default settings on Windows Explorer will get rid of any internal glitches or issues. And, thus you can preview images or videos correctly on your Windows PC. Here’s how to perform this task –
- In the Search window, type “File Explorer Options”.
- Click on the well-matching result.
- When it launches, go to the View tab, and click Restore defaults. See the Snapshot below –
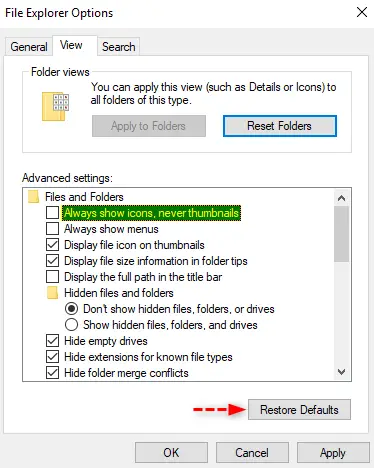
- Click Apply > OK to confirm this action of yours.
Now, check if can see images or video thumbnails inside your folder.
4. Change the default App opening Photos
“Photos” is the default application in Windows 11 to view any images, pictures, or screenshots saved on your PC. When this system app gets corrupted somehow, this may also stop previewing images or videos inside a folder. Change this default app to something like “Paint” or an app downloaded from the Microsoft Store, and you will find thumbnails showing again.
To change the default photo viewing application on Windows 11, do the following –
- Right-click on any image and choose the option – “Open with“.
- Select Paint or any other app downloaded from the Microsoft Store.
- If an application that you would like to make the default app is not appearing in the context menu, select Choose another app.
- You will see a few more apps that can open images.
- Select your preferred application, and tick the box – “Always use this app to open .png files“.
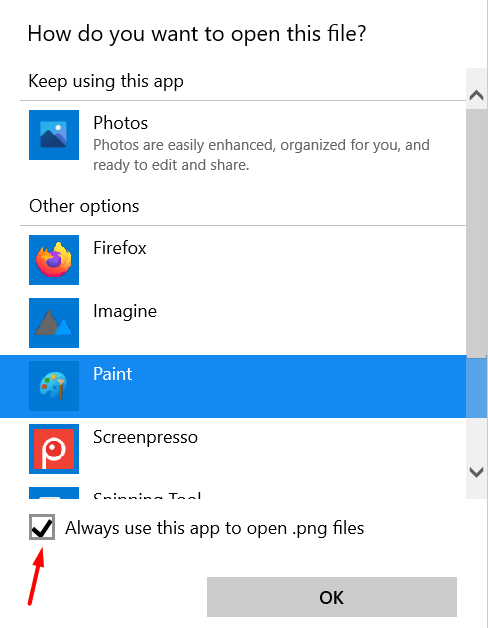
- Finally, click OK to confirm the recent changes on your computer.
- From now onward, whenever you double-click on an image, the image will open in the chosen application.
Note: Doing this will only change the default image viewing app for pictures bearing .png file format. All other images that vary in file extension will continue to open with the default app i.e. “Photos”. If you want all images open in your preferred app, you need to repeat the above process for all image file formats like JPEG, JPG, etc.
5. Get rid of the Thumbnail Cache
Thumbnails may also stop appearing inside a folder when the thumbnail cache grows in size and reaches its maximum permissible limit. Even in cases where it isn’t that huge, getting thumbnails of a huge database can sometimes be tricky and hence the problem arises.
Delete the stored thumbnail cache on your computer, and you will all other images and videos’ thumbnails showing just fine. Here’s how to get rid of the stored thumbnail cache on Windows 11 –
- Press Win + I to launch the Settings app.
- Go to System > Storage and click on Temporary Files.
- Tick the box left of “Thumbnails”, and hit Remove files.

- The system will take some time to delete the stored thumbnails, depending on how big is the stored cache.
After you see the thumbnails revert to 0 MB in size, restart your PC. From the next logon, the system will generate the thumbnails automatically.
Where does Windows store the thumbnail cache?
Starting from Windows Vista, Windows keeps all the thumbnail image data at a specific location. It is because of this cache, you see thumbnails of images regardless of which folder you open. Keeping things this way, your operating system indeed works a little faster.
6. Restart Windows Explorer
The “thumbnails not showing” issue might also appear when the file explorer has been corrupted somehow. Since you can never be sure of that, force-restart Windows Explorer and check if the thumbnails start appearing next. Here’s how to perform this task –
- Use Ctrl + Shift + Esc to launch Task Manager.
- Click More Details, if the task manager doesn’t open fully.
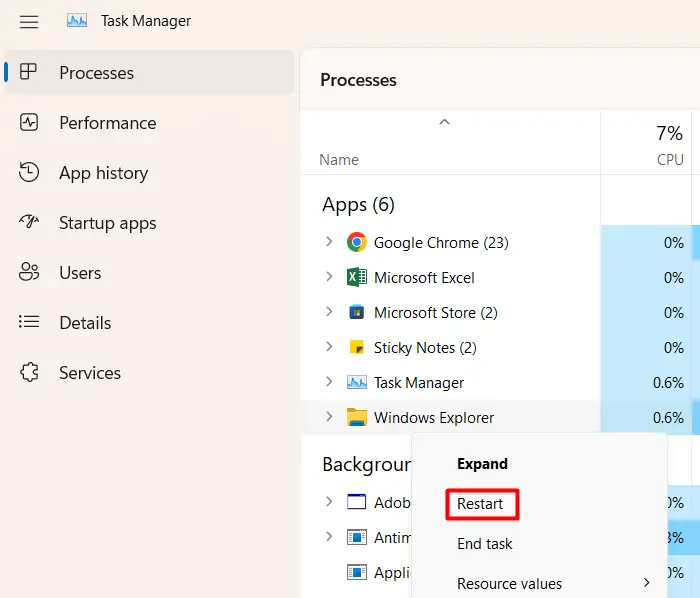
- Go to the Processes tab and scroll down to Windows Explorer.
- If File Explorer is running, you will find it under Apps, otherwise the same will appear under Windows processes (at the end).
- Right-click on Windows Explorer and select the Restart button.
- File Explorer is associated with the taskbar and a few other processes. So, while it is restarting, you won’t be able to do anything on your PC. Wait for a few seconds, and you will get back the Windows Explorer.
- Close the task manager window and check if you can now see the image or video thumbnails on your PC.
In case you are still not seeing any thumbnails, follow the next set of solutions discussed below.
7. Update the Graphics Drivers
If you haven’t updated the graphics drivers for a long time, this may cause unwarranted issues like Thumbnail previews not showing. Update the graphics drivers on your PC by following the below steps and check if the problem resolves this way.
- Press Win + X, and choose Device Manager.
- When Device Manager opens up, click the “>” icon left of Display adapters.
- Right-click on the graphic driver present inside and select Update device.

- Click “Search automatically for drivers online” and wait for some time.
- These days, it is very rare to get driver updates this way. In most cases, you will be asked to visit Windows Update and check for updates again.
- Click on the available prompt and you will be redirected to Windows Update.
- Wait for a few minutes while the system is checking for driver updates online.
- If the system does get any graphic driver updates, you will see a link to optional updates.
- Click on this link, tick all the checkboxes, and hit Download & Install.

After the optional updates are installed, restart your PC. When Windows 11 reloads, check if the image thumbnails start appearing inside your folder.
8. Perform a Full Scan using Windows Security
The presence of viruses or malware inside your system might also result in non-displaying thumbnails. Since this problem has not yet been resolved, perform a full scan on your Windows PC using the default antivirus. If you are using some third-party antivirus, you may use that as well.
In the event of your antivirus finding some trojan files or other viruses, you should also run the System File Checker tool. This is an in-built tool on Windows developed to automatically scan and repair missing or damaged system files on your PC. Here’s how to initiate an SFC scan –
- Right-click on the Windows icon and select Windows Terminal (Admin).
- When the UAC window prompts, hit Yes to authorize opening the terminal.
- Type the following inside the terminal and press Enter –
sfc /scannow
- Wait for the next 10-15 minutes as the scanning/repairing process takes around this much time.
- Once it is over, run the DISM command as provided below –
DISM /Online /Cleanup-Image /RestoreHealth

- The DISM command will check and resolve any corruption inside the system image.
- After you run both these tools successfully, restart your PC.
Sign back into your device and check if the thumbnails are appearing as they normally do. I hope the images and video thumbnails are back to normal after applying the above fixes. The thumbnail gives a fair idea of what an image or a video is really about, so it is worth solving this problem on a Windows PC.
