Several users reported encountering an error 0x80092004 when they were trying to upgrade their Windows 10 PCs to the next available OS Build. In this article, we have discussed all possible reasons that may trigger this error code on Windows including seven fixes for this update-related issue. Let’s first learn the underlying causes behind this update issue on Windows 10.
Note: Recently, this error occurred when installing a .NET Framework update KB5022729 on Windows 10. If you encounter this issue as well, read on how to fix this issue in the below sections.

What causes an update error 0x80092004 in Windows?
The error code 0x80092004 primarily occurs when your system meets one or a combination of the following issues on your computer.
- Due to the presence of corrupt system files or folders
- The latest Servicing Stack update is missing from your computer
- You have installed a buggy update on your computer and hence the error 0x80092004
If you don’t want to go through the complex solutions, you may manually download and install the pending update on your Windows 10 PC. However, do note that this error code 0x80092004 might occur again when you try to install the next available security or non-security update.
[Solved] Windows Update Error 0x80092004
If you are not able to install updates on your Windows 10 PC because of an error code 0x80092004, attempt the below fixes one after another –
1] Run Windows Update Troubleshooter
Windows Update Troubleshooter is an effective tool in Windows 10 that can find and resolve the pending update issues on your computer. Here’s how to run this tool on Windows 10 PC –
- Right-click on the Start button and select Settings.
- Select Update & Security > Troubleshoot.
- Head over to the right pane and click Additional troubleshooters.
- Under “Get up and running“, locate and click to expand Windows Update.
- When this expands, hit Run the troubleshooter.

- On the troubleshooting window, click Next, and follow the on-screen instructions.
Wait for this troubleshooting task to complete and once it is over, make sure to restart your computer. From the next login, go to Settings > Update & Security > Windows Update, and hit Check for updates.
The system will connect to Microsoft servers online and download/install the pending update on your Windows 10 PC.
2] Download and Install the Recent Servicing Stack Update
It is required of users to keep the Servicing Stack up to date before installing any cumulative update on Windows 10 older versions. If you are still running Windows 10 version 1607 or an earlier version, make sure to download the recent SSU package and install it on your computer.
You may check for the same by viewing the release note of any recent update to Windows 10. Here’s how to perform this task –
- Go to Windows 10 Update history first, and select your Windows version from the left navigation.
- You will find all updates arranged as per their release date.
- Select the recent one and head over to the right pane.
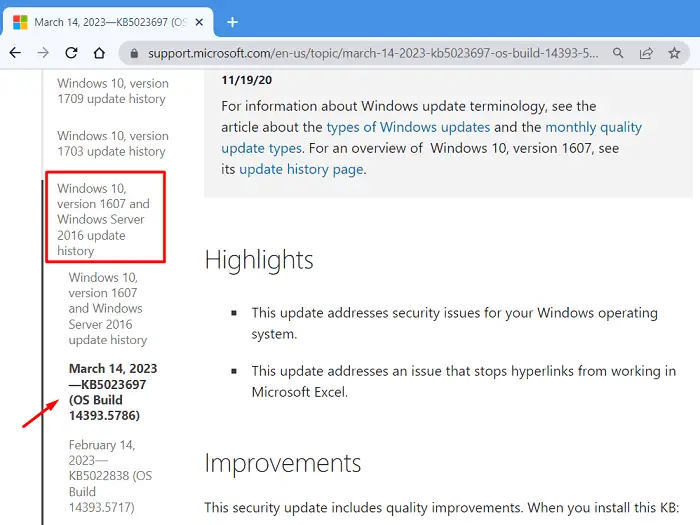
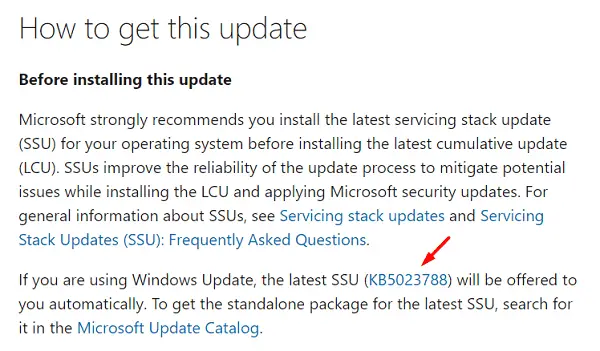
- Scroll down to the How to Get this update section, and note down the latest SSU number.
- Go to Microsoft Update Catalog next, and search for this SSU number in the text field.
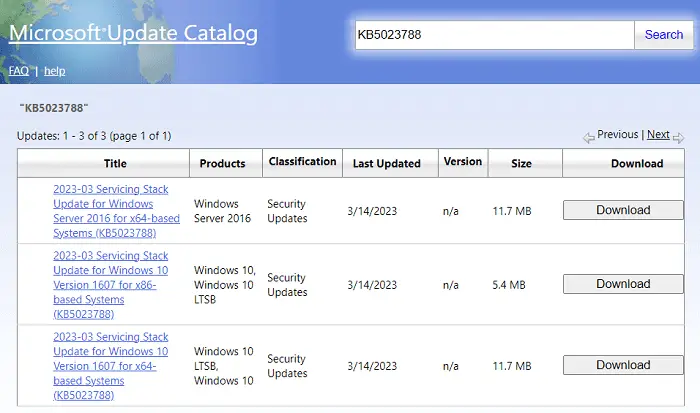
- Select the update matching your system architecture, and hit the Download button.
- Click the top link on the next page to begin downloading the chosen servicing stack update.
After the download completes, double-click on the setup file to begin its installation. Restart your PC and check if you can update Windows normally.
3] Run SFC and DISM Scans to fix Error 0x80092004
If the error 0x80092004 is still occurring, this must be due to the presence of some corrupt files or folders on Windows 10. SFC and DISM are two great tools that you may try to find and resolve internal corruption on your computer.
Here’s how to initiate the SFC scan in Windows –
- Press Win + R to launch the Run dialog.
- Type CMD on it and press Ctrl + Shift + Enter keys altogether.
- When the UAC window prompts, hit Yes to authorize accessing Command Prompt as administrator.
- On the elevated console, type the following and press the Enter key –
DISM.exe /Online /Cleanup-image /Restorehealth
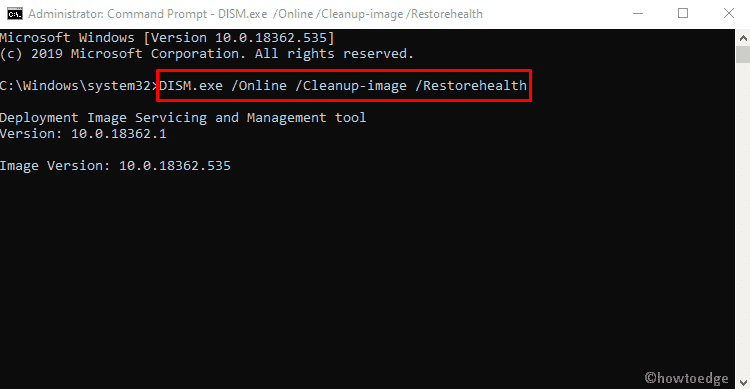
- This code will check for any file corruption within your system and resolve them automatically. The DISM utility will take 10-15 minutes to complete the scanning/repairing process, so wait patiently.
- After this command runs successfully, run the System File Checker command next. For this, copy/paste the following and press Enter –
sfc /scannow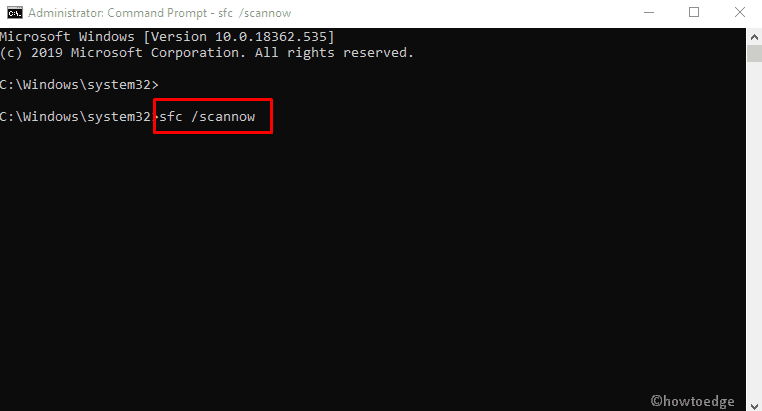
- This utility will also take 10-15 minutes to find and repair the missing as well as corrupt system files inside the System32 folder.
- After successfully running the DISM and SFC Scans on Windows, close CMD, and restart your PC.
From the next login, check if you can update Windows normally without getting into an error code 0x80092004.
4] Remove the recently installed updates
If you have recently upgraded Windows 10 and this error 0x80092004 starts occurring afterward, you must have installed a buggy update. In such an event, you should remove the recently installed updates from your system and then purge the residual or leftover files using the Disk Cleanup tool.
Here’s how to perform this task –
- First of all, press Windows + I to launch Settings and navigate to the below path –
Update & Security > Windows Update > View update history
- You may see all the recent updates on the right pane.
- Note down the KB number of a recent update and then launch PowerShell as administrator.
- When the UAC window prompts, hit Yes to authorize the access.
To remove recent updates from Windows 10 PC, you may use the DISM tool. Here’s what you need to execute on the elevated console –
Dism /online /Get-Packages
- The DISM will now display a list of recently installed updates on your computer.
- Note down the name of the package that has been recently installed.
- Next, execute the following code to remove that particular package from your system.
- For this, you may take the help of the following codes. Make sure to press the Enter key after each command.
Note: Ensure changing the package name in the below command. Else, you will end up deleting some old updates.
dism.exe /online /remove-package /packagename:Package_for_RollupFix_Wrapper~31bf3856ad364e35~amd64~~16299.248.1.17
- After you have removed the package from your system successfully, restart your computer.
- Sign back into your device again and launch CMD as an administrator.
- Execute the following code on the elevated Command prompt –
Dism.exe /online /Cleanup-Image /StartComponentCleanup
- This will clean up the running system image on your computer.
- Go to Settings > Update & Security > Windows Update, and hit Check for updates.
The pending updates should now install normally on your computer. If not, try the next set of solutions discussed below.
5] Purge the Software Distribution Folder
The Software Distribution folder is an important folder in Windows 10 that accumulates all the information related to updates that ever occurred on your computer. As time passes by, there is no need of having the old data or entries.
However, the information remains as it is unless you delete them manually. The problem here is that you don’t know which files to remove exactly and so you might end up deleting some important entries. There’s a solution by which you may purge the SoftwareDistribution folder without affecting the normal update process in Windows 10. Here’s how –
- Press Win + S together and type CMD in the text field.
- Right-click on Command Prompt and select Run as administrator.
- When the UAC window prompts on the display screen, click on the Yes button.
- Stop the Windows update services that might prevent deleting files inside the SoftwareDistribution folder. For this, you need to execute these two commands on the elevated console –
net stop wuauserv
net stop bits
net stop cryptsvc
- Doing so will stop the Windows Update, Background Intelligent Transfer Service (BITS), and Cryptographic services.
- Next, navigate to the path C:\Windows\SoftwareDistribution inside File Explorer.
- After you reach out to the above path, use Ctrl + A to select all items and then press the delete button.
- Next, head over to this path – C:\Windows\System32\Catroot2. Delete all the files and folders that are available inside this folder as well.
- After you delete all the files successfully, re-open the Command Prompt, and run the following codes on it –
net start wuauserv
net start bits
net start cryptsvc
- Close the Command Prompt and restart your computer so that the recent changes come into effect.
From the subsequent login, check if you can update Windows normally.
6] Pause Updates in Windows 10
The error code 0x80092004 must have been resolved by now. If not, you have only two solutions to go for and they are
- Pause Windows updates in Windows 10 till the next updates are available
- Or, manually download and install the pending updates
Here’s how to pause updates in Windows 10 –
- Press Windows + I altogether so that the Settings app opens up.
- Go to Update & Security > Windows Update, and click on Advanced options.
- Use the dropdown menu under Pause updates and choose a date.
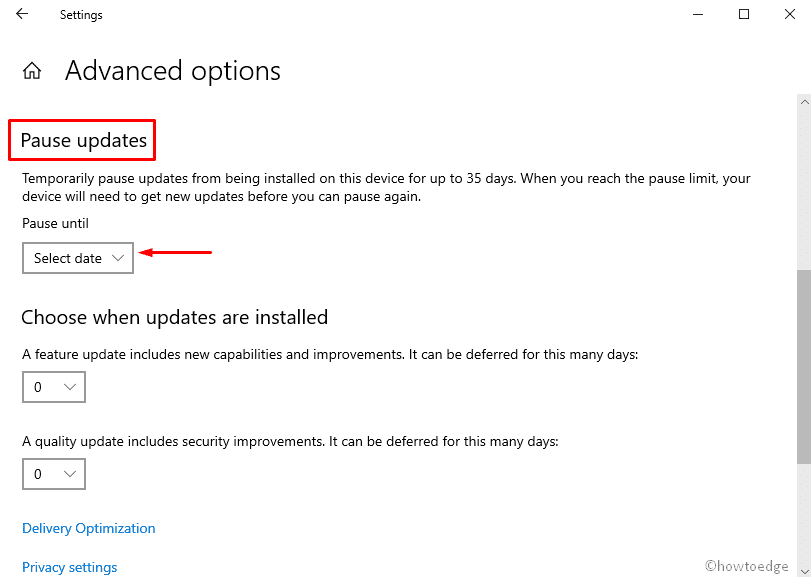
- The updates will be paused for the time you have selected using the drop-down menu.
- You may continue using your device without worrying about some pending updates pop-up.
Important – Using this setting, one can disable updates temporarily for 35 days. After that, you’ll need to select a new date to disable it again.
7] Manually install the pending update in Windows 10
If none of the above fixes work to resolve this error code 0x80092004, you may download the relevant standalone package from Update Catalog and manually install that on your computer. Here’s how to proceed with this task –
- Open Windows Settings by pressing Win + I altogether.
- Go to Update & Security > Windows Update > View Update History.
- On the following page, locate and note down the KB number of the failing update.
- Now, visit Microsoft Update Catalog on any browser and search for the copied KB number.
- Press Enter and you will find all the matching updates appearing on the display screen.
- Pick the update that best matches your system architecture, and hit the Download button.
- Click the top link to begin downloading the cumulative update.
After the download completes, you may double-click on this “.msu file” to begin upgrading to the next Build version on Windows 10.
In case you experience an error CRYPT_E_NOT_FOUND while installing this update, this means that your system declines the update on mismatching cryptographic values.
This happens only if the recent servicing update is not installed on your computer. Read this section on how to download and install the recent SSU package on your PC and then retry installing updates manually on Windows 10.

