Windows 11/10 Update Error 0x800f0922 is an update-related issue that occurs when you install a new update on your PC. Recently, this problem arises when you upgrade your operating system to KB5012170.
This error first occurred during or after you install cumulative update KB3213986 on your Windows 10. If you are facing this trouble and don’t know how to overcome it, follow this article till the end.

What causes Windows Update to fail on Error code 0x800f0922?
The error code 0x800f0922 is a common error that can occur when attempting to install a Windows update, including the Windows 11 update. This error code generally indicates that there was a problem with the update process, and the installation was unable to complete successfully.
A closer look into this problem reveals that this occurred mostly while installing pending security/non-security patch updates. This must be happening due to network connectivity issues. Missing .NET Framework or your system running on a low System Reserved partition space may also trigger this error code.
In quite a few scenarios, this error may also arise due to infected files or folders. When it appears, users receive an error message in the given format –
Some updates were not installed
Error(s) found:
Code: 0x800F0922 Windows Update ran into a problem.
Fix – Update Error 0x800f0922 on Windows 11/10
If you are struggling to solve this error code on your PC, try the below fixes and see if any resolves this issue.
1] Check your internet connection and disable VPN
As stated earlier, this error could appear when you are connected to an unstable network, connect to a different adapter and check if the problem resolves this way.
Or, you may try disabling and re-enabling your router. If you are using a VPN, simply disable that and check again if you can update Windows now.
2] Turn off Windows Defender Firewall
The Firewall being the Security tool, is freely available on all Windows 11/10 devices. Its prime work is to protect the system from malicious attacks. Yet sometimes, it might block the genuine files and thus causes the Update error 0x800f0922. Hence, the best choice here is to temporarily disable the Windows Defender Firewall and retry installing updates on your PC. Here’s how to perform this task –
in your system. Here is the proper guideline-
Step-1: Hit the Search icon and type Control Panel, click on the well-matching result to begin this app.
Step-2: Under System and Security, select the Windows Defender Firewall option.

Step-3: Now, go to the left pane and hit Turn Windows Defender Firewall On or Off.
Step-4: Here, mark the radio button Turn Windows Firewall on or off under both private as well as public sections. See the Snapshot below-

Step-5: Hit OK to save this configuration thereafter close the current window.
Once you complete the above steps, you may now update your computer without receiving any interrupting error 0x800f0922.
Note: There is no need to enable the Windows Firewall manually. As soon as the PC restarts, the Firewall will get enabled by itself.
3] Run Windows Update Troubleshooter
An update troubleshooter is basically an in-built tool designed specifically to look into matters that correspond to Windows updates or similar affairs. Running this tool is quite simple and easy to perform.
Here’s how you may troubleshoot Windows 11 –
- Press Win + I to launch Settings and navigate to the below path –
Settings > System > Troubleshoot > Other troubleshooters
- Locate Windows Update under Most frequent, and hit the Run button available on it.

- Let the troubleshooting tool diagnose and repair the underlying causes on your PC. Once it runs successfully, do restart your Windows 11 PC.
To troubleshoot Windows update on Windows 10, use these steps –
- Launch the Settings app first by pressing Win + I.
- Select Update & Security followed by Troubleshoot on the left pane.
- Head over to the right-hand side and scroll down to locate Windows Update.
- When discovered, click once to expand its box.
- Hit Run the troubleshooter to begin the detecting and troubleshooting process.
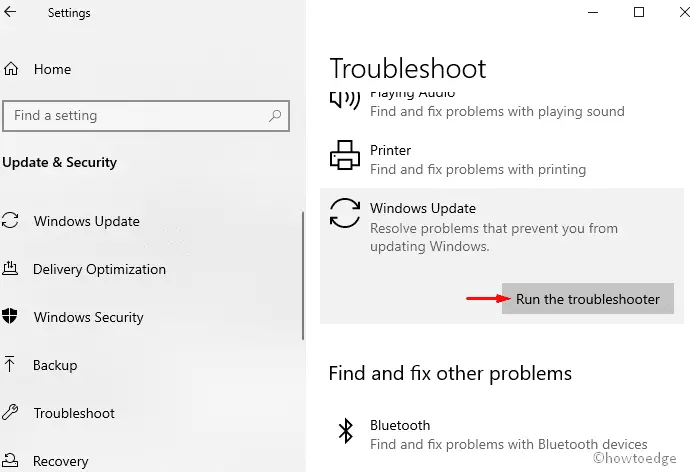
- Once over, Restart your computer and install the LCU again.
4] Update the .NET framework on your PC
September 2022 .NET framework is now available for all versions of Windows 11 and 10. As this error 0x800F0922 may occur due to a missing .NET framework, you should upgrade to the same.
In case the .NET Framework is disabled on your PC, you need to first enable it by following these easy steps –
- Press Win + R to launch the Run dialog.
- In the search field, type “Control Panel”, and press Enter.
- When Control Panel launches, click Programs > Programs & Features.
- Next, hit Turn Windows Features on or off from the left pane.
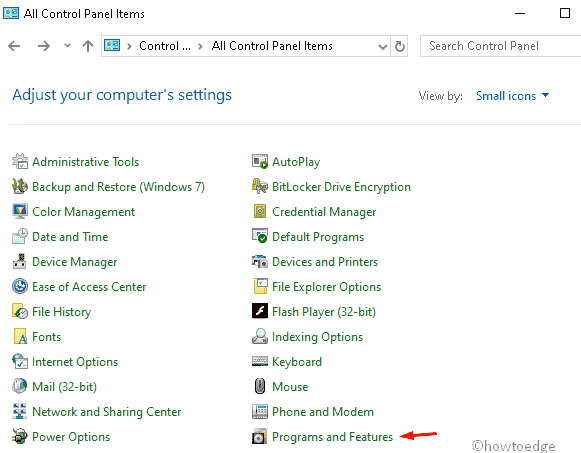
Note: If you are unable to see this option, select Small icons under the “View by:” section.
- Next, activate the .Net framework checkbox on the Windows features page then hit the OK button.

- At last, Reboot your PC so as to save the changes made so far.
5] Config trusted installer using the Command prompt
If you are still getting the same error code upgrading Windows, you may try configuring the trusted installer using CMD. Here’s what you need to do to perform this task –
- Type cmd in the Search box and right-click on the appeared Command Prompt option.
- Using the context menu, select Run as administrator.
- The confirmation dialog will appear instantly, tap Yes to proceed.
- On the elevated command prompt, type the following command line and hit the Enter key-
SC config trustedinstaller start=auto
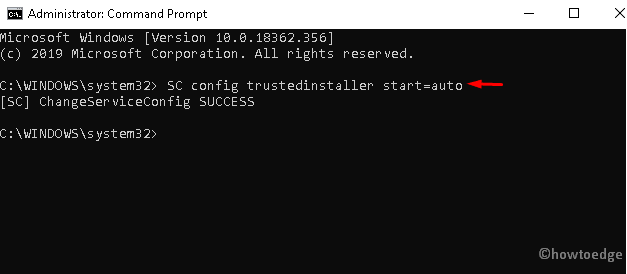
- Succeeding after, Restart your computer.
- After the next login, navigate to Settings > Update & security and download the awaiting updates.
6] Remove all your temporary files
The presence of unnecessary cache or temporary files may also trigger an error 0x800f0922, thus interfering with the Update process. Deleting these temp files will resolve this issue. Here’s the complete guideline on how to delete temp files on your PC –
- Right-click on the Windows icon and select the Run option.
- In the void box, type %temp% thereafter press the OK button.
- This will launch the folder comprising a list of temporary files.
- Delete all the contents that exist inside and Restart your computer.
You may now update the existing OS with the latest cumulative update.
7] Repair the installation file
The presence of corrupted system files might also trigger error code 0x800f0922 during Windows 10 update. If that’s the case, repairing the malicious documents using the SFC command would be of great help to avoid any critical issues. Here are the steps to work upon –
- Go to the Search and type Command Prompt in the text box.
- Right-click on the result and choose Run as administrator.
- If the User Account Control appears, tap Yes to give permission.
- Type
sfc /scannowon the elevated console and hit Enter key.
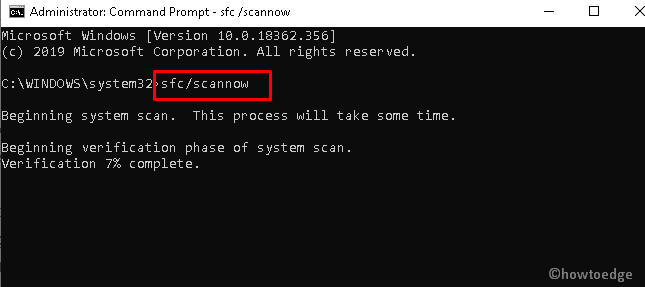
- This will start the scanning process.
- When it completes, Restart your device and download the cumulative updates again.
8] Repair damaged Windows images
If your installation is corrupted, you can also struggle and experience the Error 0x800f0922 Windows 10 issue on your display. In this case, it is recommended to perform the DISM command-line tool. If you don’t know how to run it, just follow the detailed steps below.
- At first open the Run dialog, using Win and R hotkey.
- In the void box, type cmd and press Ctrl+Shift+Enter together.
- This will open the elevated command prompt.
- Next, you will receive the UAC prompt, hit Yes.
- Copy/paste the below code inside CMD, and press the Enter –
DISM /Online /Cleanup-Image /RestoreHealth
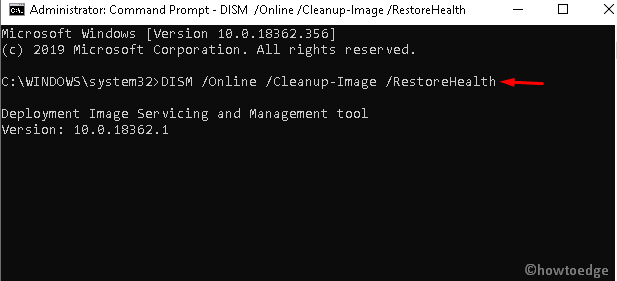
- This will take approx 20 minutes to complete, so wait patiently.
- Once done, Reboot your PC and check for awaiting updates.
9] Reset Windows update components
If the error 0x800f0922 continues prompting on the screen and you are still unable to update your system, there is a possibility of something going wrong inside the core components. To remove this bug, clear all the downloaded files’ database cache and reset update components using the steps given below –
Step-1: Press Win and R together to open the Run dialog.
Step-2: In the text box type services.msc and hit OK.
Step-3: Now scroll the cursor and locate Windows Update services.
Step-4: Once found, right-click on it and select Stop from the context menu.
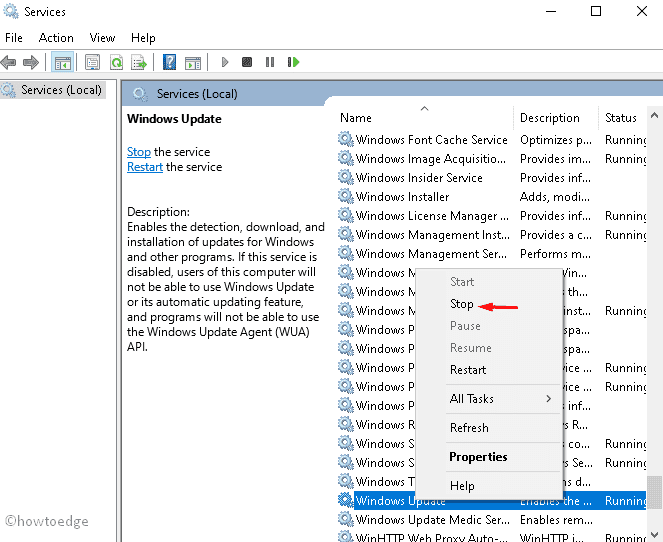
Step-5: Repeat steps 3 and 4 to BITS and Superfetch (now called SysMain) to stop all update-related services.
Step-6: After that, press Win+E to open files Explorer.
Step-7: Navigate to the location C:\Windows\SoftwareDistribution\Download and remove all the contents inside there. To do this task, press Ctrl+A to select all items and hit the Delete button.
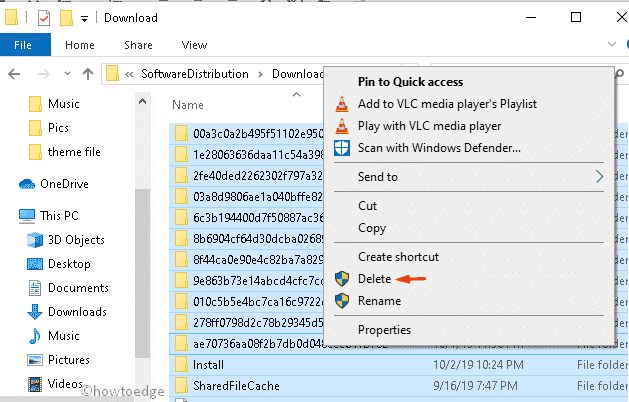
Step-8: Moving ahead, switch to the Window Update, BITS, and Superfetch services one by one and restart them again.
Step-9: Now close all the open tabs and Reboot your computer.
Step-10: Now, update the PC with no interruption.
10] Perform a clean boot
Sometimes, the presence of third-party programs may also arise this conflict and thus prevents Windows update from occurring smoothly. Performing a clean boot will surely help you to diagnose the reasons behind the update error code 0x800f0922. Here’s how this process goes –
- Right-click on the Start button and select the Run option.
- Type
msconfigin the text box and hit OK. - Go to the Services tab, select and mark the checkbox before Hide all Microsoft services.
- Next, click on the Disable all button.
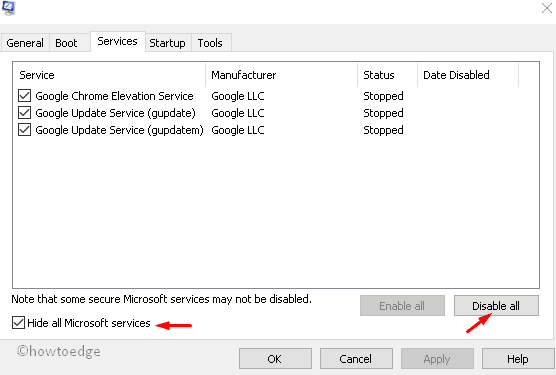
- Go to the Startup tab next and click over the link – Open Task Manager.
- Disable not-so-important services that display “Enabled” under Status.
- Restart your PC so that the changes made become effective.
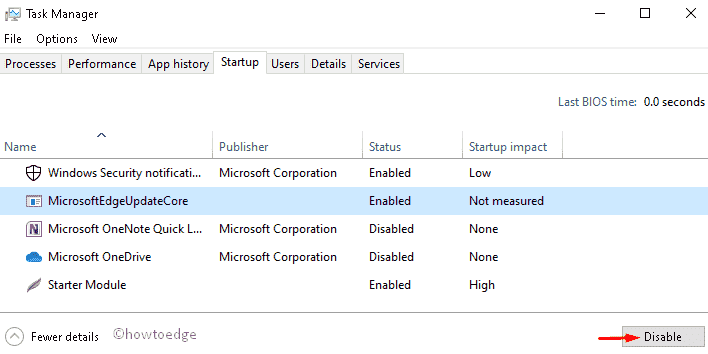
- That’s it, you may now update your device without getting into any bugs or errors while updating your Windows.
11] Modify the registry
If you are still getting the error code 0x800f0922, modifying certain key entries inside the registry may resolve this update issue on your computer. However, this task is relatively complex as any incorrect modification here might corrupt the entire operating system. So, be a bit extra careful before performing the steps below –
- Open Windows Search by pressing Win + S.
- Type
regeditin the text field, and hit Enter. - If UAC prompts, press Yes to permit the entrance.
- When the registry editor opens up, navigate to the following –
HKEY_LOCAL_MACHINE\SOFTWARE\Microsoft\Windows\CurrentVersion\WINEVT\Publishers
- Right-click on the Publishers folder and select Export on the shortcut menu.
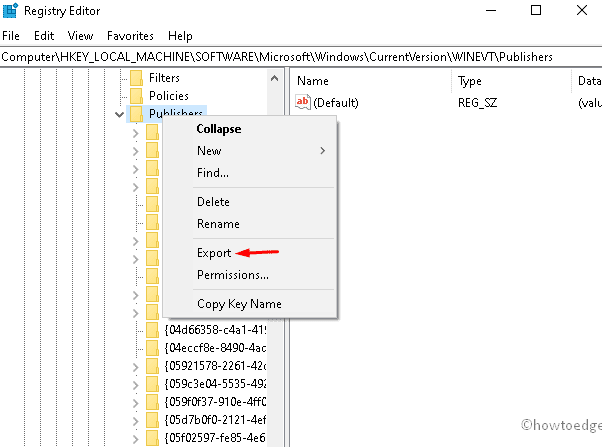
- Select the location where you want to export this key value, and then type the desired file name.
- Click Save to confirm the changes made so far.
- Restart your PC and try to install the pending cumulative updates again.
I hope you were able to resolve this update error code 0x800f0922 on your computer. Let’s know in the comment box if you face any difficulty following this guide.


