Windows Update is an essential process that keeps your operating system up-to-date and error-free. However, at times, while performing this task, you may get into some update-related error code and you can’t update your PC thereafter. In this post, we are going to discuss one such error code 0x80240034, what causes this issue, and how you may resolve it on Windows 11/10.
How do I Solve Error 0x80240034 in Windows?
Windows Update Troubleshooter is the best tool to get rid of the Update Error 0x80240034. In case the error code persists even after this, you may initiate SFC and DISM Scans. These two utility programs check for file corruption within you system and resolve them.
Delete the stored cache inside the SoftwareDistribution and catroot2 folders and check if the update error resolves this way. Make sure to stop all update services before you may deleted the accumulated cache inside the Windows Cache folders.
If that doesn’t help as well, download the pending cumulative updates manually or download the Windows ISO visiting Microsoft Update Catalog.
Fix: Update Error 0x80240034 on Windows PC
To resolve the Windows Update Error 0x80240034, use the following workarounds –
- Run the Update Troubleshooter
- Scan the system file using SFC
- Perform DISM scan
- Download the pending updates manually
- Clear Windows Update Cache/Distribution Folder
- Reset the Updates Components
- Update Windows via ISO File
1] Run the Update Troubleshooter
Update Troubleshooter is the easiest way to repair the common Windows 10 Update regarding trouble. To fix the error code 0x80240034, try this built-in application as the primitive workaround. Here’s how to do it –
- Press Win and I shortcut to launch Settings.
- Here, select the Update & Security category.
- On the left pane, head over to the Troubleshoot option.
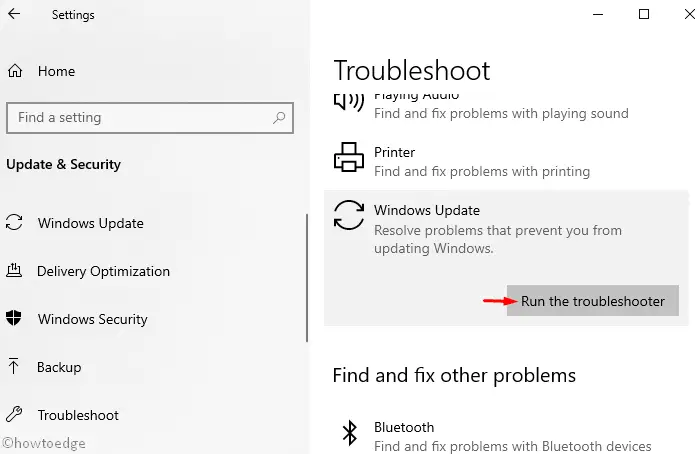
- Locate Windows Update on the corresponding right-hand side.
- Once found, click on it and select the Run the troubleshooter button.
- Now follow the on-screen guide to complete the remaining steps.
- Once over, Restart your computer and install the pending updates.
2] Scan system files using SFC
The Update error 0x80240034 may occur due to the presence of corrupt system files. SFC is a great utility program that you may use to find and repair damaged or missing system files. Here’s how to scan system files using SFC –
- Jointly press Window & Q hotkey to start the search bar.
- Type cmd in the text box and right-click on the Command Prompt option.
- From the context menu select Run as Administrator.
- If User Account Control appears, hit Yes.
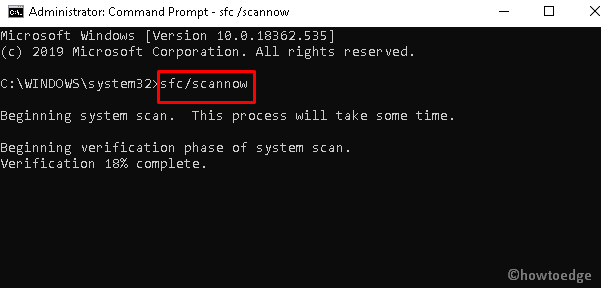
- Near blinking cursor of console area, type the following code and tap Enter.
sfc /scannow
- Now keep patience until the scanning and repairing process is completed.
- Once over, Reboot the system and try to update your OS again.
3] Run DISM scan
Just like System File Checker, DISM is too a built-in tool of Windows 10 that one can use to scan and repair corrupt Windows images. Here are the essential steps –
- Press Win and R to launch the Run dialog.
- In the void area, type cmd and press Ctrl+Shift+Enter together to start the console as admin.
- You will receive the UAC prompt, tap Yes to permit access.
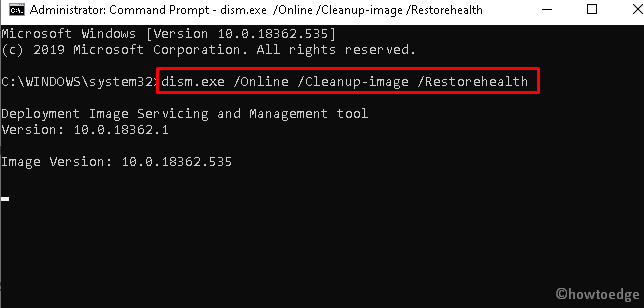
- Here, copy/paste the below code and press Enter –
dism.exe /Online /Cleanup-image /Restorehealth
- Wait until the process reaches 100%.
- Once over, Reboot your system and install the pending updates again.
Note: In case, the above code can’t obtain the file online, perform the same using Windows installation media. To do this insert the USB or DVD having Windows 10 setup file and run the following code –
dism.exe /Online /Cleanup-Image /RestoreHealth /Source:C:/Repair/Source/Windows /LimitAccess
Here C:/Repair/Source/Windows signifies the location of the attached USB or DVD. Do change the same as this depends on your own setup.
4] Download and Install Pending updates manually
If you are still unable to install the pending patches due to update error 0x80240034, you should manually download the cumulative update. However, in order to do this, you must obtain the KB number by visiting the official website. To do so, use these steps –
- Visit the Microsoft Update Catalog website.
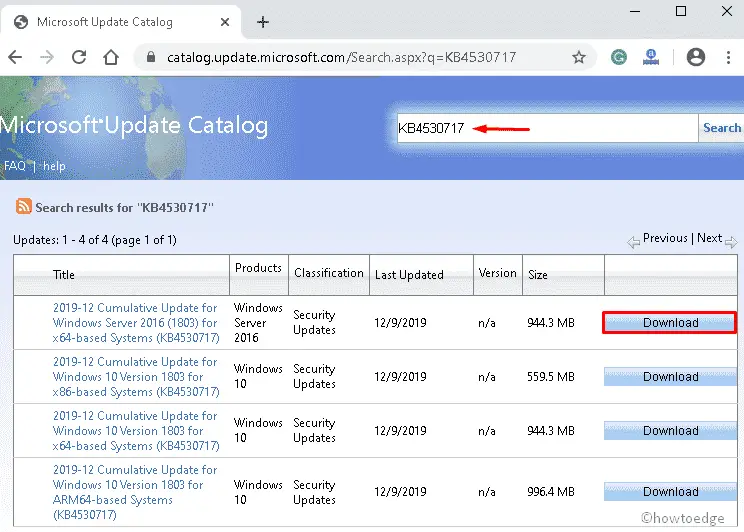
- Type the identified KB number in the search box and press the Enter key.
- A list of matching updates will appear, identify one of them as per your system’s architecture.
- Now, click the Download button as shown below –
- Next, click the setup file to install the latest Windows OS on your computer.
- Follow the on-screen instructions to complete the process.
5] Clear Windows Update Cache / Distribution Folder
The presence of unnecessary cache stored inside the Windows Software Distribution folder may also cause an error code 0x80240034 to appear while updating the existing OS. Hence, all you need is to delete such non-essential files following the below steps –
Note: Once the contents become corrupt, Windows cannot delete or re-download the items themselves. To fix this bug, you must re-download the files manually after clearing the data.
- Press Window key and S together to launch the search bar.
- Type Command Prompt near the blinking cursor.
- Right-click on the top result and choose Run as administrator.
- On the UAC prompt, press Yes to permit access.
- Next, run the following codes one after another followed by the Enter key-
net stop wuauserv
rmdir %windir%\SoftwareDistribution /S /Q
net start wuauserv
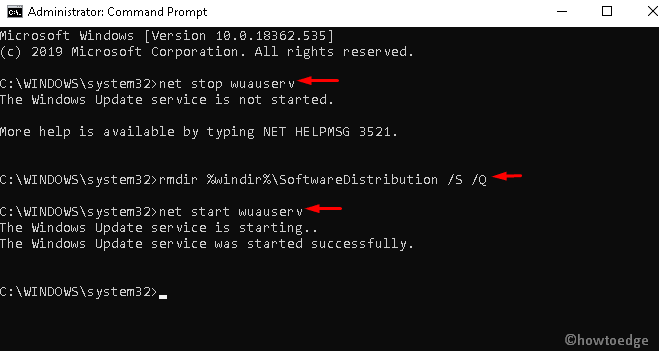
- Close all the running apps thereafter install the pending updates and see if it helps to resolve the error.
6] Reset the Windows Updates Components
If somehow any of the Updates components got corrupt, this may lead to the 0x80240034 error while installing cumulative updates. Resetting Update Components might work as a workaround to solve the error. Since this is an advanced method to fix the issue effectively, you should carefully run all the codes. Here’s how to proceed –
- Click the Start Menu and type cmd in the text bar.
- Right-click on Command Prompt and select Run as administrator.
- You will receive a UAC prompt, press Yes to grant permission.
- Now, run the following codes sequentially –
net stop wuauserv
net stop cryptSvc
net stop bits
net stop msiserver
rmdir %windir%SoftwareDistribution /S /Q
net start wuauserv
net start cryptSvc
net start bits
net start msiserver
- Make sure to press Enter at the end of each command line.
Once over, Restart your PC to confirm the above changes.
7] Update Windows via ISO File
If none of the above solutions resolve the update error 0x80240034, take the help of a Windows ISO file. This method uses the Windows Update client to install the pending patches, if available.
- Go to the Microsoft official website and click the Update Now button.

- Double Click the ISO setup file that you have recently downloaded.
- If the User Account Control window appears, press Yes to go ahead.
- Next, click the Update Now button again on the Windows 10 Update Assistant wizard.

- Tap Next to proceed ahead.
- After scanning the system performance, it will start updating the OS.
- Wait till the update process finishes.
- Follow the on-screen guide to complete the remaining steps.
- Lastly, Reboot your system to save the changes made so far.
Note: If this even doesn’t help, clean install the latest version of Windows 10. Before proceeding to perform a fresh installation, make sure to create backups of all important files and folders.


