Today, in this guide, we explore the probable rationales behind Update Error code C1900101 and suitable workarounds to fix this. A few users are receiving this bug after updating their OS with May 2019 Update. This issue in-general occurs while trying to update the operating system though it gets stuck somehow. The error code C1900101 appears with different names as well such as 4000d, 2000C, 0x20017, 40017, 30018, 30017 etc. The following guide will help you to solve each one of these error messages.
The probable reasons behind the Update Error code C1900101 are obsolete system files, corrupt drivers, and recent changes in the Settings. Defect hardware components, stopped core services may also arise this bug. Carrying out Windows Update Troubleshooter, sfc scan, Disable Windows Firewall, login with different Admin account may also fix this issue. Removing the problematic secondary devices can also repair this trouble.
- Run Windows Update troubleshooter
- Disable firewalls and any other malware prevention software
- Disconnect faulty devices attached to your computer
- Using Command Prompt (Admin)
- Run System File Checker command
- Create and log in a new user profile
- Restart BITS services, Cryptographic and MSI Installer Services
- Disable driver signatures enforcement
- Perform a clean boot
Ways to fix Update Error code C1900101 on Windows 10
Here are the step-wise workarounds to fix Update Error code C1900101 on Windows 10 PC-
Fix-1] Run Windows Update troubleshooter
Windows Update Troubleshooter is an inbuilt app by Windows 10. Its prime role is to detect the real cause that restricts upgrading process and even repairs such bugs. Try this guideline to solve the Error code C1900101-
- Make a click on the Win icon and type Control Panel in the text area.
- When the app appears, go to the Troubleshooting category.

Note: If you are unable to see this option, select Large icons under View by: drop down menu.
- Further, move to the left pane and tap View all option next choose Windows Update.
- Succeeding this, click Next and let it detects and repairs this trouble.
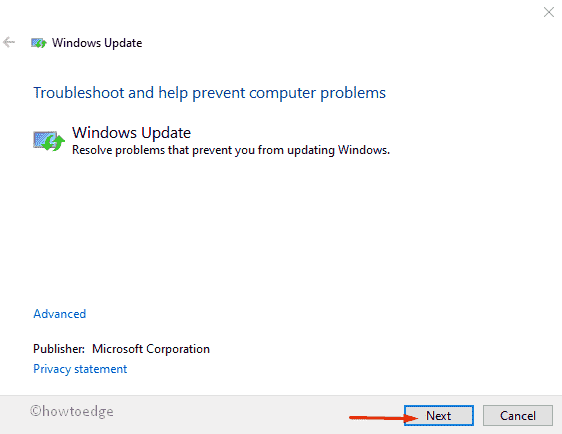
- Once the task is over, Restart your PC and try updating your PC again.
Fix-2] Disable firewall and any other malware preventing software
Firewall is an utility program of Windows, prevents unauthorized access to suspicious programs. Sometime, this may block certain services thus generating bug like Error code C1900101. Disabling Windows Firewall might solve such error messages-
- Click Search button and type Control Panel.
- Under View by: section, select Category thereafter System and Security option.
- Next, choose the Windows Defender Firewall there forth Turn Windows Defender Firewall On or Off from the left pane.

- Here, check the “Turn off Windows Defender firewall” radio button under both public and private sections. Further, tap OK to confirm the changes.
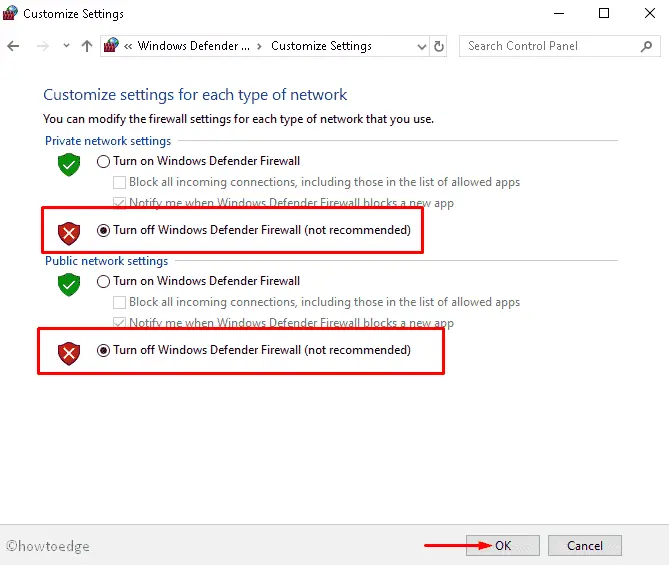
- Make sure to Reboot your system so that changes made so far are saved.
Fix-3] Disconnect faulty devices attached to your computer
Usually, hardware interference is one of the possible reasons to prevent installing updates. Unplugging the problematic secondary device is the best solution to fix this trouble.
To perform this task, disconnect all the devices (except mouse and Keyboard) such as printer, scanner, digital camera, video recorder, USB device, CD/DVD, media card reader, etc.
Now Restart your system and plug each one of the devices separately and see whether the Error code vanishes. If yes, that specific item is the culprit and you may need to repair the same.
Fix-4] Using Command Prompt (Admin)
You can fix the Update issue due to Error code C1900101 using command prompt as well. Here are the steps to follow-
- At first, shut down your PC and wait for approx 10 minutes to let it rest. After some time, press the power key to start your PC.
- Once the operating system launches, hit Start Menu and type Command Prompt.
- Next, do the right click on the well-matching result and select Run as administrator option.
- A prompt will appear asking for permission, tap Yes.
- Subsequently, type the following command and hit Enter key at the end-
rundll32.exe pnpclean.dll.RUNDLL_PnpClean /DRIVERS /MAXCLEAN

- Succeeding after, type exit command to come out off the Console.
- At last, Reboot your PC and try updating your System again. Hope this time, you can do it successfully.
Fix-5] Run System File Checker command
Missing or corrupt System core files may also arise this Update Failed Error C1900101 on your computer. Running sfc/scannow is the best tool to repair such files and thus fix this bug. Here is the step-wise process-
- Press Win and R keys combination altogether to open the Run dialog.
- Type cmd in the void box and simultaneously press Ctrl+Shift+Enter key.
- Tap Yes on the new prompt to open Command Prompt as administrator.
- In blank box, type sfc/scannow code then hit Enter.
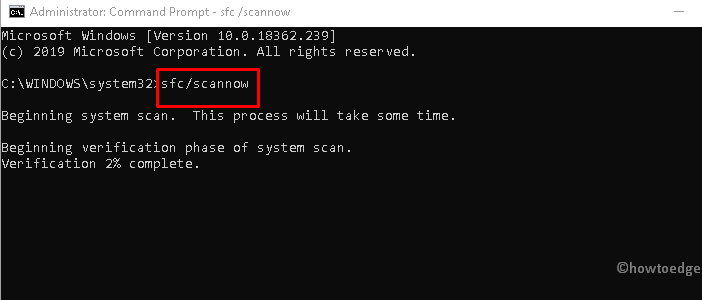
- Since this is a time-consuming process, so wait patiently.
- Once the above task finishes, Restart your PC to save the changes.
Fix-6] Create and login using a new user profile
If the update fails error code C1900101 continues to exist on your system, you should create and login with a new administrator account. This task is quite easy to perform, just follow these simple steps-
- Press Window key and R together to launch Settings.
- On new window, select Accounts thereafter Family and other users from the left pane.
- Switch to the corresponding right-hand side and click on the Add someone else to this PC option.
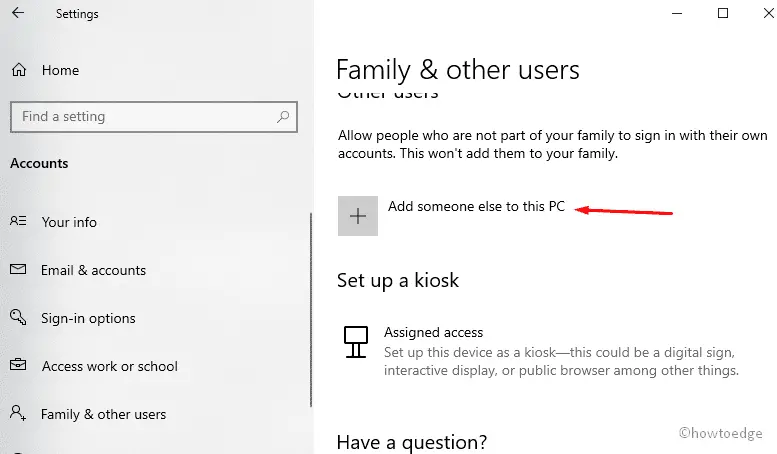
- Further, login to your Microsoft account using proper user name and password.
- Succeeding that, click Next then Finish to create an administrator account.
- Moving back, select the newly added account then hit Change account type button.
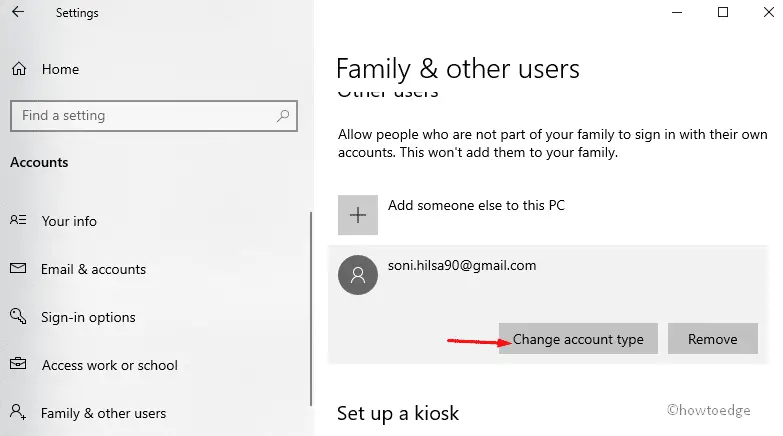
- Afterwards, select the Administrator using the drop-down menu, tap OK to confirm the changes.
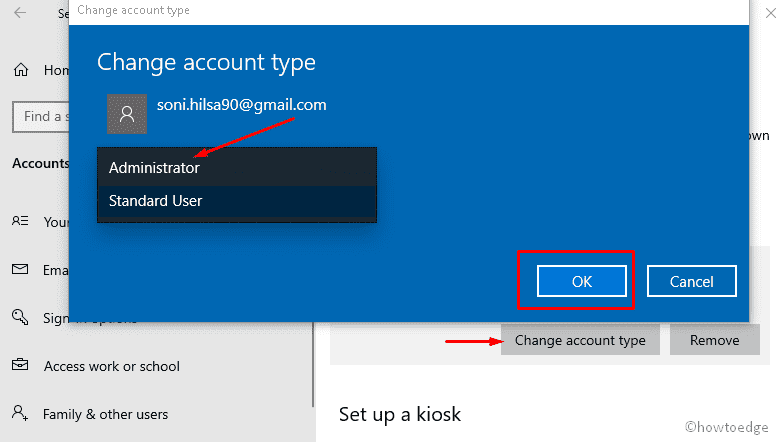
- Once finished, make this account your default Admin and try updating your PC.
Fix-7] Restart BITS services, Cryptographic and MSI Installer Services
Sometimes running certain services might also restrict the Updating process. To avoid this problem, you need to disable these services and Upgrade the PC again. Here is the complete how-to procedure-
- Firstly, go to the Search and type msconfig in the search field later select System Configuration option.
- Under the Services tab, select BITS services, Cryptographic and MSI Installer Services by holding down the Ctrl key.
- Succeeding after, click Disable all button followed by OK to confirm the changes.
- Next, move to the bottom of the page and mark Hide all Microsoft services checkbox.
- Afterwards, click on the Disable all button to confirm the changes again.
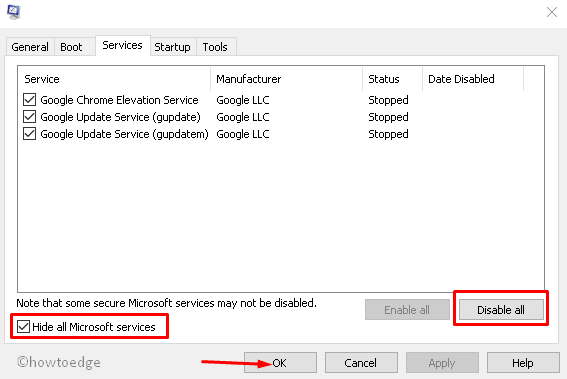
- Finally, Restart your System and try turning On the disabled services (just now).
Fix-8] Disable driver signatures enforcement
The driver helps you to run the connected device smoothly, however it may block the PC updating process in few instances. When you use Disable driver signatures enforcement, it uses a limited number of drivers and fixes any update issue. If you don’t know how to proceed, here are the steps-
- Press Win & I altogether to invoke the Settings app.
- Select Update & Security category thereafter Recovery from the left pane.
- Next, jump to the Advanced Startup option on its corresponding right pane and hit Restart now button.

- When the BIOS page opens up, select Troubleshoot followed by Advanced options on next window.
- Go ahead, and select the Startup Settings then Restart button again.
- You will receive a list of options, press 7 or F7 to Disable driver signatures enforcement.

- Your system will restart then using the least number of the drivers. You can now update your system without any problem.
Note: When you Reboot your PC, this option will be re-enabled automatically.
Fix-9] Perform a clean boot
If the above fixes do nothing, performing clean boot will surely help you to fix the Update related issues like Error code C1900101. This is because it eliminates all the conflicting bugs and fresh installs new OS.
- At first, plugin the USB device having Windows Installation Media and Reboot your PC.
- Now, Press the function keys like F2, F9, F11, Del, Esc or other depending upon your system’s model.
- When the Boot process begins, select Install now option.

- Thereupon, check the box I accept the license term followed by Next to go ahead.
- Subsequently, select Custom: Install Windows only (advanced)option afterwards choose each partition and Delete the partition containing the OS.
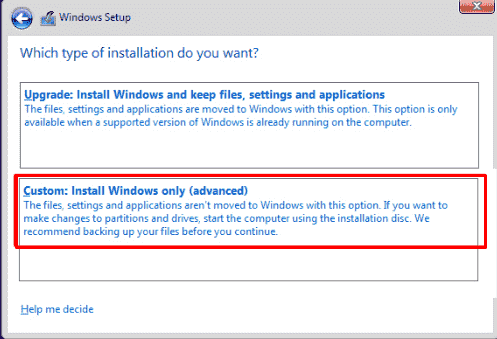
- Further, allocate the partition with specified space and let complete the installation process.
- Now you can use your system hassle free.
That’s it!


