Windows 10 Feature Update fails on Error code 0xc1420121 primarily because of either corruption inside system files or Windows Image. In case you are facing this issue while installing Windows 10 21H1, read this article in detail.
If you have ever installed Macrium software on your device, the error had started occurring because of a registry change. Actually, when you install this app, it tweaks the value of a key entry i.e. ImagePath on the registry. Worry not, as you can easily find and re-modify this REG file.
Upon receiving this error code, you may get an error message as well that reads the following –
we couldn't install this update but you can try again (0xc1420121)

Windows 10 Update Failing on Error Code 0xc1420121 Solutions
If you are encountering an error code 0xc1420121 while upgrading Windows 10 or installing a feature update, try applying the below workarounds one after another –
1] Run CHKDSK
Before going to follow any solution, you must check if your HDD is alright or its has corrupted. Here’s how to check the hardware for possible corruption in Windows 10 –
- Open Command Prompt as an Admin.
- Copy/paste the following and press Enter –
chkdsk C: /f /r /x
- You will get a message next that says “CHKDSK cannot run because the volume is in use by another process”. However, it does ask if you want to schedule your volume to be checked the next time the system restarts? (Y/N).
- Type “Y” and press Enter.

- Type exit and hit Enter to close Windows Console.
- Go and restart your PC, the CHKDSK will immediately start scanning the hard disk for possible corruption.
- When the scanning completes, check the results.
- If this scan doesn’t find any issue on the hard disk, you may try the solutions discussed below.
However, if you do find the hardware is corrupted, you should replace the hard disk with a brand one new. We advise you to for an SSD as its read and write capacity is way more than a normal HDD.
2] Run SFC Scan
Sometimes, Windows 10 update simply fails because your device lacks a few important files that are essential in nature like – winmount.sys. I know you must be thinking about how to check whether this file is indeed missing on your PC or not. Well, you shouldn’t.
Note: If you still want, go and check for the winmount.sys file at – C:\Windows\system32\drivers. |
Instead of spending time looking for this file, you should rather use the System File Checker utility program. This is because even if you find the file we mention above, there is a possibility that some other files were missing on your computer. Here’s how to run the SFC scan in Windows 10 –
- Press Win + X and select Windows PowerShell (Admin).
- When the User Account Control comes up, hit Yes to authorize opening PowerShell as an administrator.
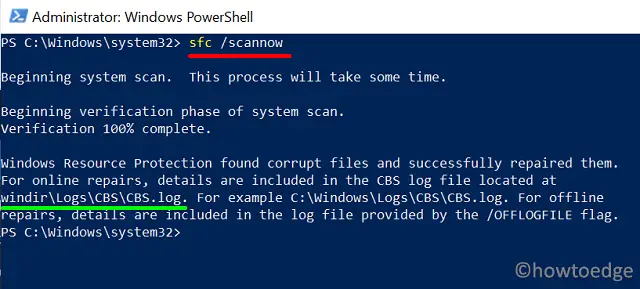
- Type “
sfc /scannow” and press Enter. - Wait for 10-15 minutes, while this checks and repairs the corrupted files that it finds during the scan.

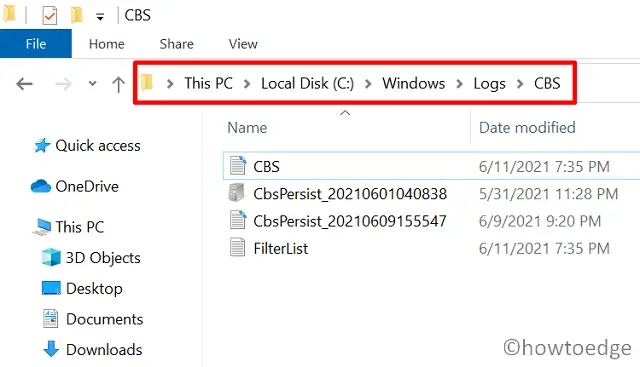
Note: In case you want to know which files were missing or corrupted that the above scan fixes, visit %windir%\Logs\CBS on the File Explorer. Here you will find a log file named “CBS”. Double-click over it to check the issues that System File Checker fixes on your PC.

3] Run DISM Scan
Many a time, the Windows Image itself becomes corrupted and thus results in errors like 0xc1420121. Just like damaged system files, you can easily find and fix the corruption inside the Windows Image using DISM. Here’s how to use this utility program –
- Press Win + R.
- When the Run dialog opens up, type “cmd”, and press Ctrl + Shift + Enter keys.
- Doing this will invoke the Command Prompt as an administrator.
- When it does start, copy/paste the below code, and hit Enter –
Ran DISM.exe /Online /Cleanup-image /Restorehealth
- Wait for a while till the above cmdlet finds and repairs the corruption on your Windows Image.
- Once this is over, close Windows Console, and restart your PC.

I hope by now you are able to resolve the error code 0xc1420121 in Windows 10. If not, there must be some complex issues on your computer. So, we advise you to manually download and install Windows 10 Feature Update using an ISO file.
download windows 10 assistant, update failed with error code 0xc1420121
4] Tweak Registry – Only for those who have ever used Macrium
If you have ever installed Macrium software on your PC, you should attempt this solution as well. As per certain reports, an older installation of Macrium may also cause Windows 10 update to fail on error code 0xc1420121. In such cases, all you require is to modify a key entry on the registry and the problem resolves automatically. Here’s how the process goes –
- Hit Win + S altogether to open the Search window.
- Type “
regedit” in the text field, and press Enter to open Registry Editor. - On the registry, navigate to the following –
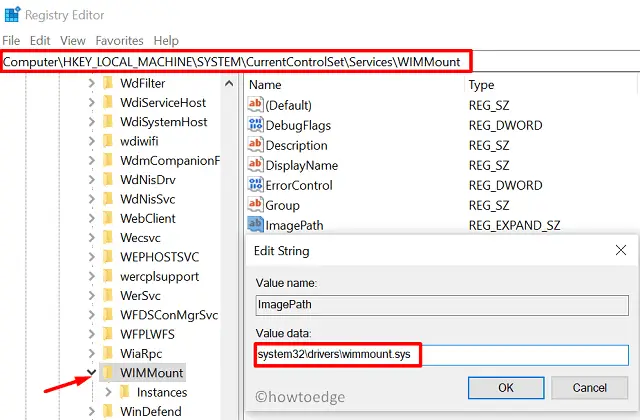
Computer\HKEY_LOCAL_MACHINE\SYSTEM\CurrentControlSet\Services\WIMMount
- Head over to the right pane and locate an entry that goes by the name – “ImagePath”.
- When found, double-click over it to open this REG_EXPAND_SZ file.
- Inside the Value data field, replace the old value with – “system32\drivers\wimmount.sys”. If it’s already been there, no need to do anything.

Note: In case you have installed Macrium software some time back on your PC, you will find the below value under the Value data field. Here is the complete description of this.
\??\C:\Program Files\Macrium\Reflect\wimmount.sys
- That’s it, hit OK to apply the modifications, and restart your PC.
Sign back into Windows 10, and check if you are now able to install the pending feature update on your PC or not. I think you are now.


